Connect a TNA to evalink talos
To ensure a proper connection, turn on the TNA device only after finishing all steps described in both Enable Virtual TNA Receiver Globally and Configure Virtual TNA Receiver for a Site.
To establish the connection between a TNA and evalink talos, you need to enable the Virtual TNA Receiver integration and configure it for a site within your company.
Enable Virtual TNA Receiver Globally
To enable Virtual TNA Receiver on a global level:
-
Go to Company > Integrations
-
Scroll to the Virtual TNA Receiver and click Add Integration
The configuration dialog opens. The toggle is set to Integration Enabled automatically.
The figure below shows the Virtual TNA Receiver first-time enabling process:
-
Click Submit
Configure Virtual TNA Receiver for a Site
You can configure one or several TNA Virtual Receiver instances for any site within your company.
When an instance is properly configured, evalink talos can receive and process incoming alarms. In addition, if the systems connected to the TNA support it, evalink talos can also send commands and data to them.
To configure a Virtual TNA Receiver instance for a site:
-
Go to Sites > [site] > Receivers > tab
-
Click on the Add a Virtual Receiver button and select Virtual TNA Receiver from the list
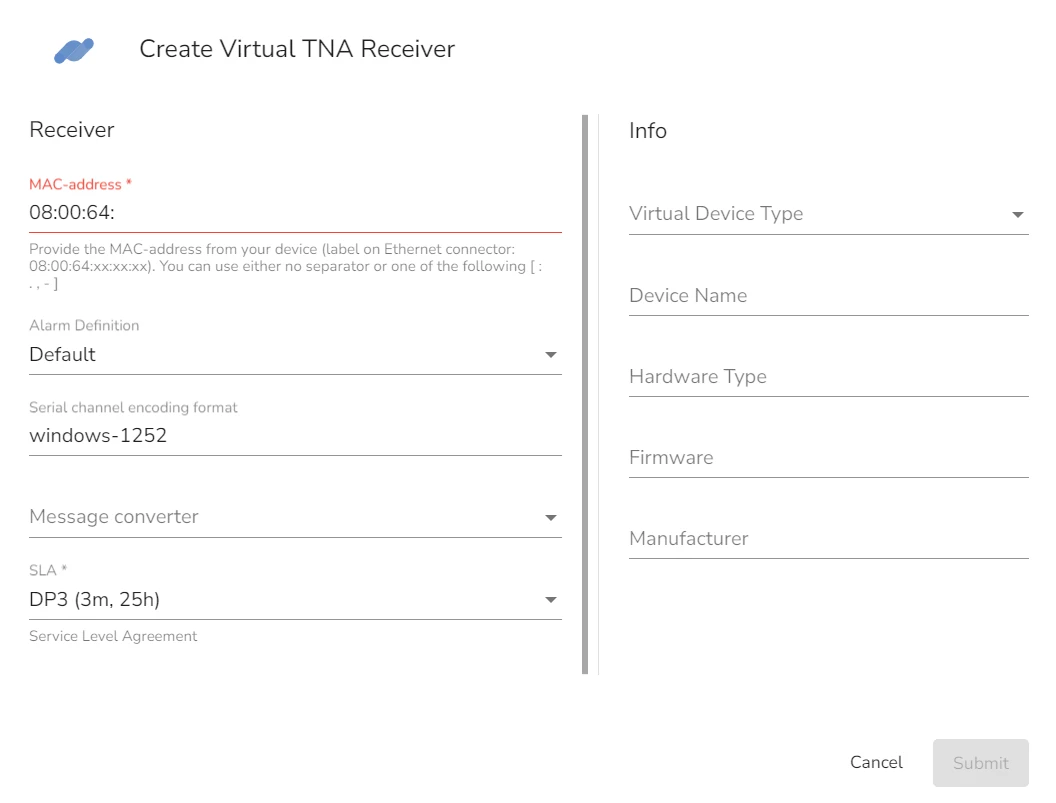
A Virtual TNA Receiver configuration dialog opens:

-
In the Receiver section, enter the MAC address of your TNA device
infoYou can find the MAC address on your TNA device and its packaging. The first six digits are the same for all devices, so they are already pre-entered in the evalink talos configuration. You need to type the remaining digits, copying them from your TNA device.
-
Select the Alarm Definition profile from the dropdown menu
You can find detailed lists of all available Alarm Definition sets on the Company > Settings > Alarms page.
-
Select a serial channel encoding format
By default, evalink talos uses Windows-1252 format.
-
Select a message converter
infoMessage converters are pre-configured per company by evalink talos team and depend on particular customer requirements.
-
Select the SLA (Service Level Agreement) option to be used
SLA DP3 (3m, 25h) is selected by default. For details on setting up SLA options for a Virtual Receiver, see section Direct Connection Monitoring > Set SLA for a Virtual Receiver.
-
In the Info section, you can enter the information about your TNA setup and connected devices. All fields are optional. The Firmware and Manufacturer fields are populated automatically after the first connection to the TNA is established.
-
Click Submit
-
Turn on the TNA device
You can create more instances of Virtual TNA Receiver by clicking the Add Receiver button.
 Link is copied