Operations with a Site Group
Create a Site Group
There are several ways to create a Site Group of a particular type.
To create a new Site Group:
-
Go to Site Groups
-
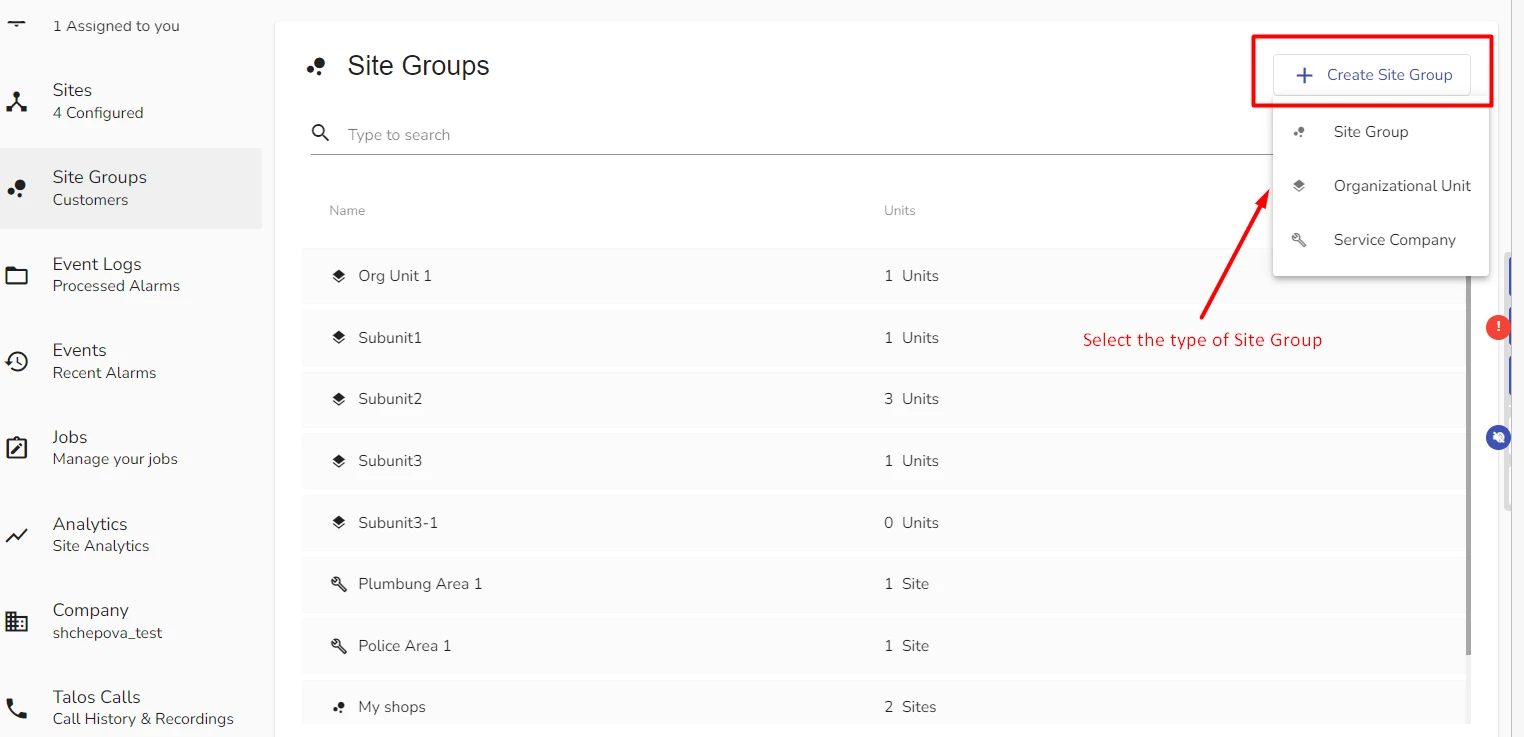
Click Create Site Group
-
From the dropdown list, select the type of Site Group you want to create
-
In the dialog that opens, type in the name of your new Site Group
-
If in the previous step you have selected Service Company, select the Service Company Type from the dropdown list
infoYou can create Service Company types in the Settings tab of your Company. For more details, see section Configure Service Company Type below.
You will not be able to create a new Service Company unless you have configured at least one Service Company Type.
-
Click Submit
To create a new Regular Site Group or an Organizational Unit nested in another Organizational Unit:
-
Go to Site Groups
-
Select an Organizational Unit where you want to nest a new Site Group
-
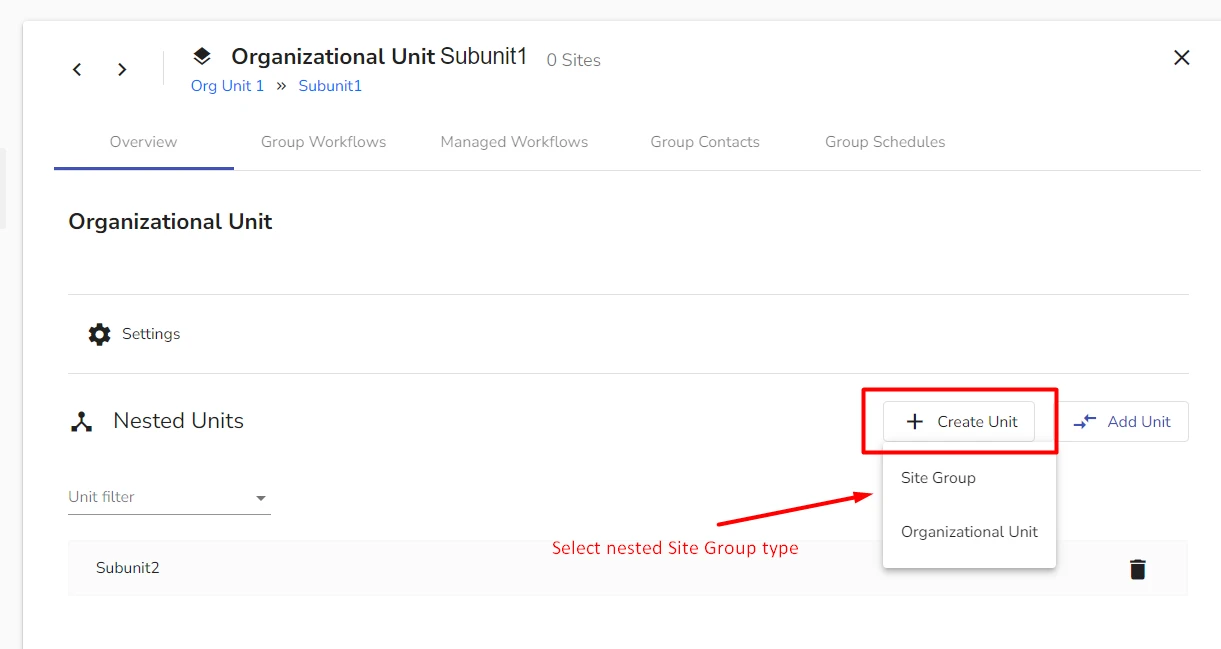
In the Overview page of the selected Organizational Unit, click Click Create Unit
-
From the dropdown list, select Organizational Unit or Site Group
-
Type in the name of the new nested Site Group
-
Click Submit
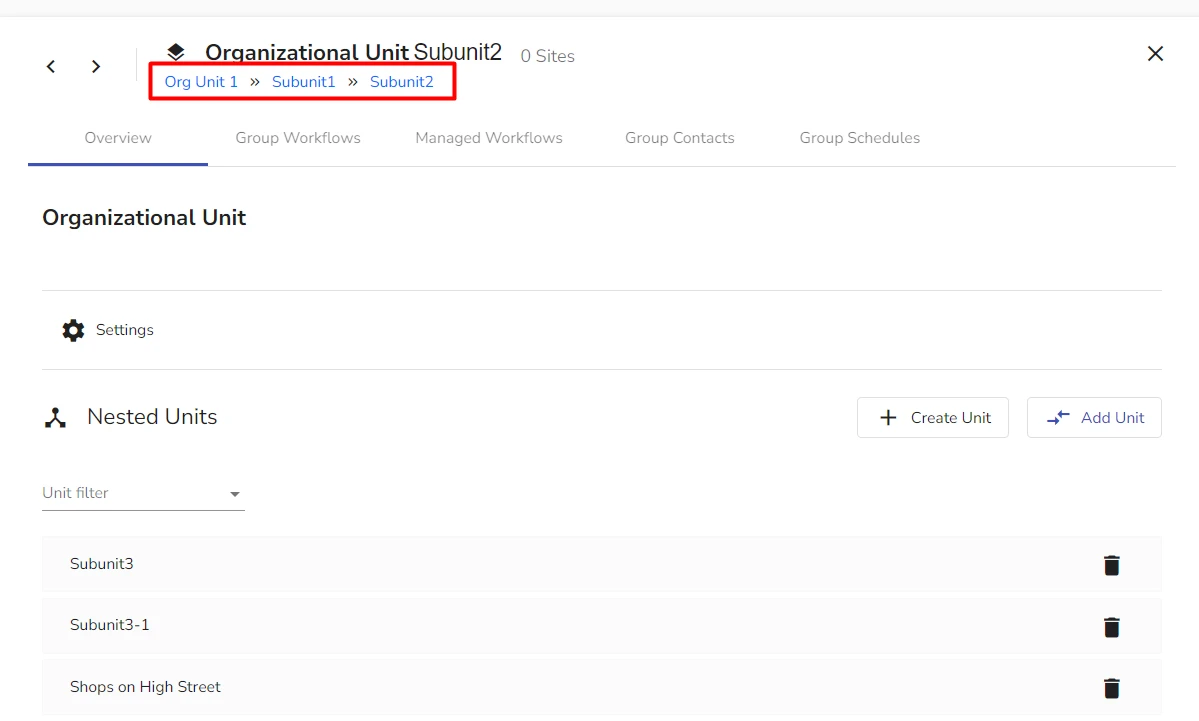
The new Site Group or Organizationsl Unit will be nested in the Organizational Unit from which you created it. evalink talos displays the hierarchy tree path below the Site Group's name.
Add a Site to a Regular Site Group
You can add multiple sites to your Site Group. If a site already belongs to a Site Group, you can still add it to other Site Groups. This action removes a site from a Site Group where it was previously added.
To add a site to a Site Group:
-
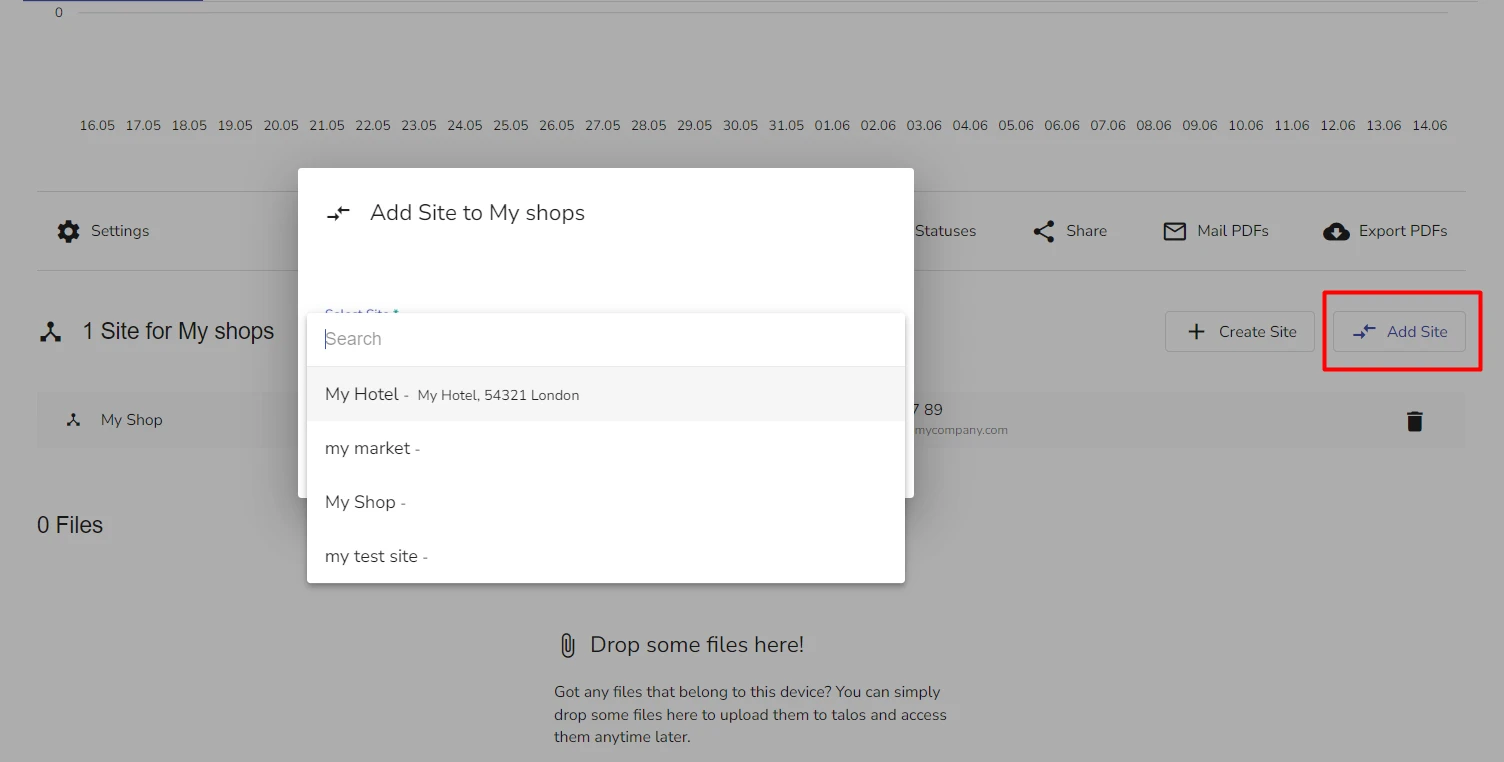
On the Site Group Overview subpage, click Add Site
Add Site dialog opens:
-
In the Add Site dialog, select the site you want to add to the Site Group
-
Click Submit
Once the site is added to a Site Group, workflows, contacts and schedules of this Site Group become available for this site.
You can't add sites directly to Organizational Units.
You can also create a site from a Site Group, so when its creation is complete, it will already belong to the Site Group. For this, use Create Site option on the Site Group Overview page. For details on how to create a site, see section Manage Sites > Create a Site.
Nest a Site Group within an Organizational Unit
You can add an already existing Site Group or Organizational unit to an existing Organizational Unit, provided that is isn't nested within another Organizational Unit.
You can check if a Site Group is nested elsewhere by looking at its hierarchy tree. If it only has a single level (with the name of the Site Group), it means it is not nested anywhere.
To add / nest an existing Site Group to an Organizational Unit:
-
Go to Site Groups
-
Select an Organizational Unit where you want to nest an existing Site Group
-
Click Add Unit
-
In the dialog that opens, select the name of the Site Group or Organizational Unit which you want to nest.
-
Click Submit
Delete an Element from a Site Group
Deleting an element from a Site Group or Organizational unit only removes it from inside the structure. It doesn't delete an element from evalink talos.
After you delete an element, it is still available in the list of sites or Site Groups, depending on the element type.
To delete an element:
-
Open the Overview page of a regular Site Group or an Organizational Unit from which you want to delete an element
-
In the list of sites or nested elements, find the necessary element you want to delete and click
-
Confirm the deletion
Edit Site Group Settings
Site Group settings are the same, regardless of the Site Group type.
To edit Site Group settings:
-
Go to Site Groups and select the necessary Site Group from the list
-
In the Overview page of the selected Site group, click Settings
The Settings subpage opens:
-
On the Settings subpage that opens, enter or edit the following information:
-
In the Group pane, specify the Group Name
-
In the Address pane, specify the company details for the site
-
In the Custom Fields pane, specify the values for custom fields, or click Configure to setup a new custom field
After you click Configure, you will be directed to another page. To prevent your changes from being lost, scroll down the Settings subpage and click Save.
If you have Custom Fields configured on the Company level, but they do not appear available for selection for Site Groups, make sure that the Scope field in your Custom Field settings is set to Site Groups or All.
For details about Custom Fields, see Work with Sites > Custom Fields.
-
In the Code Word pane, specify the code word for the Site Group
You can change the existing code word or click Add Code Word to create a new one. For more information about configuring code words, see section Site Code Words.
To delete a code word, click the delete button to the right of the code word that you want to delete.
Delete a Site Group
You can't delete a Site Group that has any sites in it, an Organizational Unit that has nested elements or a Service Company that is assigned to any sites.
To delete a Site Group:
-
From the Site Group Overview, open the Settings subpage
-
Scroll down to the Delete button and click it
infoIf a Site Group you want to delete doesn't meet deletion requirements (see the warning above), the Delete button is disabled.
-
Type in the confirmation and press Confirm Delete
Working with Site Group Statuses
Site Group Statuses subpage is a dashboard that displays cumulative information about statuses of all sites that belong to the Site Group. It is available only for regular Site Groups.
To access Site Statuses, click the Statuses control on a Site Group Overview subpage.
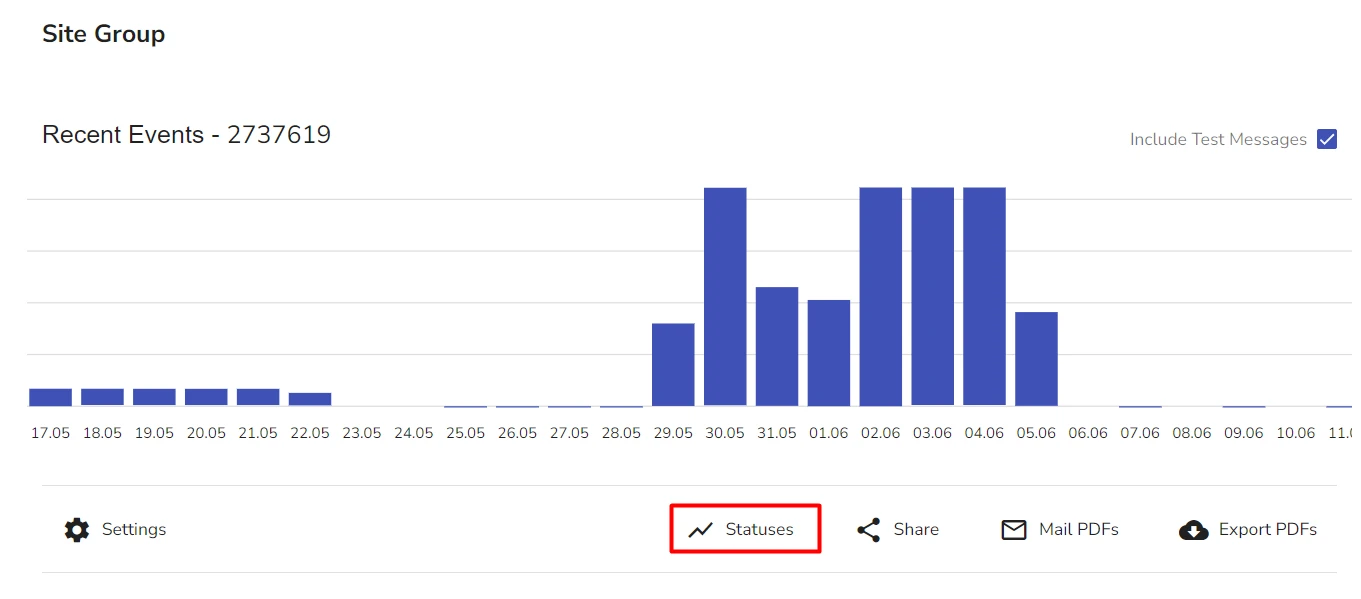
You can't change any individual Site Statuses or Status Roles from the Site Group Statuses subpage. You can do this for each site separately, in its respective Status Subpage.
For more details about Site Statuses, see section Statuses Overview > Status Basics.
The figure below shows a Site Group Status subpage:
You can view the following information and use the following display options on the Site Group Statuses subpage:
- Select sites to view by State. For details about Site States, see section Work with Site Statuses > Site States
- Select sites to view by tags
- Select sites to view by site name
- Group or Ungroup sites by Status Role. For details about Site Status Roles, see section Work with Site Statuses > Status Roles
- Select sites to view by Site Status
- Switch between Live mode (displays the current information about sites in the Site Group) and Stats mode (displays information about sites for a set period of time)
- Switch the Stats mode display between a pie graph and a regular graph
Configure Service Company Type
When you create a Service Company, you need to specify the Service Company type. It is a required field without which evalink talos doesn't let you to create a Service Company.
A Service Company Type is a generic placeholder wihch allows you to differentiate between your Service Companies. It is best practices to create an informative name for a Service Company Type, such as Police, Utilities or Accounting, which would refer to its business activities.
To configure a Service Company Type:
-
Navigate to Company > Settings > Sites
-
Scroll to the Service Company Types pane and click Add Type
-
Type in the Service Company Type name and click Create
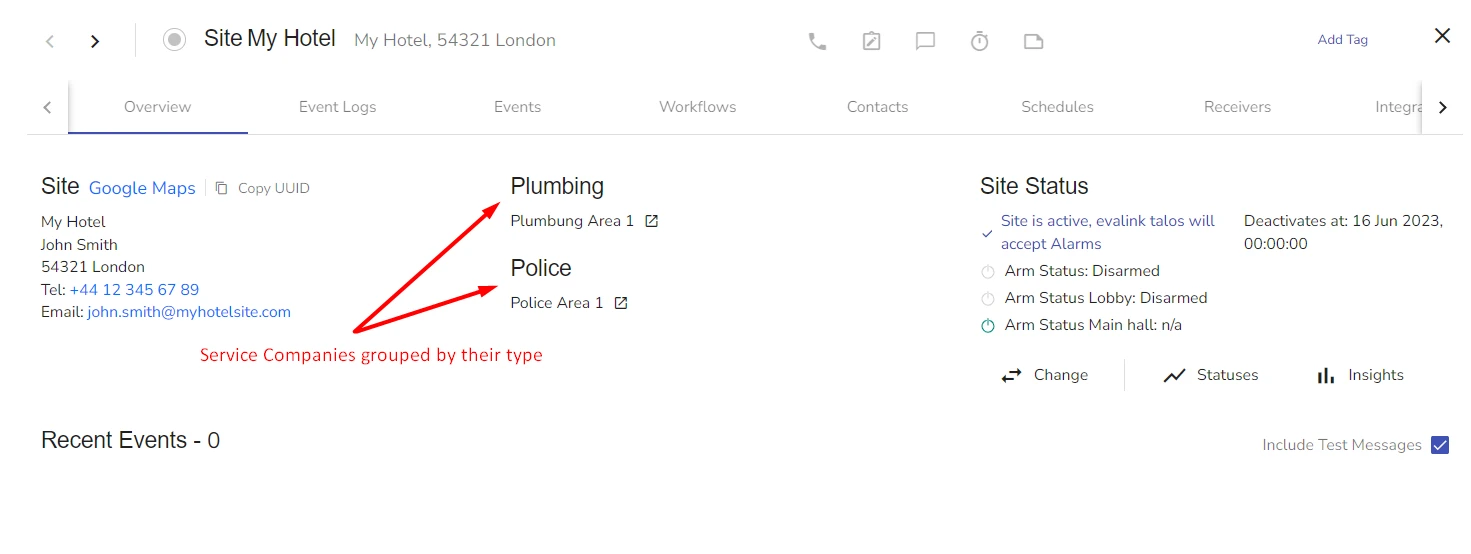
When you assign Service Companies to a site on evalink talos, they are displayed on the Site Overview subpage, grouped by type:
 Link is copied