Alarm Expression Syntax
Overview
An alarm expression defines an alarm as a pattern containing an alarm code and, optionally, a number of alarm attributes. Alarm expressions work similarly to regular expressions in programming, making it possible to configure some deeply tailored procedures – for example, create a separate workflow for alarms that arrive from a certain zone and partition of a site and contain a certain text pattern in the payload.
Alarm expressions can be used in the majority of UI fields that accept alarm codes. See section Fields that Accept Alarm Expressions for some examples.
The key tasks performed with the help of alarm expressions are:
- alarms matching – recognizing incoming alarms with the expected parameter values and invoking a procedure, for example, a workflow. Wildcards are supported, see section Wildcard Use
- alarms creation – triggering alarms with specific parameter values
Alarm Expression Syntax: [alarm_code]{<parameterA>, <parameterB>, ...}.
Examples:
-
FA
-
+350 {zone = 5, partition = 1, payload = 12345, headers.armed = true}
In the examples above:
-
FA – indicates an alarm with a FA alarm code (SIA)
-
+350 – an alarm with a 350 (CID) alarm code (see section Alarm Code for an explanation)
-
zone = 5 – an alarm with zone ID = 5
-
partition = 1 – an alarm with partition ID = 1
-
alarm payload contains text 12345
-
an alarm has a custom
headerssub-parameterarmed(see section headers Sub-Parameters) with a value set to true
The +350 {zone = 5, partition = 1, ...} example above will also match alarms with zone = 0005 / 005 / 05, partition = 0001 / 001 / 01, since leading zeros in zone and partition IDs are ignored by evalink talos when matching alarms.
This behavior doesn't depend on the value of the global Remove leading zeros from zones and partitions toggle (see section Work with Zone, Partition, and Other Details in Incoming Alarms > Global Zone and Partition Settings > Remove Leading Zeros from Zones and Partitions).
Alarm Code
The alarm code can be set in any notation: SIA, CID, VdS, etc., or a wildcard may be set (see section Wildcard Use).
For CID and VdS alarm codes, it is possible to create or match alarms or restores by setting the alarm value parameter as + /-, where + (plus) indicates an alarm, and - (minus) indicates a restore. Consider the following examples:
-
350, 61H – matches both alarms and restores for 350 and 61H alarm codes
-
+350, +61H – creates / matches alarms
-
-350, -61H – creates / matches restores
Parameters
| Parameter | Expected data type | Example | Comment |
|---|---|---|---|
type | string | BA {type = BURGLARY} | evalink talos uses the following type values: GENERAL, CALL, MOTION, BURGLARY, ARM_DISARM, ACCESS_CONTROL, FIRE, GAS, HOLD_UP, HEAT, MEDICAL, CONNECTION, TECHNICAL, PANIC, EMERGENCY, POLLING, REMOTE_ACCESS, WATER, TAMPER, FREEZE, BYPASS. When using type for alarm creation, make sure to set the type value in accordance with the alarm code. For example, type = BURGLARY will work only in a combination with an alarm code from the burglary range (130, BA, etc.). If used with a non-corresponding alarm code (for example, type = BURGLARY with the FA alarm code), the type parameter is ignored by evalink talos when the alarm is received |
severity | int | BA {severity = 7} | The user can assign values in a range [0-7]. If a larger value is set, evalink talos assigns a 7 severity to the alarm when it is received |
zone | string | BA {zone = 5} | The specified value matches, for example, 05, 005, etc. in incoming alarms, since leading zeros are ignored during alarms matching (for zones and partitions only) |
partition | string | BA {partition = 1} | Same as for zone, see above |
technical | boolean | BA {technical = true} | Indicates if the alarm is a technical alarm or not |
test | boolean | BA {test = true} | Indicates if the alarm is a test alarm or not |
zoneName | string | BA {zoneName = Entrance hall} | – |
partitionName | string | BA {partitionName = Grocery store} | – |
payload | string | BA {payload = 12345} | – |
headers | An array of sub-parameters | BA {headers.message = 12345} | See section headers Sub-Parameters below |
headers Sub-Parameters
A headers parameter may have a number of sub-parameters.
The array of headers sub-parameters is dynamic. Any headers sub-parameter that arrives in an alarm is accepted, displayed in alarm details with its value, and can trigger a matching workflow or an activity that is invoked by a matching alarm expression.
A headers sub-parameter can be set by any alarm source, for example:
- by an external system
- by evalink talos itself, using an alarm expression with this sub-parameter
The table below lists the key sub-parameters that evalink talos works with:
- the proprietary evalink talos
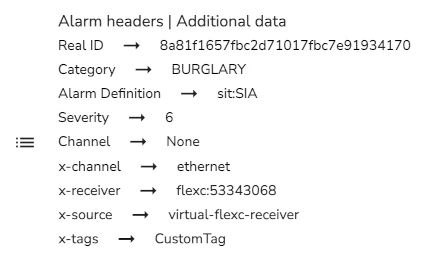
headerssub-parameters – the ones with the x- prefix, for example,x-tags,x-source,x-zip, etc.). The figure below shows some examples, as they appear in the alarm details:
- the commonly used sub-parameters (for example,
latitude,longitude,message, etc.)
| headers Sub-parameter | Example | Comment |
|---|---|---|
x-receiver=<[receiver_type]:[unique_property]> | +350 {headers.x-receiver = tna:080064AABBCC} | Allows to match alarms arriving from a particular transmitter. To obtain the [receiver_type]:[unique_property] pair, trigger an alarm on the concerned transmitter and collect the value of the x-receiver header from the alarm details. See an example on the figure above. The values can be used as is, for example, headers.ex-receiver=flexc:53343068.The [unique property] may differ depending on the receiver type. If transmitter MAC address is used as a property, it is specified with no delimiters, for example, 080064AABBCC |
x-tags | BA {headers.x-tags = CustomTag} | Allows to match alarms by a tag or several tags assigned to the site. It is mostly used internally with the Check Tag step in a workflow. To know which tags are assigned to the site, go to the Sites page and view this information in the list. It is also possible to trigger an alarm on the site and view the x-tags header the alarm details, if present (see the figure above). If the site has several tags, the x-tags header in the alarm details lists them all, with a semicolon as a delimiter: for example, x-tags -> CustomTag;BillingPlan1 |
x-source | BA {headers.x-source = brivo} | The source of the alarm. To know the format in which the value is set, the user can trigger an alarm on the concerned site. See the figure above for an example |
x-channel=<IpChannelType.[type]> | BA {headers.x-channel = IpChannelType.ETH} | The communication channel: ethernet or mobile Accepted values: IpChannelType.ETH (for ethernet connection) or IpChannelType.GPRS (for mobile connection) |
latitude | BA {headers.latitude = 55.018803} | The latitude of the place where the alarm was triggered |
longitude | BA {headers.longitude = 9.533952} | The longitude of the place where the alarm was triggered |
location | BA {headers.location = BackDoor} | The location of the place where the alarm was triggered |
room | BA {headers.room = Bedroom} | The field has generally the same meaning as the location header |
message | BA {headers.message = 12345} | The text message that arrives with the alarm |
attachment | BA {headers.attachment.url = https://some-url} | A URL, file or media attachment that arrives with an alarm. This sub-parameter requires the use of attributes. For details about attachment attributes and related syntax, see section Attributes for attachment headers.attachment Sub-Parameter below |
Examples of custom headers sub-parameters use:
-
headers.[Transmitter_type]EventId– for example, headers.DC09EventId = 123456789 -
headers.SensorUniqueId– for example headers.SensorUniqueId = *654* (a matching expression)
Attributes for headers.attachment Sub-Parameter
The headers.attachment sub-parameter allows users to add
external URLs, images, and widgets when creating alarms, and also link to files, images, and videos stored internally on evalink talos for sites and site groups.
When you add an attachment to an alarm, it is shown in alarm details in a dedicated Attachments tab. In this tab, you can preview widget and media attachments, preview and follow links from URL attachments, and download file attachments or open them in your web browser.
When you process an alarm that has an attachment, with a workflow, it will also be shown in the workflow processing view in the Info tab.
The table below lists attributes for the headers.attachment sub-parameter.
Adding a link to an attachment that is stored on evalink talos requires knowing an internal file ID of the file or media. For details on how to obtain this file ID, see section Locate Object IDs in Web Browser Console.
The use of headers.attachment.talos attributes is more common for evalink talos API calls, not for alarm expressions.
| Attachment attribute | Example | Comment |
|---|---|---|
attachment.url=[url] | BA {headers.attachment.url = https://some-url/} | The URL to be shown to an operator who processes an alarm. Links to live feeds can be included here, for example. Depending on the external site security settings, the preview may not be available. Only external links to websites protected by TLS (https://) are supported |
attachment.image=[url] | BA {headers.attachment.image = https://some-image-url.png} | The URL of an external image. Most common image formats, such as .gif, .png, .jpg, are supported. Only external links to images from websites protected by TLS (https://) are supported |
attachment.widget=[url] | BA {headers.attachment.widget = https://url-to-a-widget-website; height = 300px} | The URL of an external widget. You can also specify widget height in pixels. Only external links to widgets from websites protected by TLS (https://) are supported |
attachment.talos.file = /api/storage-service/uploads/[file-id] | BA {headers.attachment.talos.file = /api/storage-service/uploads/1c0a806f-2435-4a88-8a46-f3f798a04475} | The link to a file stored on evalink talos. You can add any type of files using this set of attributes. Attached files, including media files, will be shown as a file in alarm details (no preview). For details on locating file IDs, see this Section |
attachment.talos.image = /api/storage-service/uploads/[file-id] | BA {headers.attachment.talos.image = /api/storage-service/uploads/1c0a806f-2435-4a88-8a46-4af358d75029} | The link to an image stored on evalink talos. Most common image formats are supported. Use this set of attributes for image files to be shown with a preview in alarm details. For details on locating file IDs, see this Section |
attachment.talos.video = /api/storage-service/uploads/[file-id] | BA {headers.attachment. talos.video = /api/storage-service/uploads/1c0a806f-2435-4a88-8a46-b5f69ac21984} | The link to a video stored on evalink talos. Most common video formats, such as .mp4, are supported. Use this set of attributes for video files to be shown with a preview in alarm details. For details on locating file IDs, see this Section |
Wildcard Use
Wildcards are used for alarms matching in order to maximize the matching results.
Both * and ? wildcards are supported. A * wildcard can be replaced with any number of symbols. A ? wildcard is replaced with one symbol only.
Consider the examples below:
-
* – matches any alarm
-
+* – matches alarms only (-* matches restores only)
-
??H – matches VdS alarm codes
-
B? {zone = *} – matches alarms with SIA alarm codes that start with B (BA, BR, etc.) that have a zone set
-
35? – matches alarms with a CID alarm code that starts with 35 (will match 350, 351, 352, ...)
-
* {headers.latitude = 55.018803, headers.longitude = 9.533952} – matches alarms with the specified latitude and longitude in the alarm details
Wildcards cannot be used with boolean parameters (test, technical).
Fields that Accept Alarm Expressions
Alarm expressions are accepted in most input fields that accept alarm codes, with the following major exceptions:
-
the Event code field in the Trigger Alarm dialog
The dialog opens when you are triggering an alarm from the Alarms page.
-
the Alarm code is ... condition in the incoming conditions of a workflow (see section Work with Workflows > Workflow Incoming Conditions and Workflow Comment > Conditions and Condition Values in Workflow Reference > Operations with a Workflow). The field supports wildcards in the alarm code (see section Wildcard Use)
These fields have adjacent fields in which alarm details (zone, partition, payload, etc.) can be set explicitly.
Some examples of fields that accept alarm expressions are provided below.
Alarm Matching Fields
- The Expression field in the incoming conditions of a workflow
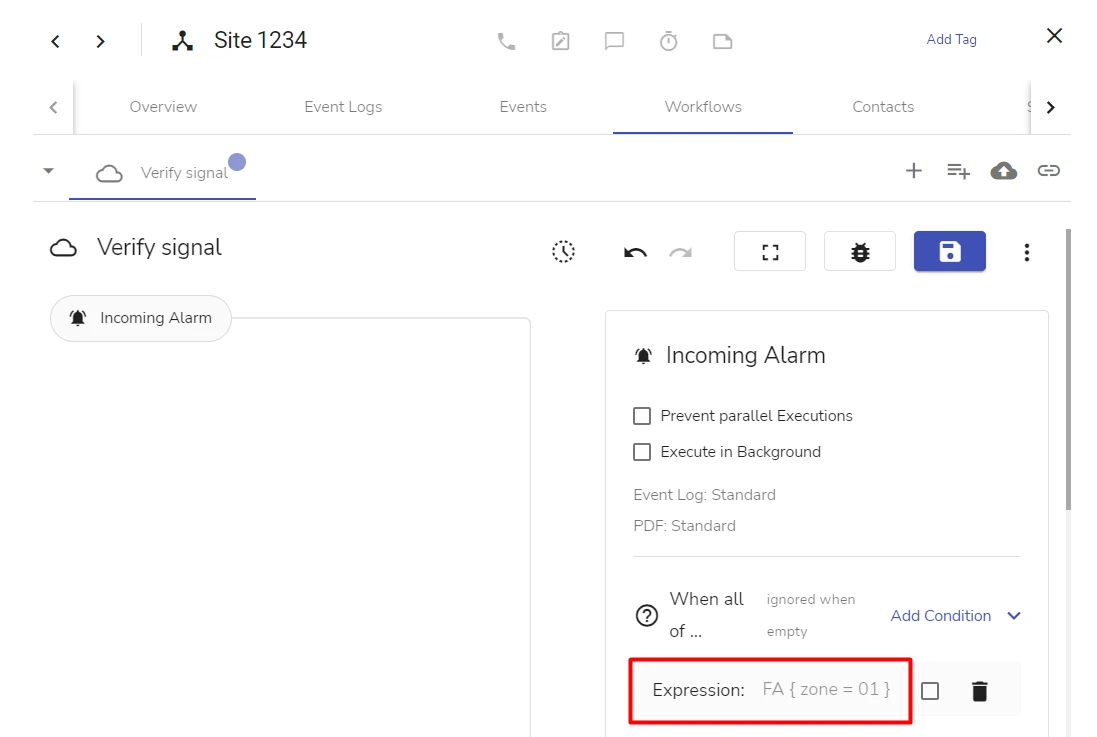
The field appears when the Expression ... condition is selected (see section Work with Workflows > Workflow Incoming Conditions and Workflow Comment > Conditions and Condition Values in Workflow Reference > Operations with a Workflow).
- The Filter field in the Other Steps > Retrieve Alarms step of a workflow
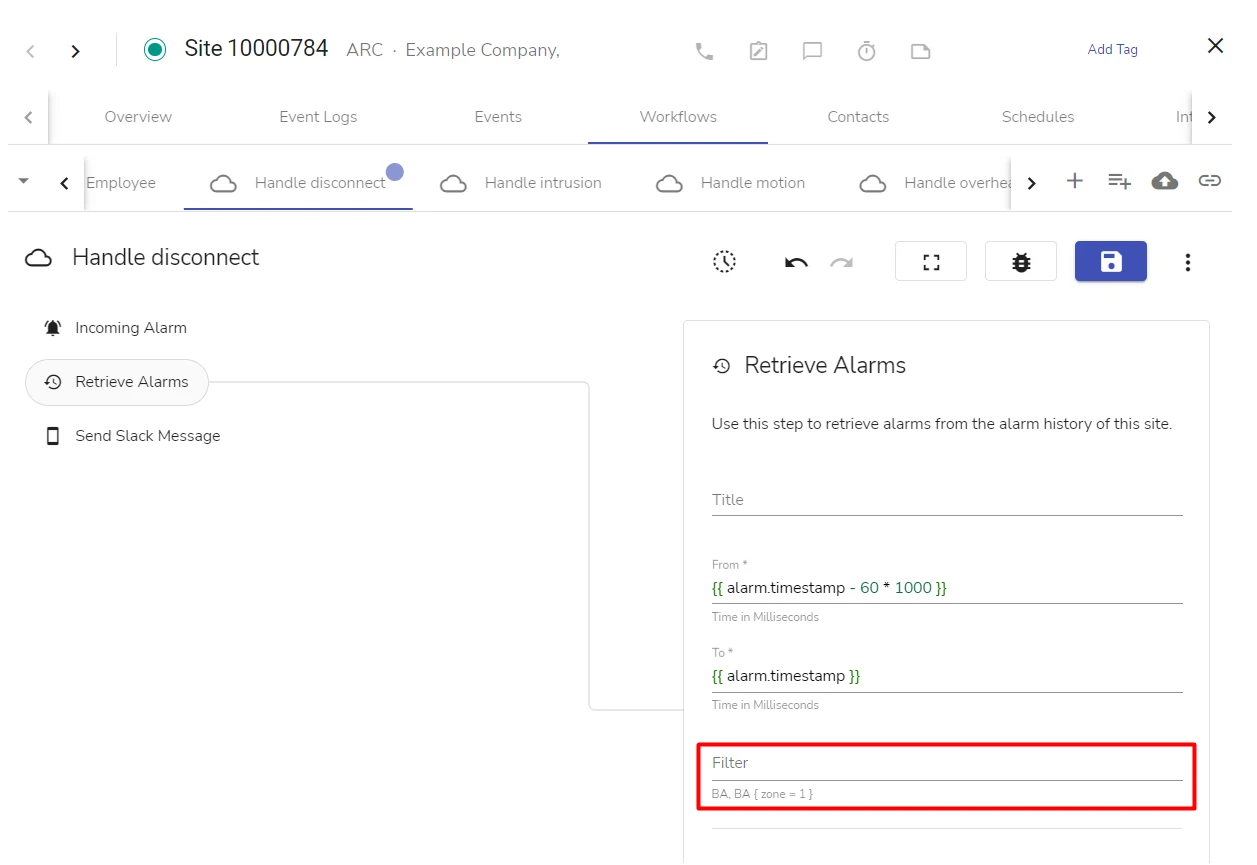
The field opens when the step is being configured in the workflow editor.
- The Ignored Alarms, Rejected Alarms, Alarm for activation, Alarm for deactivation fields on the site Settings subpage
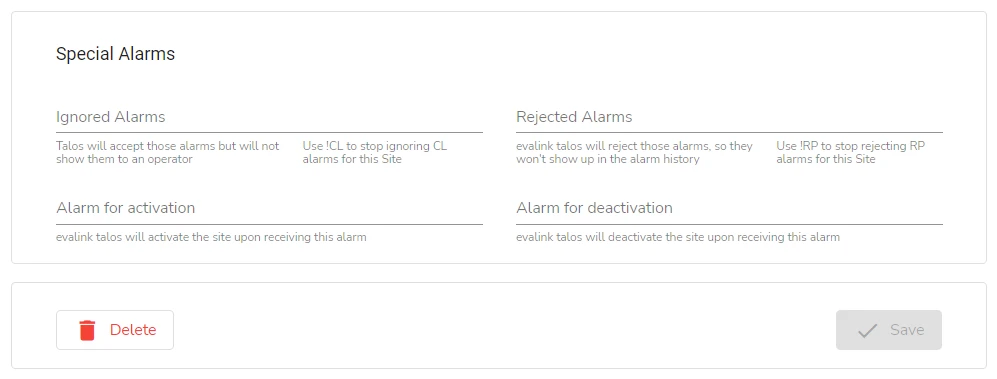
The subpage can be accessed by clicking on Settings on the site Overview page.
- The Ignored Alarms and Rejected Alarms fields in the global special alarms editing dialog
For details on ignored and rejected alarms, see section Negative Expressions for Globally Ignored / Rejected Alarms.
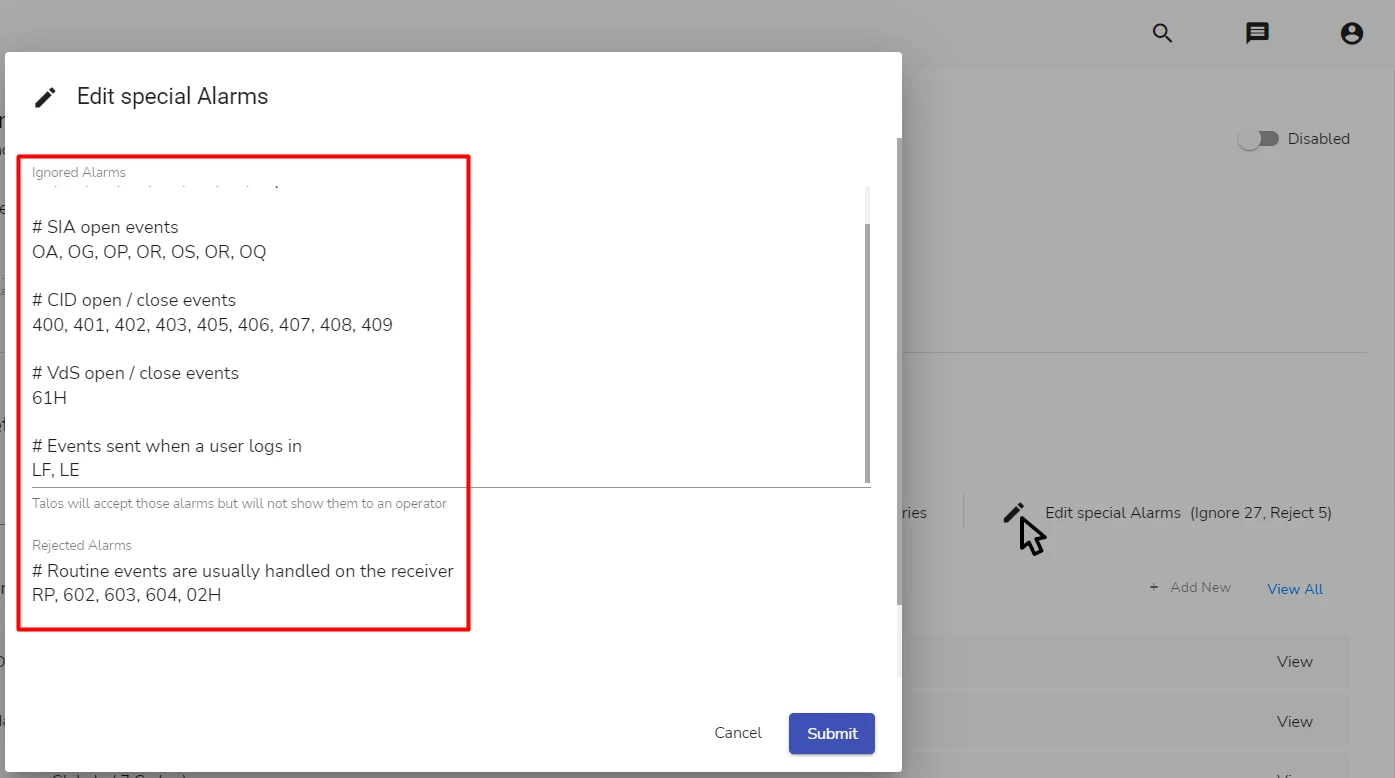
To open the dialog, go to Company > Settings > Alarms and click on the Edit special Alarms button.
New alarm expressions can be added to all lists: to the Rejected Alarms list or to any of the four lists in the Ignored Alarms section. Alarm expressions can also be added for the alarm codes already listed.
Negative Expressions for Globally Ignored / Rejected Alarms
evalink talos has a global list of:
-
ignored alarms – alarms that do not show up on the Alarms page, but appear on the Event Logs page and can be dispatched by Alarm Dispatcher or processed by an Automated Workflow
-
rejected alarms – alarms that are not processed by evalink talos at all and leave no record in the event logs
The list of ignored and rejected alarms can be viewed and edited by Administrator only.
For details on how to access the global ignored / rejected alarms list, see p. 4 in section Alarm Matching Fields.
By default, the following alarms are included in the list:
-
Ignored alarms:
-
SIA – OA, OG, OP, OR, OS, OR, OQ
-
CID – 400, 401, 402, 403, 405, 406, 407, 408, 409
-
VdS – 61H
-
other – LF, LE
-
-
Rejected alarms: RP, 602, 603, 604, 02H
It is possible to make an exception for a particular site, allowing it to receive selected alarms from the global ignored / rejected list. This operation can be performed by users with Administrator and Manager permissions.
To allow a site receive certain alarms from the ignored / rejected list, set a negative expression for each such alarm in the Ignored Alarms or Rejected Alarms field on the site Settings subpage (see p. 3 in section Alarm Matching Fields).
For example, to stop ignoring alarms with 400 CID alarm code for a site, specify !400 in the Ignored Alarms field. You can use more targeted expressions – for example, !400 {zone = 5} to let through only 400 alarms from zone 5.
Negative expressions of the type above are supported for these fields only: the Ignored Alarms and Rejected Alarms fields in the site Settings.
Alarm creation fields
- The Active Violation, Passive Violation, and Restore fields in the Status Rule editing dialog
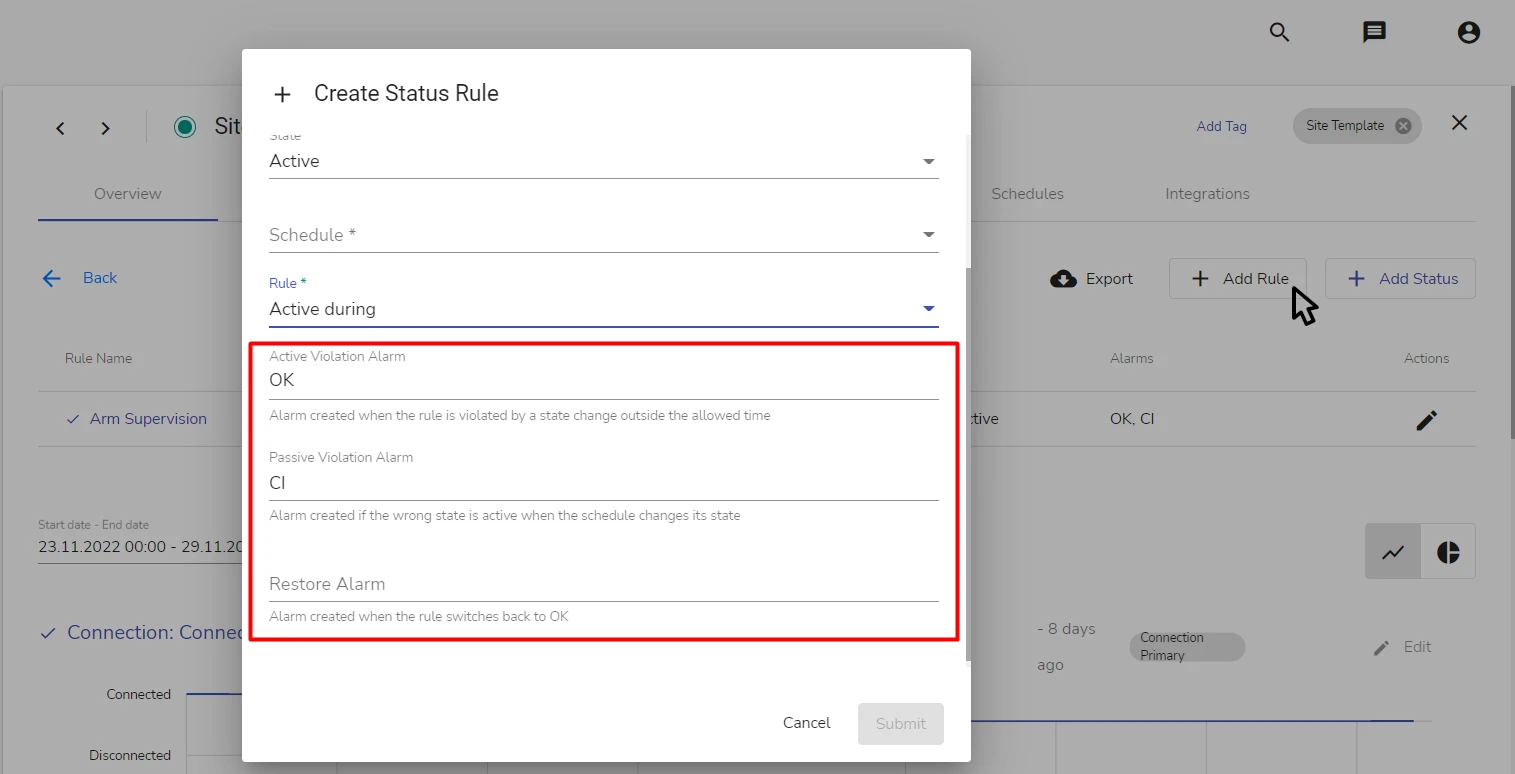
The dialog is opened when creating or editing a Status Rule on the site Statuses subpage. To access the subpage, click on the Statuses button on the site Overview page.
- The Alarm Expression field in the Other Steps > Trigger Alarm step of a workflow
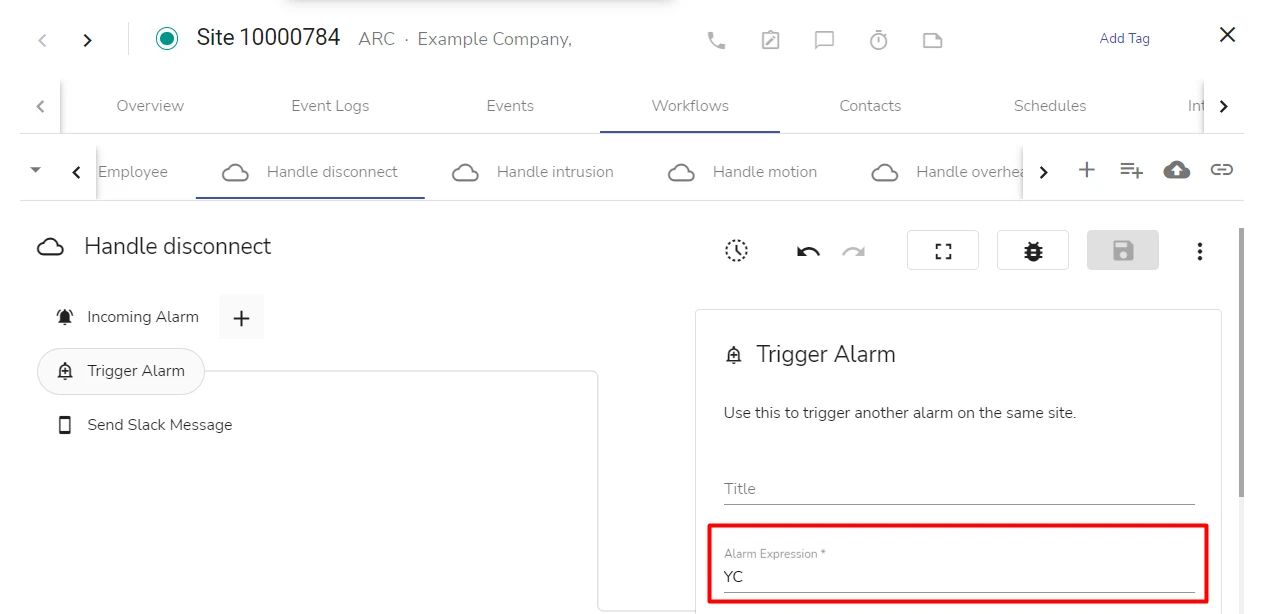
The field opens when the step is being configured in the workflow editor.
- The Alarm Code (Active) and the Alarm Code (Inactive) fields in the alarm settings of a schedule
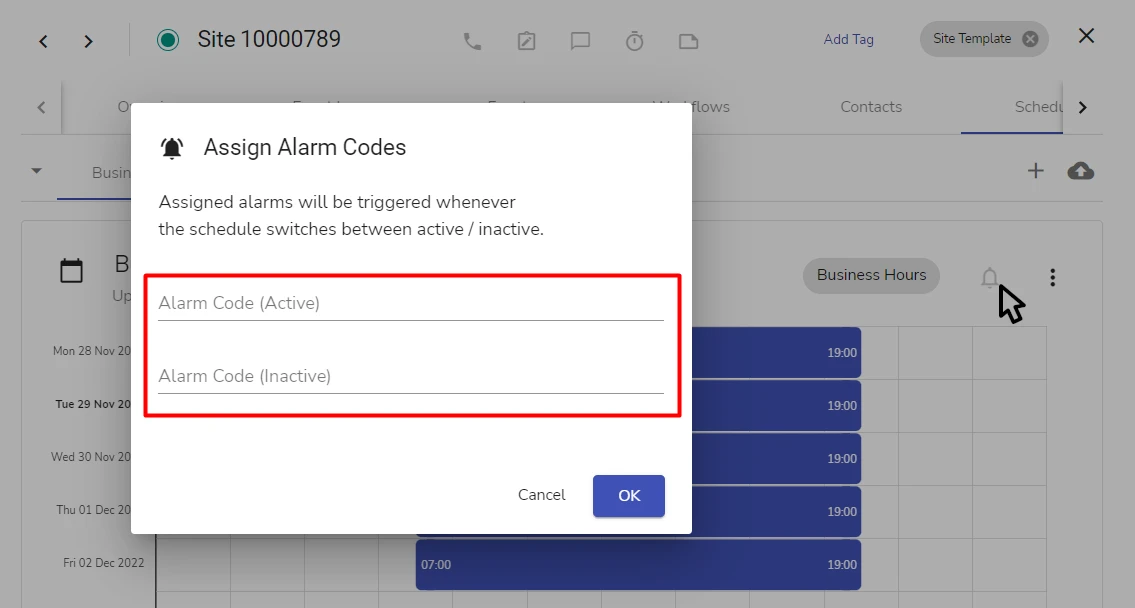
The dialog is opened from the page of a particular site schedule. To access the dialog, go to Sites > [site] > Schedules, navigate to the tab of the schedule and click on the alarm icon.
Setting alarms on schedule activation and deactivation is not supported for site group and global schedules.
Dialogs with Alarm Expressions for Both Matching and Creating
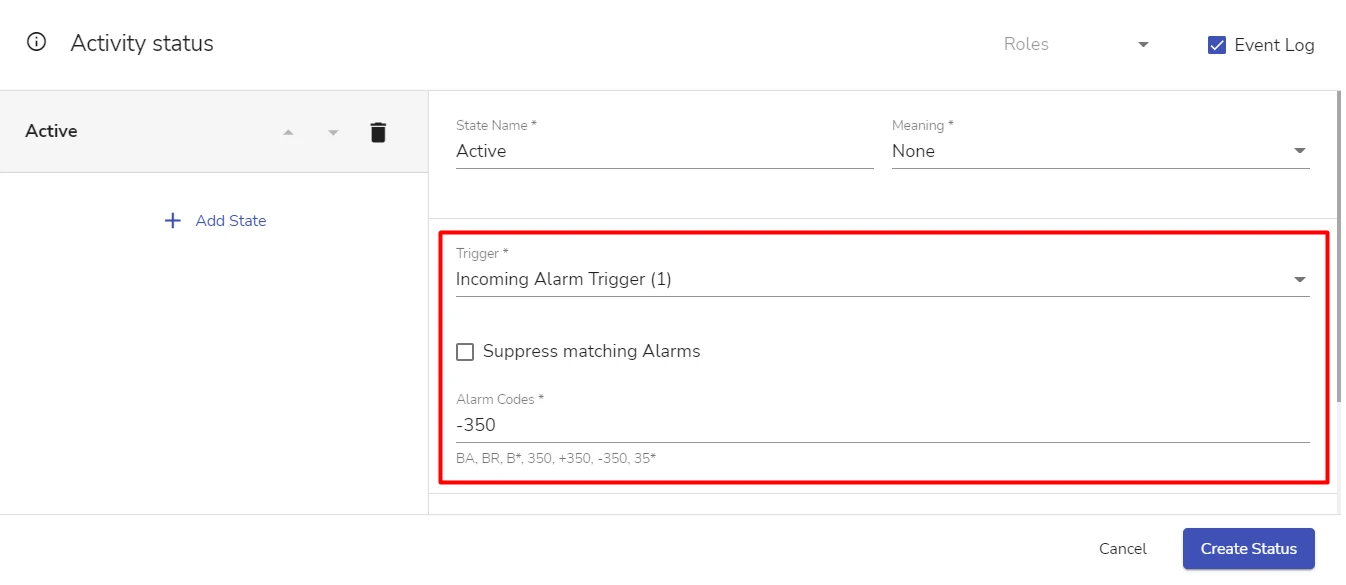
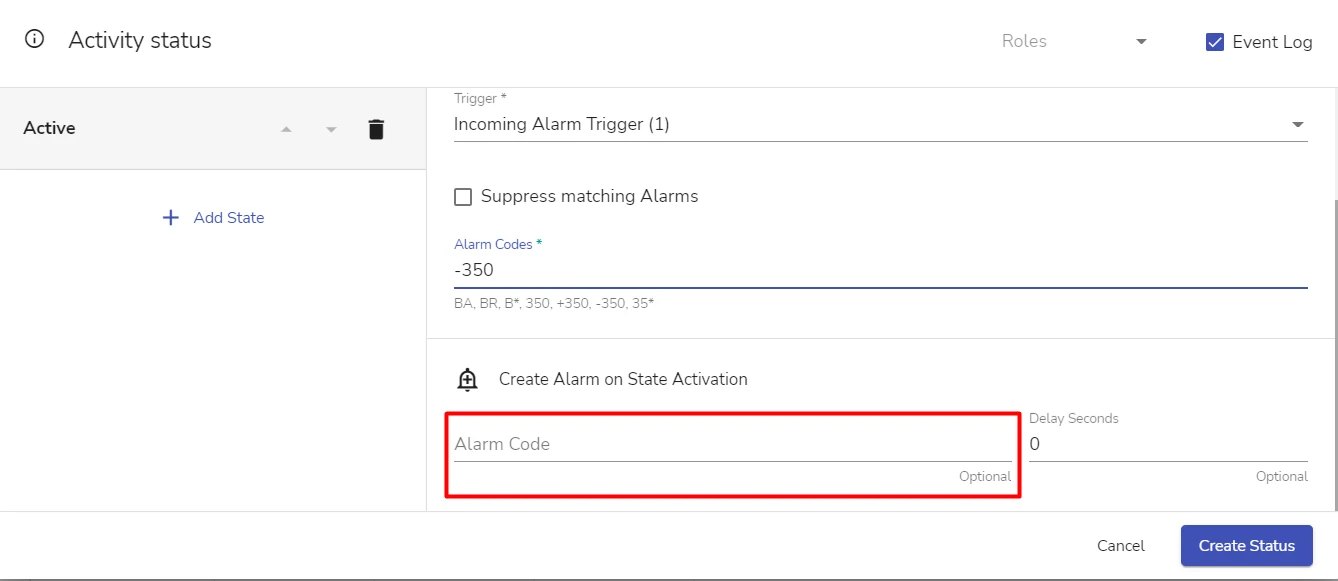
- The site status editing dialog
The dialog opens from the site Statuses subpage (Sites > [site] Overview page > Statuses) when a site status is created or edited.
In the Alarm Codes field of the dialog, an alarm that sets a state is configured.
In the Alarm Code field below it, a State Activation alarm is set.
-
The Criteria Mappings subpage
To access the subpage, click on the Criteria Mappings button on the site Overview page. A new record is added by clicking Add on the subpage.
In the Criteria field, a source alarm / alarm expression that needs to be transformed is specified.
In the Event Code field, the final (transformed) alarms / alarm expressions are specified.
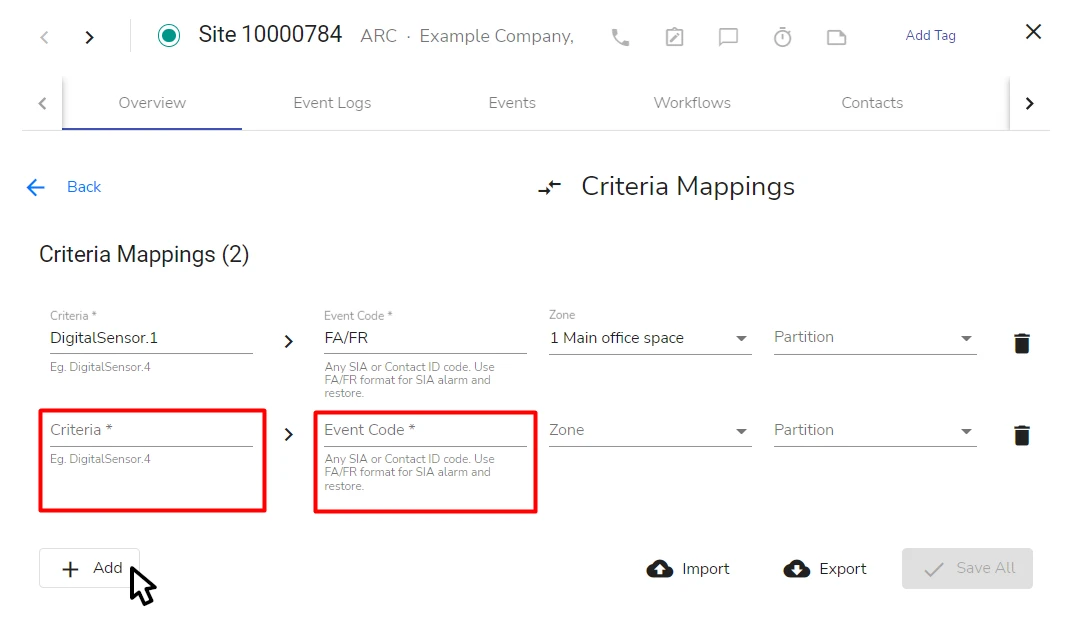
For details on Criteria Mappings, see section Work with Zone, Partition, and Other Details in Incoming Alarms > Overview > Key Alarm Details Customization: a Summary.
For the Event Code field, only a limited number of parameters are supported in an expression: zone, zoneName, partition, partitionName and message.
The values set in Zone and Partition fields of a Criteria mapping override the zones and partitions set in expressions in the Event Code field (if set).
The Event Code field uses its own specific syntax for alarm / restore values: both values can be set in one field, separated by a slash. See section Work with Zone, Partition, and Other Details in Incoming Alarms > Work with Criteria Mappings > Create a Criteria Mapping for details.
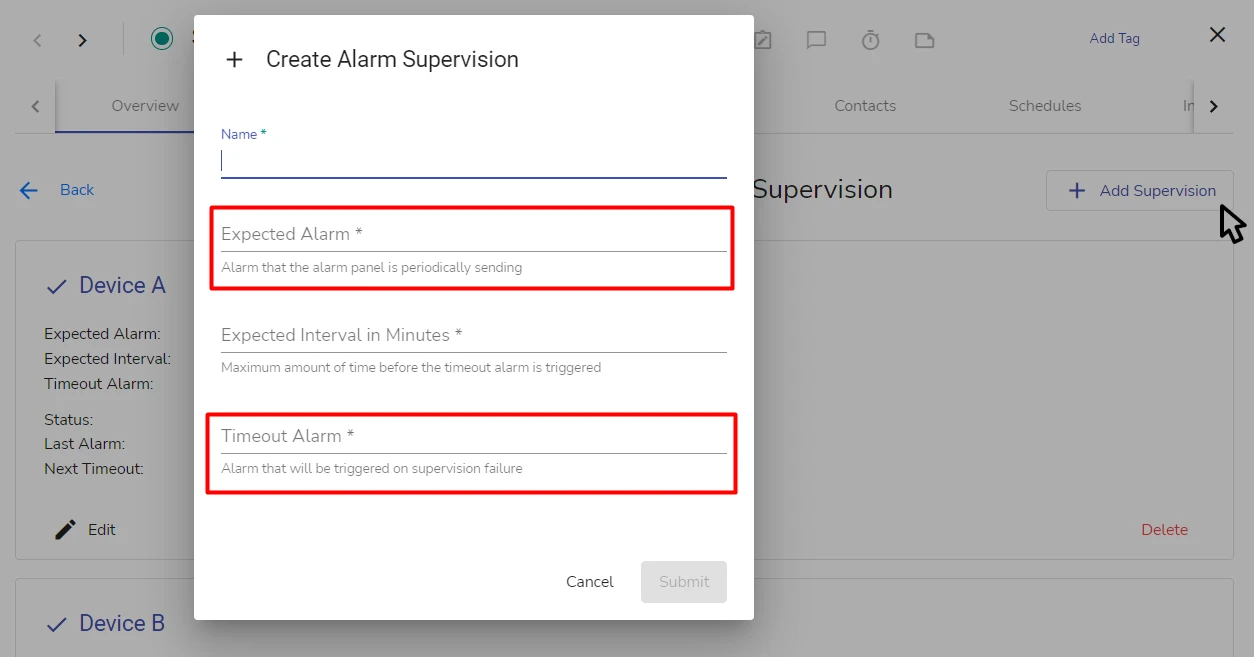
- The Alarm Supervision configuration dialog
The dialog opens when a supervision is being configured (created or edited) on the Alarm Supervision subpage of a site. To access the subpage, click on the Alarm Supervision button on the site Overview page.
In the Expected Alarm field, an alarm that acts as a heartbeat message is set.
In the Timeout Alarm field, an alarm that signals a supervision failure is set.
 Link is copied