Manage Schedules
The creation and deletion of schedules is available to Administrator and Manager only.
Editing schedules is available to Administrator, Manager, and Operator.
Create a Schedule
When creating a schedule, it is possible to use one of the evalink talos predefined week schedule templates that come with configurable hours. The default hours for these templates are:
- Business Hours, Mon–Fri 7:00-19:00
- Business Hours – Lunch Break, Mon–Fri 7:00-19:00 with a lunch break from 12:00 to 14:00
When you create a new schedule for a site, it automatically uses the time zone set for this site in Site Settings.
evalink talos doesn't allow adding custom week schedule templates, but it is possible to select a template when creating a schedule and edit its working hours as desired.
The other option is to create an empty schedule (without using a template) and then manually add the necessary entries as described in section Edit a Schedule > Add a Schedule Entry.
When you create a Schedule for a site, evalink talos uses the same time zone that is defined for this Site by default.
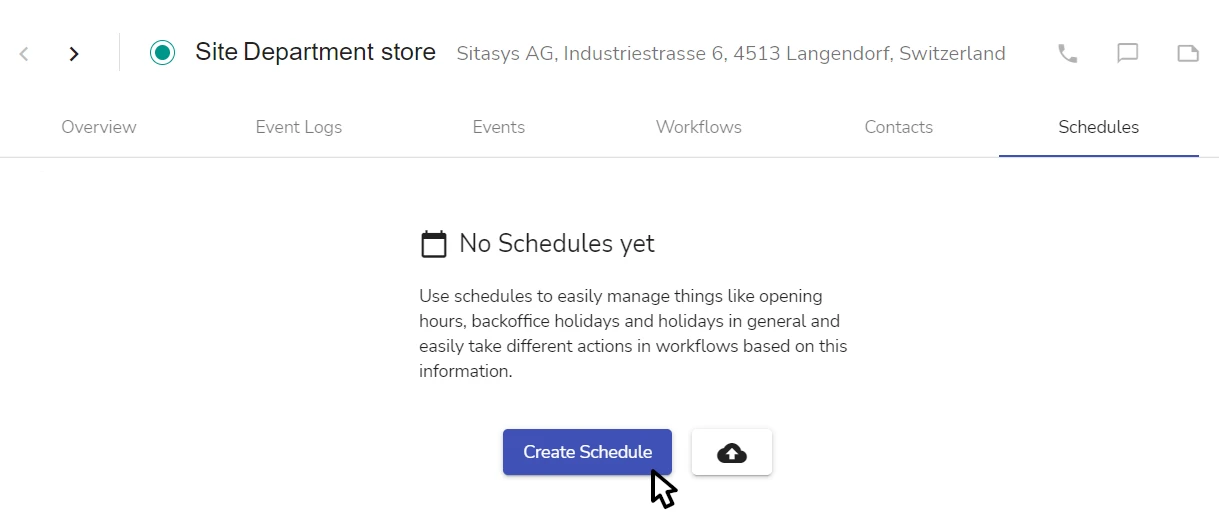
The figure below shows the creation of a schedule for a site:
To create a schedule:
-
Go to the Schedules page on which you need to create a schedule
- to create a global schedule – go to Company > Global Schedules
- to create a schedule for a site group – go to Site Groups > [site group] > Group Schedules
- to create a schedule for a site – go to Sites > [site] > Schedules
-
Click the Create Schedule button in the central part of the page

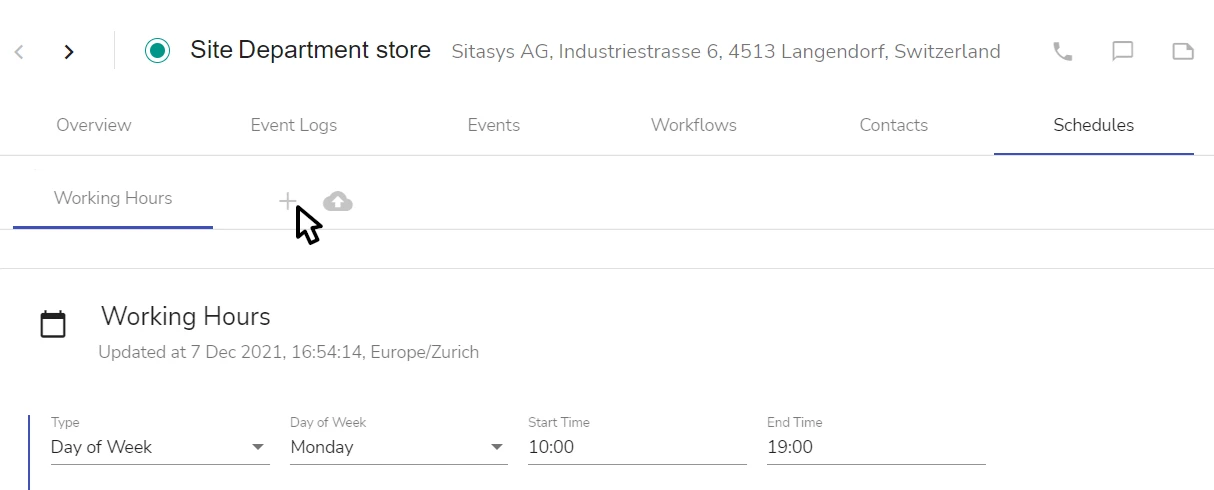
If there are already some schedules created, click on the plus icon in the top part of the page.

-
In the schedule creation dialog, specify the name for the schedule in the Name field
-
(Optional) Select one of the predefined evalink talos working week templates from the Template drop-down. Edit the template working hours if necessary
tipChoose a template with the lunch break only if during the lunch hours the site is monitored differently as compared to business hours – for example, if the office is supposed to be closed and armed for lunch.
-
(Optional) If you wish to assign a Schedule Role to the schedule, select it from the Roles list
For details on using Schedule Roles, see section Schedules Overview > Schedule Roles.
You can assign several Schedule Roles to one schedule.
infoA Schedule Role can be assigned to only one schedule on each Schedules page (of a site, site group, or of the Company).
-
(Optional) Specify the buffer time to be applied before and / or after the schedule start and end time
-
set the buffer for the start time in the Buffer Minutes (Before) field
-
set the buffer for the end time in the Buffer Minutes (After) field
For details on buffer times, see section Schedules Overview > Buffer Times.
-
-
Click Submit to create a schedule.
The page of the new schedule opens.
If no working hours were set for the schedule on step 4, the schedule is opened in the List view (see section View a Schedule > List View). Otherwise, it opens in the Calendar view (see section View a Schedule > Calendar View).
You can also import a schedule from a JSON file that contains a schedule in evalink talos format – for example, the one exported from another site.
To import a file, click on the Import icon on the schedule page, navigate to the schedule file on your file system and submit the file.
Configure Random Alarms for a Schedule
You can configure a number of random alarms for a schedule with enabled alarms to be generated during active schedule hours.
The time between such alarms is randomized, but you can set the number of alarms which you want to trigger within a certain period of time.
This allows you to carry out remote guarding in cases when an operator needs to check in during a set period of time.
To configure random alarms:
-
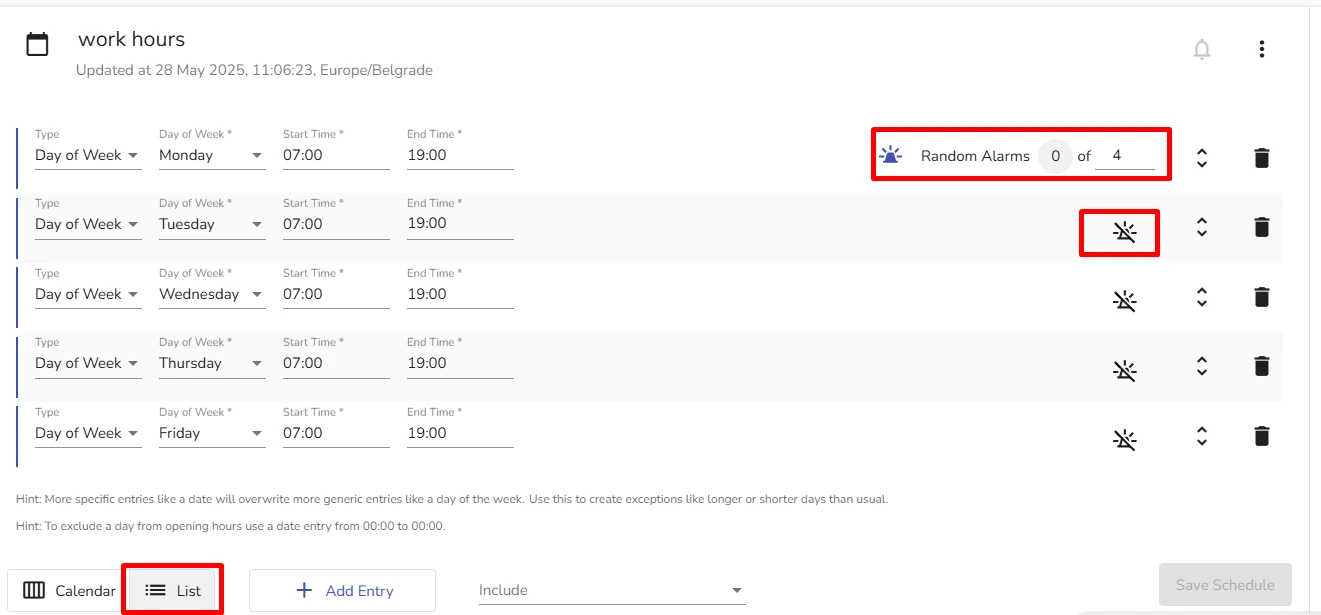
Navigate to the schedule you want to add random alarms to and switch to the List view

-
Click on the light icon next to a schedule entry to which you want to add random alarms
For example, if you are editing a business hours schedule and need to perform remote guarding only on a certain business day, you can add random alarms to this day separately.
-
In the Alarms Target field, select the number of alarms you want to trigger
The number of alarms has to be a positive number.
-
(Optional) Click the light button to disable the setting.
If you use the light button, evalink talos saves the configuration of random alarms. If you want to completely delete it, use the icon.
-
Save the schedule
Once you have added random alarms to the schedule, in the List view evalink talos shows the number of alarms which have already been triggered during the set period.
Edit a Schedule
Before editing a schedule, make sure that this will not break the operation of workflows, Status Rules and other evalink talos objects that use this schedule.
You can perform the operations described below on the page of a particular schedule. To access the schedule page for the appropriate entity (site, site group, or Company), follow the steps described in section View a Schedule > Navigate to the Schedule Page.
The same steps are used to edit global, site group- and site-level schedules.
Schedule Entry Types
Editing a schedule involves, for the most part, creating, editing and deleting schedule entries. A schedule entry corresponds to a single activity timespan that has a start and end time. For example, creating a working day with an explicitly defined lunch break takes two schedule entries – 9:00-13:00 and 14:00-18:00, for instance.
The following types of entries can be added to a schedule:
-
Day of Week – a recurring entry (see below) that specifies a timespan for a weekday (for example, Tuesday)
-
Special Day – an entry that allows adding a globally-configured Special Day to a schedule (see section Schedules Overview > Special Days). A Special Day is a recurring entry as well
-
Date – a non-recurring entry for the specified date
-
Multiple Dates – a non-recurring entry for a range of dates that have a specific schedule with the same start and end time
-
Date Range – a non-recurring entry for a timespan that is longer than one day
All the types of entries above can be accessed in the List view of the schedule. In the Calendar view, only entries of Date type can be accessed.
As seen from above, evalink talos schedule entry types fall into two major groups:
-
recurring entries – records that set periodic timespans
For example:
- a Day of Week entry for Tuesday is automatically applied every Tuesday
- a Special day entry for August 1 is automatically applied every year
-
non-recurring entries – records relevant to a particular date or dates of the particular year only
When recurring entries are in conflict with non-recurring ones (for example a Tuesday entry for Tuesday, November 15 conflicts with a Date entry for November 15), non-recurring entries take precedence. Schedule hours prioritization is described in section Advanced Topics > Schedule Hours Priority in Case of a Conflict.
Add a Schedule Entry
Schedule entries can be added in both the Calendar and the List views.
If a schedule has at least one Day of Week entry set, it is opened in the Calendar view by default. Otherwise, the schedule is opened in the List view.
In the Calendar view, you can only add entries of Date type. To add other types of entries, switch to the List view (see section Add an Entry in the List View).
After applying changes, make sure to click Save Schedule before navigating away from the page. An active (blue) Save Schedule button indicates that there are unsaved changes on the page.
Add an Entry in the Calendar View
In the Calendar view, the editing permissions for users are are follows:
-
Administrator and Manager can apply all changes available on the page
-
Operator only can add, edit, or delete entries. Including other schedules into the current schedule is not available to Operator
When in the Calendar view, any mouse click in the central part of the page puts your focus inside the calendar widget. To scroll to the bottom of the schedule page – for example, in order to click Save Schedule – click your mouse outside the widget and then scroll.
The figure below shows adding an entry to a schedule in the Calendar view:
The operation is performed on the schedule page (see section View a Schedule > Navigate to the Schedule Page).
To add an entry to a schedule in the Calendar view:
- Click the Add Entry button below the widget
Alternatively, right-click on an empty space in the widget for the corresponding date and select Add Entry from the context menu
- In the dialog that opens, specify the details:
-
(Optional) Set the date (dd.mm.yyyy) in the Date field
-
(Optional) Specify the start and end time of the entry in the From and To fields
For hours setting tips, see section Advanced Topics > Schedule Entries Time Format.
If you set the value in the To field earlier than the value in From, the entry will start at the specified time and extend overnight.
-
(Optional) Add a Note, specifying the reason of the change or any other relevant information
- Click Submit
Instead of clicking Submit, you can just press Enter after editing each field.
The new entry appears on the schedule page.
You can edit the entry as desired by dragging the borders of the entry with a mouse, see section Edit a Schedule Entry for details.
- Click the Save Schedule button below the widget
After changes are applied to a particular date in the Calendar view, a separate entry of Date type with the specified time range is created in the List view.
You can undo or redo the recent changes using the Undo and Redo buttons, or Сtrl+Z / Ctrl+Shift+Z hotkeys.
Add an Entry in the List View
The operation is performed on the schedule page (see section View a Schedule > Navigate to the Schedule Page).
To open the List view, on the schedule page, click the List button at the bottom of the page.
Each list record corresponds to one schedule entry. You may specify several schedule entries for one day, for example, 10:00-13:00 and 14:00-19:00, if the alarms should be treated differently during the lunch break.
The figure below shows adding a schedule entry in the list view:
To add an entry to a schedule in the List view:
- Click the Add Entry button at the bottom of the page
The new entry appears in the list, by default, it is an entry of Date type.
-
Specify the parameters for the new entry
a. From the Type drop-down, select the schedule entry type and specify the details appropriate for the selected type
-
Day of the Week – set the hours for the day of the week
-
Special Day – select one of the globally-configured Special Days (see section Create a Special Day and Add It to a Schedule) and specify the hours for it
-
Date – set the hours for a particular date of a particular year
-
Multiple Dates – set the dates and the common start / end times for these dates
-
Date Range – set the start / end date and time for the period
For explanations about the entry types above, see section Schedule Entry Types.
b. (Optional, for date-specific types only) provide Notes
c. (Optional, for non-recurring entry types only) If you want the entry to be erased from the calendar after the date is in the past, leave the Cleanup checkbox selected (the default option). The entry will disappear from the page in 24 hours after its expiry
To keep the entry on the page after expiration (for information purposes, for example), deselect the checkbox.
infoNote that selecting the Cleanup checkbox doesn't make the entry recurring (repeated each year). To create a recurring entry, use a Special Day, see section Create a Special Day and Add It to a Schedule.
For hours setting tips, see section Advanced Topics > Schedule Entries Time Format.
After editing a field, press Enter to apply the changes.
-
-
Click the Save Schedule button at the bottom of the schedule page
To take a lunch break into account, add two entries for the concerned day(s): one for the hours before, and the other one for the hours after lunch.
Edit a Schedule Entry
You cannot edit a day in the past. The current day can be edited, including the hours that have already passed.
The figure below shows editing a schedule in the Calendar view:
To edit a schedule entry in the Calendar view:
- On the schedule page, scroll to the desired entry in the widget
By default, the page is opened on the current week. The current day record is highlighted in bold in the grid.
-
Edit the entry
a. Drag the borders of the schedule entry bar with your mouse to adjust the start / end time as necessary
b. In the dialog that opens when you release the bar, specify the reason of the change in the Note field (an optional step) and click Submit
To set more precise hours (for example, 18:02), open the editing dialog by
-
left-clicking on the schedule entry
OR
-
right-clicking and selecting Edit Entry from the context menu
Edit the fields as necessary and click Submit to apply the changes.
infoInstead of clicking Submit, you can just press Enter after editing each field.
-
To wrap a schedule entry around midnight, drag the corresponding border of the bar beyond the edge of the screen. When the bar appears on the next (or previous) line, continue dragging until the desired hours are set.
Currently, if you wrap a schedule around midnight and make it 'touch' the beginning of the next day schedule, there is smooth transaction between the two. This means, no Open/Close event is triggered. However, evalink talos only supports schedule units that are 23.59 hours long or less.
If the newly created schedule exceeds this limit, evalink talos automatically splits it into two directly joined schedule units at midnight.
- Click the Save Schedule button below the widget
To edit a schedule entry in the List view:
-
Click the List button at the bottom of the page to open the List view
-
Edit the parameters of the corresponding schedule entry
After editing a field, press Enter to apply the changes.
For tips on configuring various types of schedule entries, see subsection Add a Schedule Entry in the List View
- If the Save Schedule button at the bottom of the page is active (blue), click Save Schedules to apply the unsaved changes
You can undo or redo the recent changes using the Undo and Redo buttons, or Сtrl+Z / Ctrl+Shift+Z hotkeys.
Delete a Schedule Entry
To delete an entry in the Calendar view:
- Delete an the entry in the widget by
-
right-clicking on it and selecting Remove Entry
OR
-
clicking on the schedule entry to open the editing dialog, clicking the Delete button in the dialog (see the figure below), and then clicking Submit
The entry is deleted without a confirmation.
- Back on the schedule page, click the Save Schedule button below the widget
Deleting a day entry in the Calendar view creates a new day off record in the List view: an entry of Date type hours set to 00:00-00:00. For details on time notation in schedules, see section Advanced Topics > Schedule Entries Time Format.
To delete an entry in the List view:
-
Click the List button at the bottom of the page to open the List view
-
Click on the delete icon for the entry in the list
The entry is deleted without a confirmation.
- Click the Save Schedule button at the bottom of the page
All changes applied in the List view are immediately reflected in the Calendar view.
After a single-day entry (for example, of Date type or Special Day type) is deleted from the List view, in the Calendar view, the hours for this day are set to regular hours defined by the recurring schedule entries.
Include Another Schedule into a Schedule
Including a schedule allows to reference another schedule in your main schedule. The rationales for that are described in section Schedules Overview > Included Schedules.
The operation is performed on the schedule page (see section View a Schedule > Navigate to the Schedule Page).
The same steps are used to include a schedule into a global, a site group, or a site-level schedule, in the Calendar or in the List view.
The figure below shows including a schedule in the List view:
To include another schedule into a schedule:
-
On the schedule page, in the Include drop-down at the bottom of the schedule page, select the schedules that you wish to include.
In the list that expands, the items with a Global label are global schedules, the items without a label are the schedules created for the current site. The site group-level schedules are labeled with the site group name.
You can include several schedules from the list.
-
Click Save Schedule
After you include a schedule, a link to it appears in the List view on the Schedule page. You can view the included schedule details by clicking on the link. You can check how the schedule is applied in the Calendar view.
If later you wish to exclude a schedule, click on the Include drop-down to open the list, deselect the schedule that you wish to exclude, click outside the drop-down to close the list, and then click Save Schedule.
Create a Special Day and Add It to a Schedule
The concept of Special Days is described in section Schedules Overview > Special Days.
evalink talos allows configuring two types of Special Days:
-
Special Days occurring on the same day every year – for example, the Christmas Eve
-
Special Days with a floating date – for example, a Maintenance day that takes place yearly on the first Friday of March
Create a Special Day
To create a Special Day:
-
Go to Company > Settings > Schedules
-
In the Special Days section of the page, click Add Special Day
-
Specify the Name and the Date for the Special Day
You can set the date manually in dd.mm format or select it from the calendar. To open the calendar, click on the small calendar icon inside the field
-
Specify if the Special Day has a defined or a floating date:
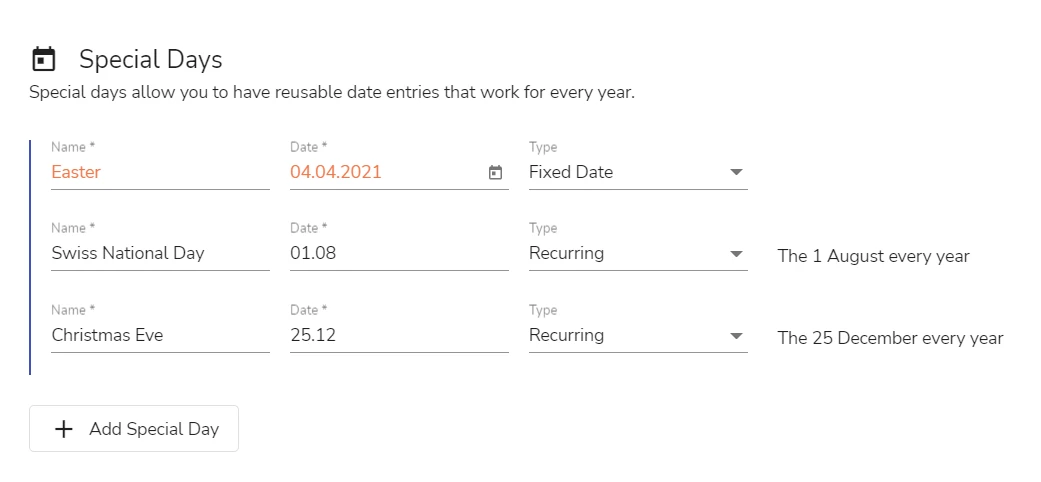
- to create a Special Day with a defined date, select the Recurring option from the Type drop-down (the default option)
A hint with text The [Day Month] every year appears opposite to the entry.
- to create a Special Day with a floating date, select the Fixed Date option from the drop-down
If the Date was specified in dd.mm format, selecting this option transforms the Date into dd.mm.yyyy format. For the yyyy value, the current year is used.
-
Click Save
The new Special Day appears in the list.
Whenever an entry with a floating date appears to be in the past (expires), the Name and Date of the entry are displayed in red font, prompting the user to set the correct date for the next year.
The figure below shows a list of Special Days with a highlighted expired entry.

If later you wish to delete a Special Day, first exclude it from all schedules that use it. Otherwise, the delete icon for this Special Day is disabled.
Add a Special Day to a Schedule
Before you begin, you need to configure the Special Days you want to add on the global level (see section Create a Special Day).
To add a Special Day to a schedule:
-
Go the schedule page (see section View a Schedule > Navigate to the Schedule Page)
-
Click on the List button at the bottom of the page to switch to the List view
-
Click Add Entry button at the bottom of the page
The new entry appears in the list – by default, of Date type.
- Edit the entry as follows
a. In the Type drop-down, select Special Day
b. In the Special Day drop-down that appears, select the desired Special Day
- Specify the hours for the Special Day in the Start Time and End Time fields
For hours setting tips, see section Advanced Topics > Schedule Entries Time Format.
- Click Save Schedule
Delete a Schedule
You cannot delete a schedule that is included in another schedule.
After a schedule is deleted, evalink talos entities that relied on it (such as workflows, status rules, etc.) may be broken or operate with errors. Before deleting a schedule, make sure to re-assign all dependent objects to other schedules. When deleting a schedule, evalink talos doesn't check any interdependencies, apart from includes.
To delete a schedule:
-
On the schedule page, click on the three dots icon at the right side of the schedule page
-
Select Delete
-
Enter a configuration code and click Confirm Delete
 Link is copied