Alarm Dispatcher Global Configuration
Monitoring Station Basics
A Monitoring Station is an entity within evalink talos that is a placeholder for an established connection for alarm forwarding.
Monitoring Stations connect to to third-party alarm receiving centers which process the alarms that you forward there from evelink talos. They can also connect to other tenants on evalink talos or to a site within your company through a virtual receiver, for example, through a DC09 Virtual Receiver.
Monitoring Stations are created on a global level. You can create multiple Monitoring Stations for a single tenant.
When a Monitoring Station is created, you can use it to forward alarms from a particular site. All available Monitoring Stations are listed on your company dashboard.
evalink talos uses several protocols to connect Monitoring Stations with their receiving devices:
- ArcXml
- Sur-Gard
- DC09
- talos
The talos protocol is used to connect your Monitoring Station with another tenant or site on evalink talos. If you want to use this type of connection, please contact evalink talos support team through our Helpdesk.
Add A New Monitoring Station
To add a new Monitoring Station:
-
Navigate to Company > Settings > Dispatcher
-
In the Dispatcher subpage, click Add Monitoring Station
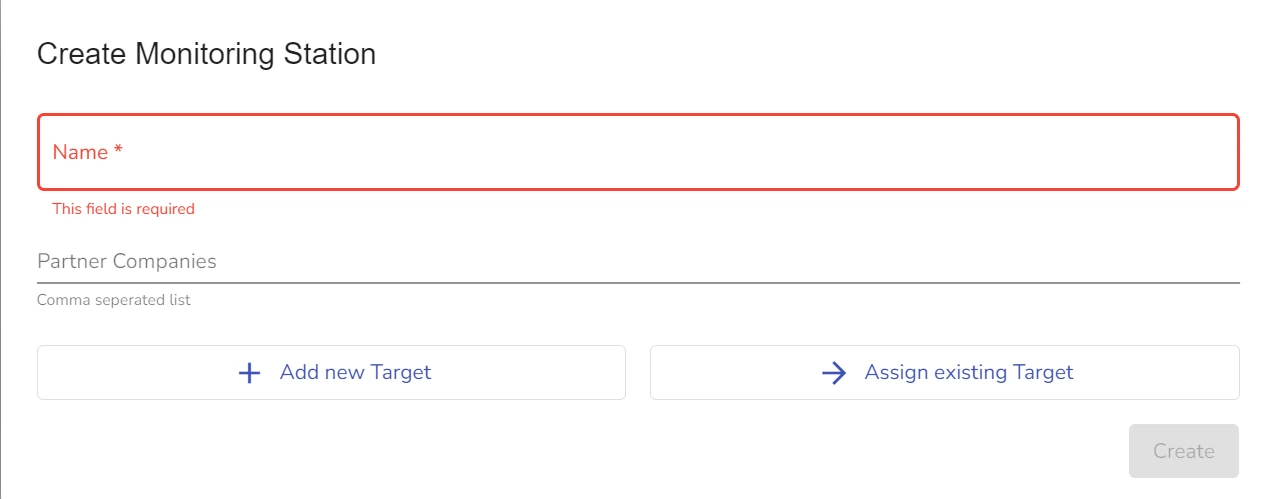
The Create Monitoring Station dialog opens:
-
In the dialog that opens, type in the name of your new Monitoring Station
The name should be globally unique.
-
(Optional) In the Partner Company Field, enter IDs of your partner companies.
infoA Partner Company in this context is another evalink talos company where you want to make this Monotoring Station available.
-
Do one of the following:
- Click Add new Target to configure a new Target destination for alarms
- Click Assign existing Target to use a previously configured Target destination for your alarms
infoYou can add several Targets within the same monitoring station. Adding several Targets allows you to forward alarms to different routes within the same Monitoring Station.
For details on how to configure a Target, see section Configure a Target for a Monitoring Station below.
-
Click Create
Configure a Target for Monitoriong Stations
A Target for a Monitoring Station is a destination point the Monitoring Station connects to in order to forward alarms.
You can add a new Target only when configuring a new or editing an existing Monitoring Station. Once you add a Target, you can use it for other Monitoring stations.
To add a new Target:
- In the Company > Settings > Dispatcher subpage, do one of the following:
- Click Add Monitoring Station
- Next to an existing Monitoing Station record, click Edit
-
In the dialog that opens, click Add New Target
-
In the Name field, type in the name of the new Target
-
(Optional) Add a phone number for calls and / or a phone number for SMS messages and / or an email to receive notifications.
infoThis step is obligatory if you want to use the escalation options.
-
(Optional) In the Escalation pane, select the notification language
-
(Optional) Set up Timeout Signal and Timeout connection fields in seconds.
infoIt is best practices to use higher number of seconds for Timeout Signal and Timeout Connection because sometimes there can be a few seconds delay before Alarm Dispatcher processes an alarm.
Setting the values that are too short may cause a big amout of calls, text messages or emails about otherwise normally processed alarms.
-
In the Stuck Signal Escalation Paths and Dead Target Escalation Paths select one of the following:
- Call
- SMS
-
(Optional) In the Configuration pane, add an Account Template
-
Click Submit
Once you create a Target for any Monitoring Station, it becomes available for all other Monitoring Stations, the ones that you create anew or the existing ones. You can add an existing Target to any Monitoring Station by clicking Add an Existing Target when creating or editing one.
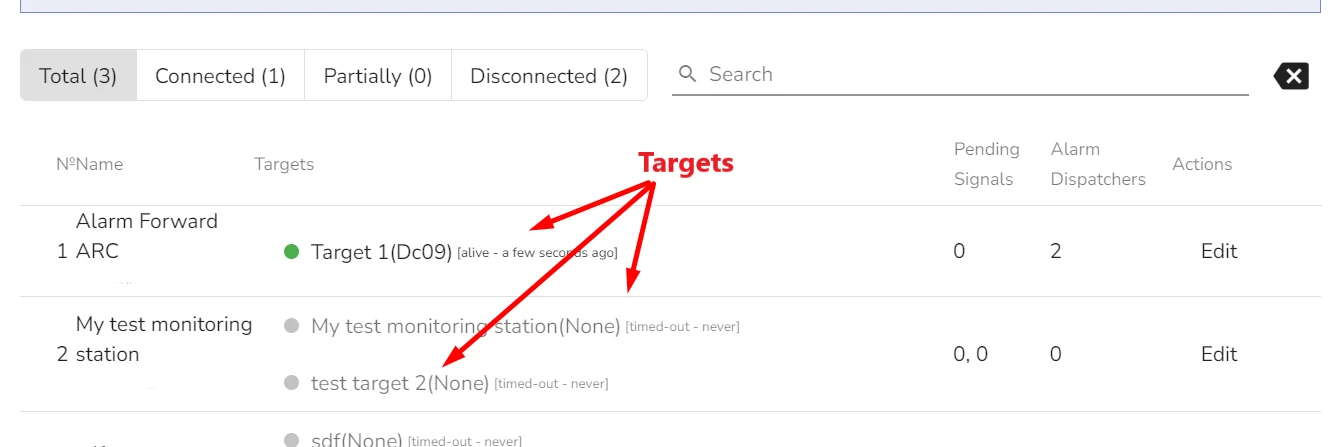
You can add several Targets to any Monitoring Stations. When you add a Target, it is displayed in the Monitoring Station record on the Company > Settings > Dispatcher page.
Configure Connection Protocol for a Monitoring Station
After you create a Monitoring Station, you need to configure its connection to a third-party ARC or another talos tenant where you want to forward alarms by using one of the offered protocols. The protocol connection is configured for each Target separately. This way, if a Monitoring Station has several Targets, it can connect to as many alarm forwarding destinations using different protocols for each Target.
To configure connection protocol:
-
On the Company > Settings > Dispatcher page, find the Monitoring Station and Target you want to conigure and click on it
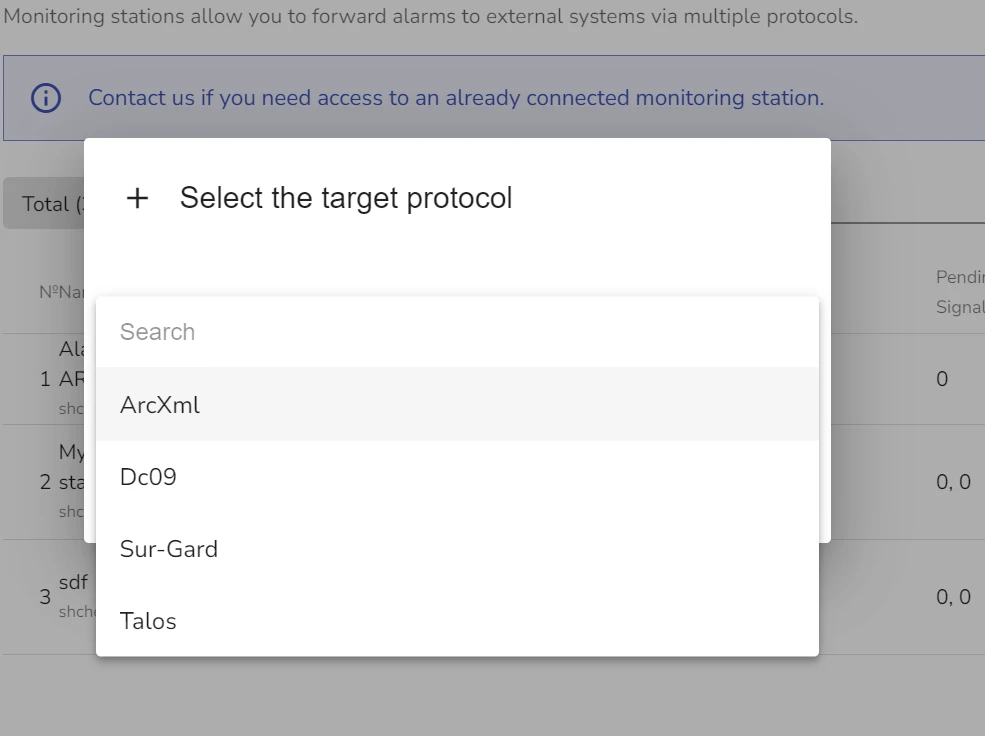
Connection Configuration dialog opens:
-
From the dropdown list, select the desired protocol and click Submit
Protocol Configuration dialog opens. The figure below shows a DCO9 protocol configuration dialog.
-
Fill out the details for your selected protocol connection
-
Click Submit
The talos protocol allows you to connect to another tenant on evalink talos to use it as a monitoring station.
If you need to use this option, please contact our technical support team through our Helpdesk.
Configure DCO9 Protocol for the Monitoring Station
DC09 is one of the protocols evalink talos can use to connect to external monitoring stations or to sites on evalink talos that act as monitoring stations.
If the monitoring station you forward alarms to is a tenant on evalink talos, make sure that you have a connected DCO9 Virtual Receiver at one of the sites in this tenant. If you are using DCO9 protocol for your Alarm Dispatcher, it is best practices to create a dedicated site within your tenant with a single instance of a DCO9 Virtual Receiver for this purpose.
To configure DC09 procotol for connection with a Monitoring Station:
-
Follow the procedure Configure Connection Protocol for a Monitoring Station to step 3
-
In step 3, select DC09 from the dropdown list and click Submit
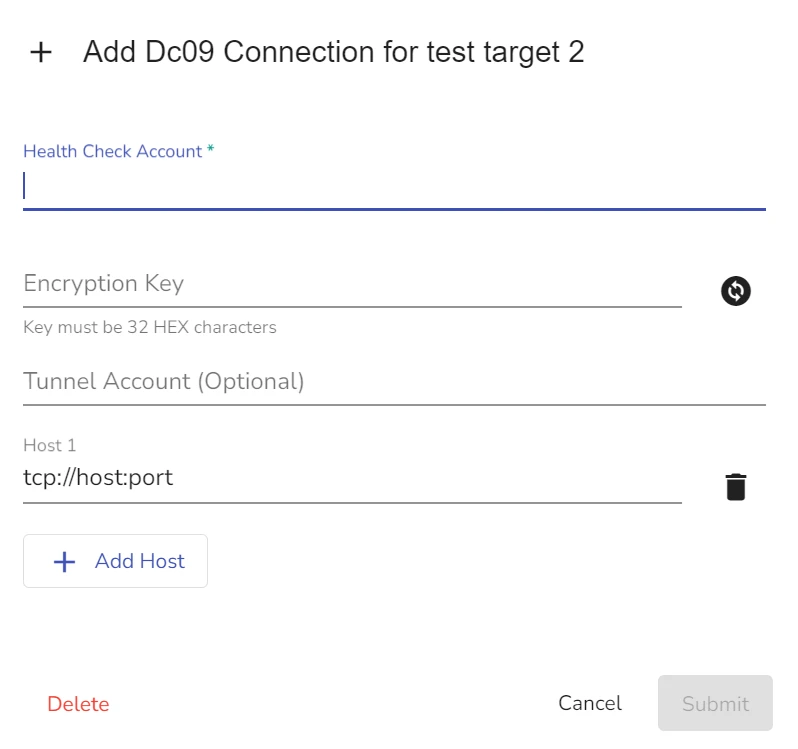
An Add DCO9 connection for the Target dialog opens:
-
In the Health Check Account field, specify an account of a DCO9 Receiver where you want to forward alarms
For example, if you are forwarding alarms to another site or tenant, use the account of a DCO9 Receiver from this site.
-
In the Encryption Key field, specify the encryption key from this DCO9 Virtual Receiver instance
-
(Optional) If you are using Tunnel connection, specify the Tunnel account
-
In the Host 1 field, specify the IP address of your Monitoring Station where you want to forward alarms from this site
infoFor example, if you are using another site within your or another tenant on evalink talos, in this field you enter the IP of the Virtual Receiver, taken from the Receiver details.
You can have more than one host for your connection.
-
(Optional) Click Add Host to add another host
-
Check or Uncheck the Forward share link option
infoChecking this option allows evalink talos to create a shareable link when dispatching an alarm. The recepient can follow the link to access this particular alarm information on evalink talos. The link is valid for one hour after the dispatch.
-
Select the User Handling option from the dropdown list
infoIn most cases, it is recommended to use the default option. Check your monitoring station settings for details.
-
Enable or disable the Sequence Validation option
infoThis option depends on whether your monitoring station has sequence validation for incoming signals or not.
It is recommended to use the same value for this option as is used on your destination monitoring station.
-
Click Submit
Configure ArcXml Protocol for the Monitoring Station
To configure ArcXML protocol for the Monitoring Station:
-
Follow the procedure Configure Connection Protocol for a Monitoring Station to step 3
-
In step 3, select ArcXml from the dropdown list and click Submit
An Add ArcXml connection for the Target dialog opens:
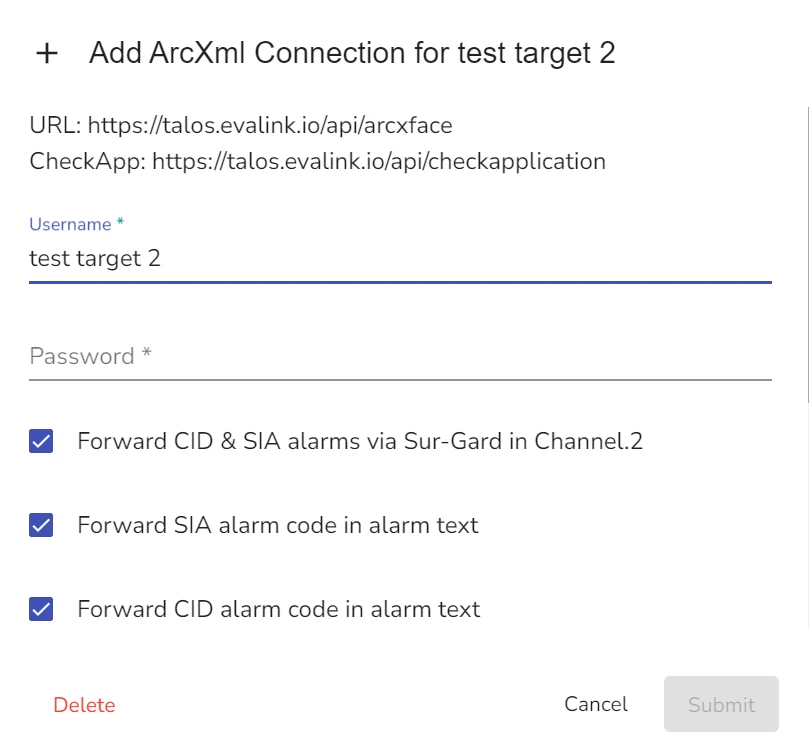
In the Username field your Target name is specified.
-
In the Password field, set up a password you will use on both sides: evalink talos and your monitoring station where you want to dispatch alarms
-
Depending on your desired configuration, check or uncheck the following checkboxes:
- Forward CID & SIA alarms via Sur-Gard in Channel.2
- Forward SIA alarm code in alarm text
- Forward CID alarm code in alarm text
- Forward VdS alarm code in alarm text
- Forward any alarm code in alarm text
- Forward alarm zone and alarm partition in alarm text
- Convert VdS special Alarms to 'Cover/PowerSensor
-
Click Submit
Configure Sur-Gard Protocol for the Monitoring Station
To configure Sur-Gard XML protocol for the Monitoring Station:
-
Follow the procedure Configure Connection Protocol for a Monitoring Station to step 3
-
In step 3, select Sur-Gard from the dropdown list and click Submit
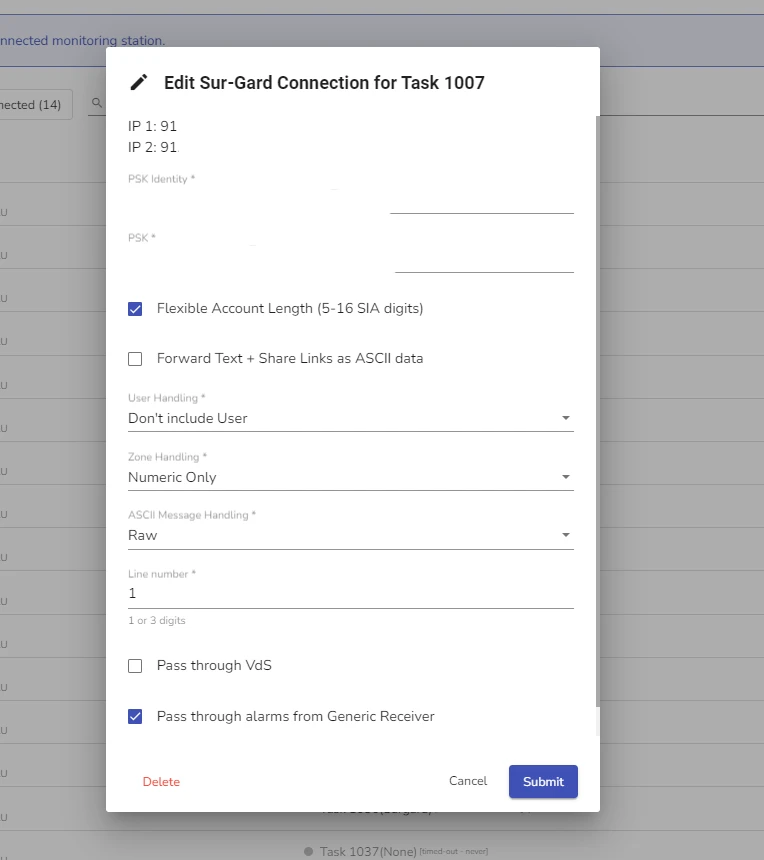
An Add Sur-Gard connection for the Target dialog opens:
-
In the PSK field, provide the pre-shared key that you will use both on the side of your Sur-Gard receiver or monitoring station and on the evalink talos side
-
Check or uncheck the checkboxes for following settings:
- Flexible Account Length (5-16 SIA digits)
- Forward Text + Share Links as ASCII data
These settings define how the forwarded alarm message looks.
-
From the User Handling dropdown list, select the necessary user setting
-
From the Zone Handling dropdown list, select if this target connection supports numeric or hexadecimal zone naming
-
From the Zone Text Handling dropdown list, select the option of how this target connection must treat the zone text
-
From the ASCII Message Handling dropdown list, select standardized or raw ASCII message treatment options
-
In the Line number field specify the line number (accepted values are 1 to 3 characters long)
-
Check or uncheck the Pass through flags
infoPass thourgh Alarms from Generic Receive flag allows this instance of alarm Dispatcher to forward binary alarm payloads as is, instead of parsing them according to evalink talos fields.
Pass through VdS flag allows to forward full VdS frames.
Radionics protocol flag allows you to use Radionics protocol.
-
Click Submit
Edit a Monitoring Station
To edit a Monitoring Station:
-
In the Company > Settings > Dispatcher page, find a Monitoring Station you want to edit and click Edit next to its record
-
In the Edit Monitoring Station dialog that opens, edit the details as desired
-
Click Submit
Edit a Target
You can edit your created Targets, when you edit Monitoring Stations where they are used.
To edit a Target:
-
In the Company > Settings > Dispatcher page, find a Monitoring Station which uses a Target you wan to edit and click Edit next to its record
-
In the Edit Monitoring Station dialog, scroll to the Target you want to edit
-
Edit the Target details as desired
-
Click Submit
Deleting a Monitoring Station only deletes Targets that this Monitoring Station uses if they are not used by any other Monitoring stations.
Delete a Monitoring Station
To delete a Monitoring Station:
-
In the Company > Settings > Dispatcher page, find a Monitoring Station you want to delete and click Edit
-
In the dialog that opens, click Delete
-
Type in deletion confirmation and click Submit
evalink talos does not stop you from deleting a Monitoring Station that is used for one of your sites.
When you delete a Monitoring Station that is used, it can prevent the Alarm Dispatcher on the site where it is used from working correctly.
Delete a Target
You can delete a Target from a Monitoring Station. If this Target is used in another Monitoring Station, deleting this Target from one Monitoring Station does not remove it from the system or another Monitoring station. In this case, it is also still available for assigning it to new and existing Monitoring Stations.
To delete a Target from a Monitoring Station:
-
In the Company > Settings > Dispatcher page, find a Monitoring Station where this Target is used and click Edit
-
Scroll to the Target you want to delete from this Monitoring Station and click the icon
-
Type the deletion confirmation and click Submit
If you want to completely remove a Target from the system and make it unavailable for adding to Monitoring Stations, you need to delete it from all Monitoring Stations or delete all Monitoring Stations that use it.
 Link is copied