Alarm Operations
Alarm Reception
When an alarm arrives, evalink talos notifies you in the following ways:
- Plays an alarm sound repeatedly until you refresh the page or handle an alarm
- Displaying a popup message
- Adds a New Alarm flag and number of currently active alarms in the left main menu
- Adds an animated highlight to the New Alarm flag in the left main menu. This option is only available if the alarm isn't automatically picked up by an Alarm Dispatcher, a Workflow or Autofeed and needs to be handled manually.
If there are alarm handling settings in place that can be applied to new alarm, such as Autofeed, Alarm Dispatcher or Workflows, evalink talos applies them automatically and then creates notifications.
Alarms that get handled by evalink talos automatically, provided that there are settings in place, and alarms that you need to handle manually have distinctly different sound notifications.
If an alarm doesn't match any automated alarm handling settings and needs to be assigned to a workflow or an operator manually, it appears in the Alarms dashboard:
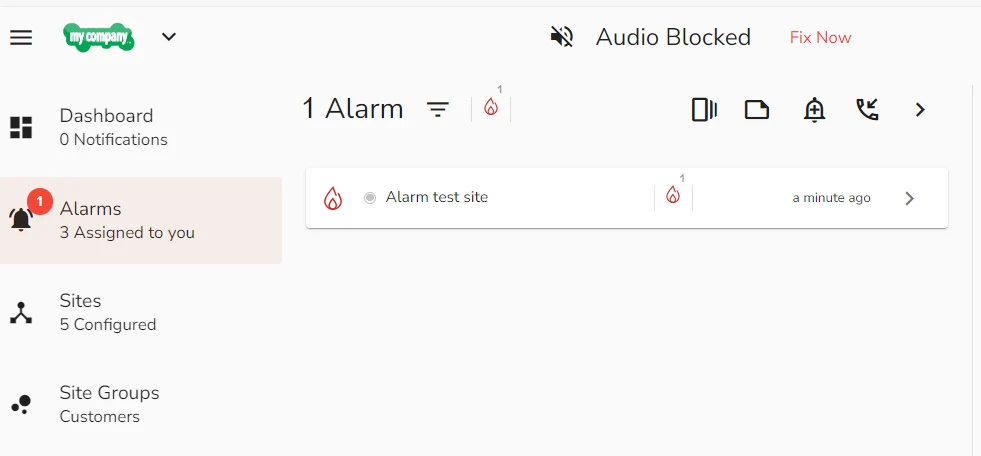
Viewing Incoming Alarms
There are several places in evalink talos where you can view data about your incoming alarms.
- On your dashboard
Your dashboard features accumulated incoming alarms for your entire tenant for the recent 14 days.
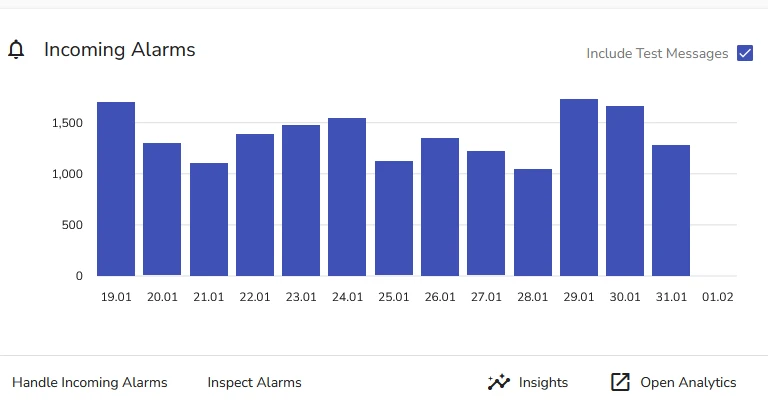
On your dashboard, you can also view alarms that are assigned to you as an operator.
- In Site or Site Group Overview
For each particular Site or Site Group, evalink talos displays recent incoming alarms for the period of 1 month in the Site Overview page.
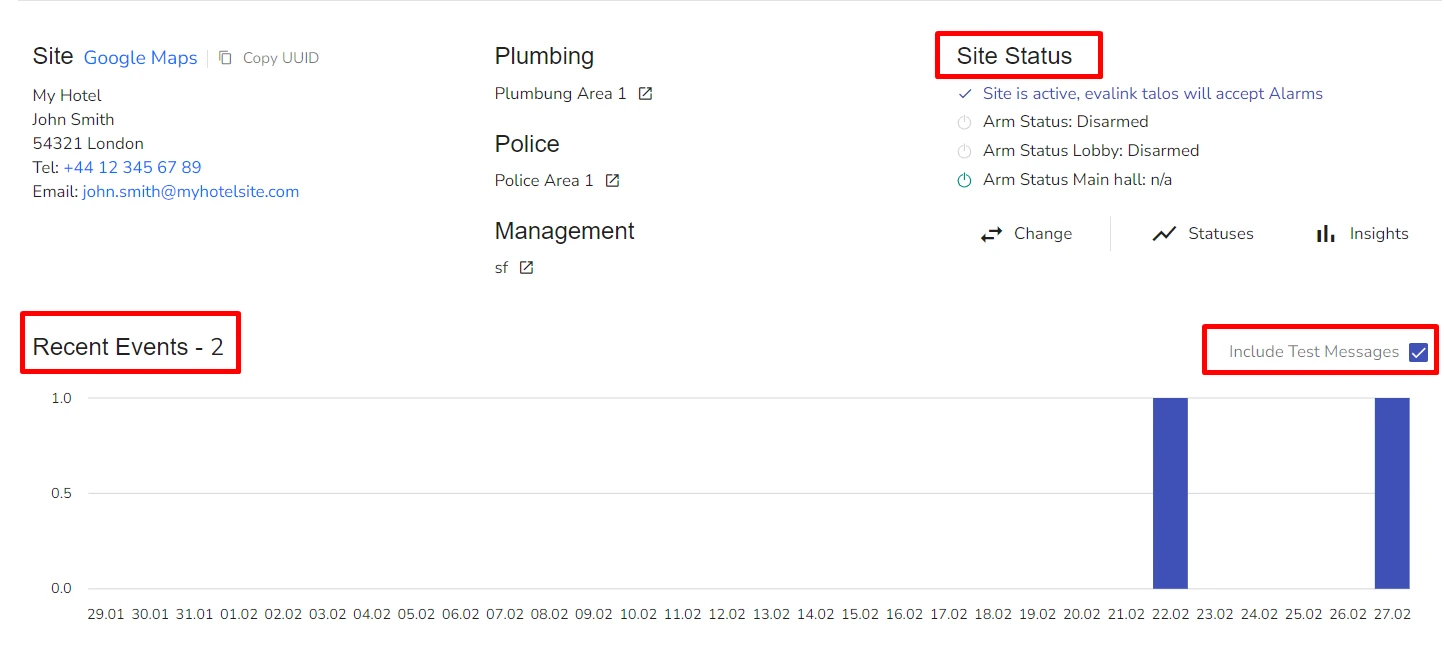
You can also include or exclude the display of test messages in this view by checking the Include Test Messages box.
In Site Overview, you can also view details about your Site Status, such as whether it is active and receives alarms, its Arm / Disarm state. For more details about Site Statuses, see section Statuses Overview.
- On the Alarms page
The Alarms page acts as a hub for alarm distribution. It features the Alarm Queue and the Operator View, where you can see all alarms that are assigned to you. On the Alarms page, you can set up the Autofeed for yourself and assign alarms to operators or to yourself.
For details about working with Autofeed, see section Working with Autofeed. For details about assigning alarms, see section Assign or Reassign Alarms.
Alarm Actions
You can perform several alarm-related actions at the Alarms page of evalink talos.
To access the available Alarm Actions, navigate to Alarms and click Alarm Actions icon in the upper right of the screen.
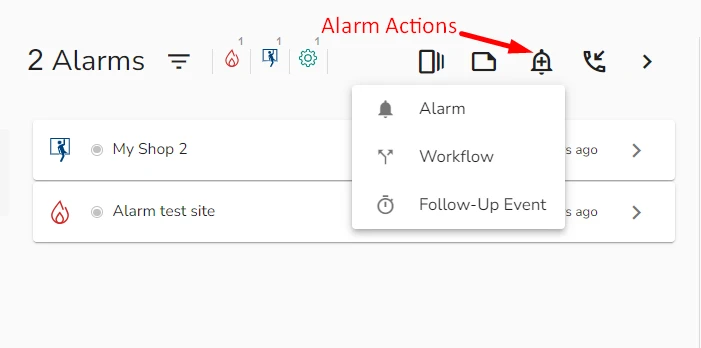
The following Alarm actions are available:
- Trigger an Alarm
- Trigger a Workflow
- Create a Follow Up event
Create a Follow Up Event
A follow-up event is a way to remind an operator to perform certain actions at a set time or to trigger and Automated Workflow for some background actions. It is a preconfigured Alarm that belongs to a specific Alarm Type: Follow Up. Follow up events help your time and action management. For example, you can use follow up events to monitor workflows where human action is needed, like a specialist checking premises.
To create a follow up event:
-
Navigate to Alarms and click on the Alarm Actions icon
-
From the dropdown list, select Follow-up
A Follow-up configuration window opens.
-
In the Select Site field, select the site for which you want to add a Follow-up event.
-
In the Select Event Code field, select the Follow-up event code.
infoCompany Admins can create custom follow-up Event Codes for specific types of actions. For details, see section TBA.
-
In the Message field, type a message to the operator who receives this follow-up
-
In the Date and Time field, select the date and time of the follow-up event.
Use the following options to select date and time:
-
Enter the day and time of the follow-up event manually
-
Use the Up and Down arrow buttons on your keyboard. The step is 1 hour
-
Type a short command to set a specific delay time for the follow-up event
-
Click the Calendar icon to configure the follow-up delivery settings
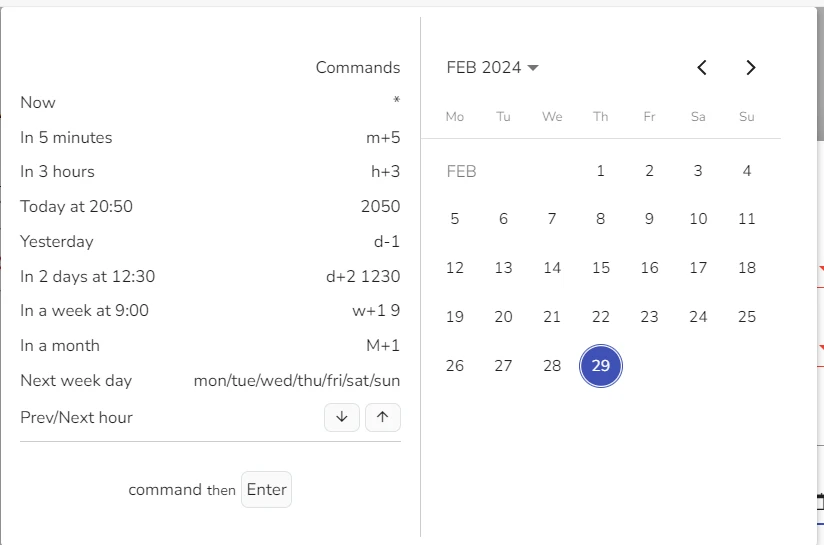
infoIn the Calendar view, you can select a date and view a list of short commands for setting a specific follow-up delivery delay time.
-
-
Click Submit
In Event Definition configuration, it is possible to make evalink talos treat follow-ups as regular alarms. In this case, if there is a manual or automatic workflow with conditions that match the follow-up even settings, this follow-up event is picked up and processed by the workflow. Creating specific workflows for follow-ups allows you to monitor and keep record of workflows where human action and its subsequent report is a necessary step.
Trigger a Workflow
You can manually select and trigger a workflow from those available to you.
To trigger a workflow:
-
Navigate to Alarms and click on the Alarm Actions icon
-
From the dropdown list, select Workflow
A Trigger Workflow dialog opens.
-
In the Select Site field, select a site for which you want to trigger a workflow
-
In the Select Workflow field, select a workflow you want to trigger.
infoOnly workflows available for the site you selected are listed.
-
(Optional) Select the following workflow settings:
- Alarm Code
- Zone
- Partition
-
Click Trigger
Triggering a workflow from Alarm Actions creates a corredponding alarm and an Event Log according to the settings you've configured. It's best practices to trigger workflows this way when you need to test your workflow settings.
Trigger an Alarm from evalink talos User Interface
You can manually trigger alarms from evalink talos user interface to test your settings. For example, configurations for workflows or Alarm Dispatcher.
To trigger an alarm from evalink talos user interface:
-
Navigate to Alarms and click on the Alarm Actions icon
-
From the dropdown list, select Alarm
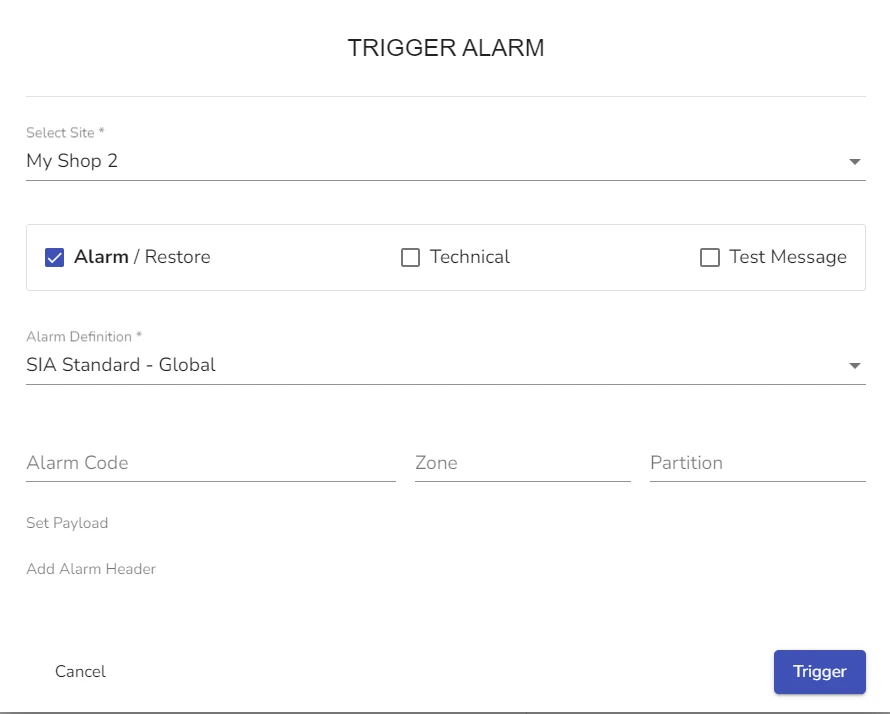
The Alarm dialog window opens.
-
In the Select Site field of the Alarm dialog window, select the site for which you want to trigger an alarm
-
(Optional) Check or uncheck the following alarm flags:
- Alarm / Restore: checking this flag adds the Alarm state to the alarm. Unchecking it adds a Restore state
- Technical: checking this flag makes evalink talos to treat your alarm as a technical message
- Test message: checking this flag makes evalink talos to treat your alarm as a test message
-
In the Alarm Definition field, select one of the available Alarm Definitions.
infoAlarm Definition determines how evalink talos parses the incoming alarms.
For details about using Alarm Definitions, see section Work with Alarm Definitions.
-
(Optional) In the Alarm Code field, specify the alarm code.
infoYou can specify a random Alarm code, but in this case, evalink talos parces such an alarm as an Unknown alarm.
You can also start typing and select the desired alarm code from the dropdown list of matches.
-
(Optional) In the Zone and Partition fields, specify a zone and a partition.
infoIf there are zones and partitions configured for your site, they are prompted to you during the selection.
You can also add random zone and partition values. In this case, evalink talos displays them in alarm details for zone and partition, but they aren't created on the site.
-
(Optional) In the Set Payload field, add payload information
-
(Optional) In Add Alarm Header field, specify an Alarm header and its values
infoThis information is added in Alarm details in the Headers section.
-
Click Trigger.
Once you trigger an alarm from evalink talos UI, it is treated like any other alarms. Depending on its settings, it can be picked up by a workflow, forwarded further by an instance of the Alarm Dispatcher or automatically assigned to an operator through Autofeed.
Mute / Unmute Alarm Notifications
Muting and unmuting alarm notification is a personal setting. This means, you can only configure it for yourself and not for other operators.
To configure sound notifications and their volume:
-
Navigate to Alarms and click on the User icon
-
From the dropdown list, select Settings
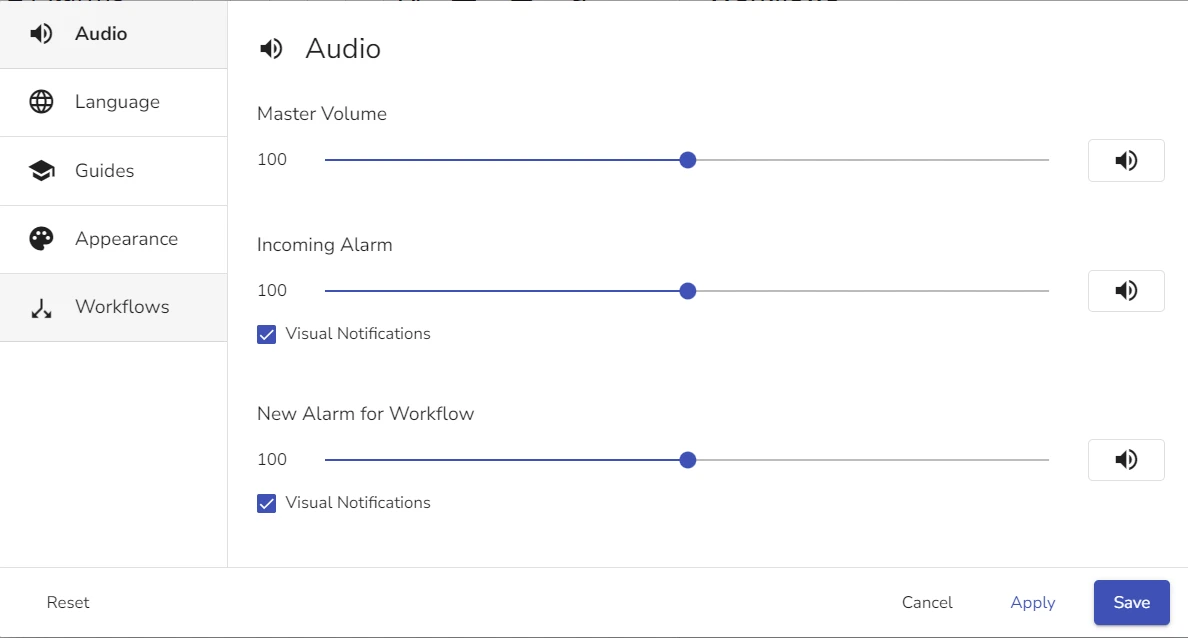
A User Settings dialog opens.
-
In the Audio tab of the User Settings, set up the following:
-
Master Volume: the overall volume of sounds in evalink talos
-
Incoming Alarm: the olume of incoming alarm notifications
-
New Alarm for Workflow: the volume of alarm notifications for workflows
-
Workflow Parking: the overall volume of incoming parked workflow notifications
Click the corresponding Volume icon to mute or unmute notifications.
-
-
(Optional) Check or uncheck the Visual Notification checkbox for corresponding settings to enable or disable visual and animated notifications
-
Click Apply and Save.
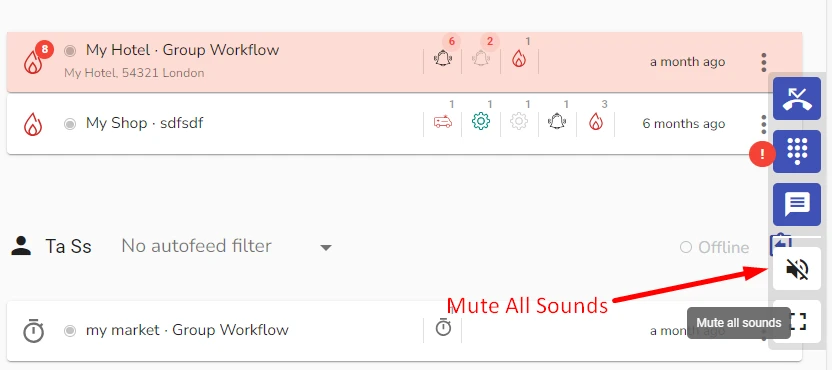
You can also mute all sounds in evalink talos from the right side Action Bar:
Sorting and Filtering Alarms
You can sort and filter incoming alarms in the alarm queue.
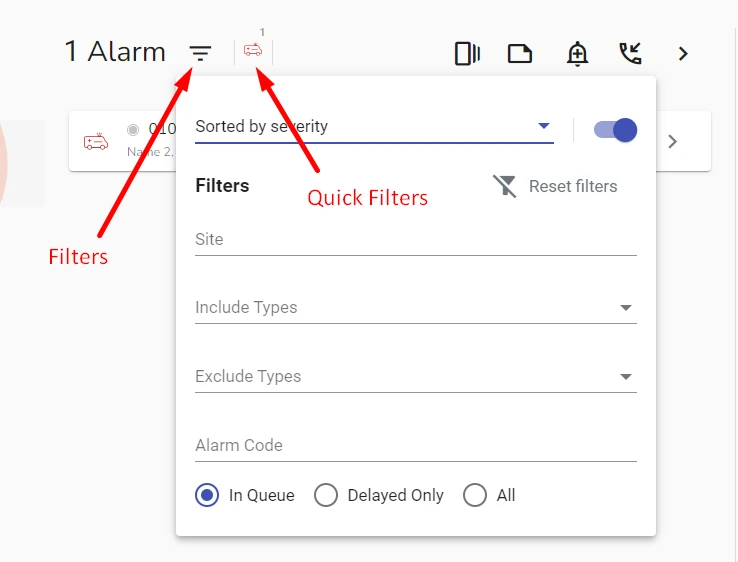
There are two filter options:
-
Quick filters
Quick Filters reflect only the Alarm Types that are already present in the queue. Pressing a quick filter icon, you can display only alarms that belong to that specific type. For instance, if you have Fire, Technical and Connection alarms in your queue, and press the quick filter Fire icon, evalink talos shows only Fire alarms in the queue. Other alarm filter icons become disabled. To revert to the original queue, you need to press the Fire icon again.
-
Regular filters
You can access the filter dialog by clicking the Filter icon.
Filter Alarms
To filter alarms:
-
Navigate to Alarms and click the Filter icon in the alarm queue.
A filter dialog opens.
-
In the filter dialog, set the following filters you want to apply:
- Filter by Site
- Include Alarm Types
- Exclude Alarm Types
- Alarm Code
infoYou can use several filters from the filter dialog simultaneously. If you set up several filters, the relationship between them is AND, not OR.
-
Click anywhere outside the filter dialog to save your settings and close it
When you apply filters, only alarms that match filter criteria are displayed in the alarm queue. If filters are applied, there filter icon is marked with a red number 1.
To remove filters, click on the Filter icon again and then click Reset Filters icon.
Sort and Group Alarms
You can also sort and group alarms in the queue. To sort alarms:
-
Navigate to Alarms and click the Filter icon in the alarm queue.
A filter dialog opens.
-
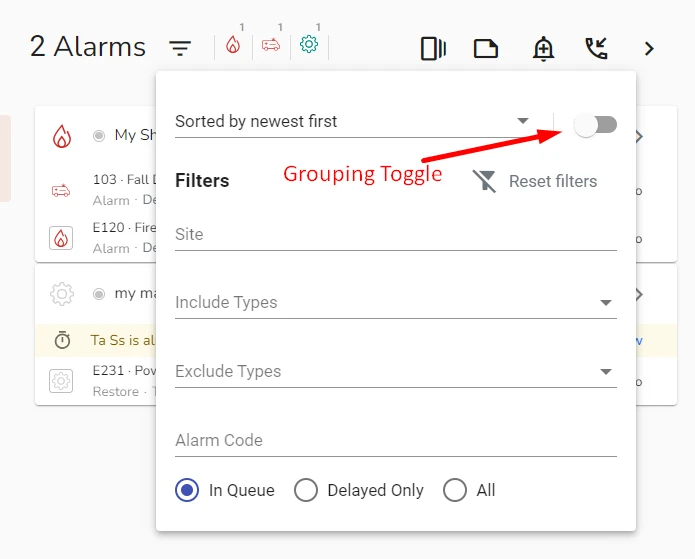
In the Sorted by field, select the desired value:
- Sorted by severity
- Sorted by severity (invert)
- Sorted by oldest first
- Sorted by newest first
You can additionaly group or ungroup the alarms in the alarm queue by site by using the Group Toggle.
You can also display all, exclude delayed or display delayed only alarms by using the Delayed Only, All and In Queue radio buttons.
- Click anywhere outside the filter dialog to save your settings and close it.
 Link is copied