Alarm Dispatcher Configuration for a Site
When a Company Admin has configured the Alarm Dispatcher on the global level, the tab Dispatcher becomes available for each site of the tenant. You can't create several instances of an Alarm Dispatcher for one site, but within the same instance you can create several dispatch destinations. Each destination can have its own set of dispatch conditions.
Create an Alarm Dispatcher
To create an Alarm Dispatcher for a Site:
-
Navigate to Sites > [Site] > Dispatcher
-
Click Create Alarm Dispatcher button
-
In the Account field, type the numeric ID that would be the ID of your Alarm Dispatcher for this particular site
evalink talos lists this Account number in your alarms, forwarded to a Monitoring Station, as the source.
If you are forwarding alarms to another evalink talos Monitoring Station, the Account field of the Alarm Dispatcher has to match that site ID.
-
Click Submit
The Alarm Dispater configuration appears on your site Dispatcher tab:
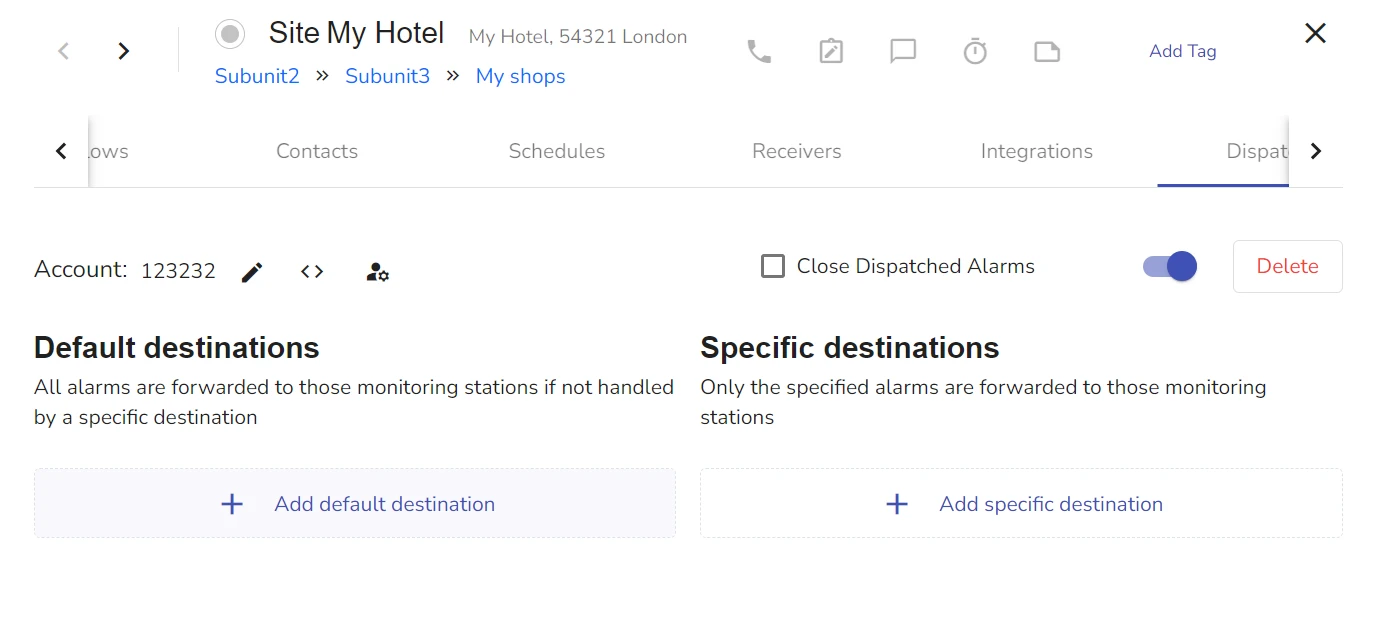
At this stage, the Alarm Dispatcher configuration is not complete. You need to configure at least one Destination for the alarm Dispatcher to forward your alarms.
You can also check the Close Dispatched Alarms checkbox in order for evalink talos to automatically close alarms that are dispatched.
If you choose not to close dispatched alarms, an evalink talos manual workflow can pick them up or they remain open for operators to handle.
Configure Default Destinations
A default destination is where evalink talos sends all alarms, regardless of their properties if the Alarm Dispatcher is enabled and configured for a site. Using this forwarding option is suitable when you want to forward all alarms from the given site.
This procedure becomes available only after you have added the Alarm Dispatcher to your site. For details, see section Create an Alarm Dispatcher above.
To configure a Default Destination:
-
In the Dispatcher tab of a site, click Add Default Destination
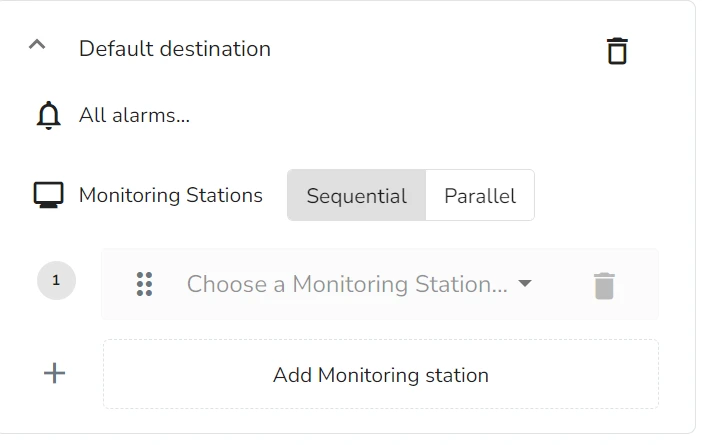
The Default Destination configuration area becomes available:
-
In the Default Destination configuration area, click Add Monitoring Station
-
From the dropdown list of available Monitoring Stations, select a Monitoring Station for your Default Destination
The dropdown list contains Monitoring Stations that a Company Admin user has configured at the global level.
-
(Optional) Click Add Monitoring Station to forward alarms to more than one Monitoring Station by default
-
If you have added two or more Monitoring Stations, select one of the following forwarding options:
- Sequential - if the first Monitoring Station in the list does not respond, evalink talos forwards alarms to the next one in the list
- Parallel - evalink talos forwards alarms simultaneously to all Monitoring Stations in the list
-
Click Save Configuration
Configure Specific Destinations
Unlike the Default Destination, where evalink talos forwards all alarms, Specific Destinations allow you to filter alarms you forward. When you add a Specific Destination, you can configure conditions for the alarms you forward there. Only alarms that match a rule set that you have configured, are forwarded using this Specific Destination.
You don't need to add a Default Destination to be able to add a Specific Destination.
If you add a Default Destination and a Specific Destination, evalink talos forwards all alarms to the Default Destination, except the alarms with conditions defined for the Specific Destination.
If you add only a Specific Destination, evalink talos forwards only alarms that match its specific conditions.
To add a Specific Destination:
-
In the Dispatcher tab of a site, click Add Specific Destination
Specific Destination Configuration area becomes available:
-
In the New Rule area, select a condition based on which evalink talos selects alarms for dispatching:
- Alarms - selection is based on a specific Alarm Definition
- Criteria - selection maps to Zones.
- Alarm code - selection is based on a specific Alarm Code
- Workflow - evalink talos forwards alarms from a specific workflow
- Depending on your choice in previous step, do one of the following, correspondingly:
- For Alarms, select an Alarm Definition from the dropdown list
- For Criteria, select a criterion number from the dropdown list
- For Alarm Code, type the desired alarm code
- For Workflow, type the label name. You need to add the same label to the Send to Monitoring Station workflow step. For details about working with workflow steps, see section Workflow Step Types
-
(Optional) Click Add Alarm to add another alarm forwarding condition configuration
infoYou can have one or several alarm conditions configured for forwarding alarms. evalink talos forwards alarms if they match at least one condition from the configured list.
-
In the Monitoring Station configuration area, click Add Monitoring Station
-
From the dropdown list of available Monitoring Stations, select a Monitoring Station for your Specific Destination
The dropdown list contains Monitoring Stations that a Company Admin user has configured at the global level.
-
(Optional) Click Add Monitoring Station to forward alarms to more than one Monitoring Station
-
If you have added two or more Monitoring Stations, select one of the following forwarding options:
- Sequential - if the first Monitoring Station in the list does not respond, evalink talos forwards alarms to the next one in the list
- Parallel - evalink talos forwards alarms simultaneously to all Monitoring Stations in the list
-
Click Save Configuration
Work with Account Templates
You can use Pebble language to add an Account Template when configuring the Alarm Dispatcher for a Site.
When you add a template, evalink talos uses it instead of the regular site account. If you enter incorrect template information, the regular account is used instead.
The figure below shows the control where you can edit the Account Template:
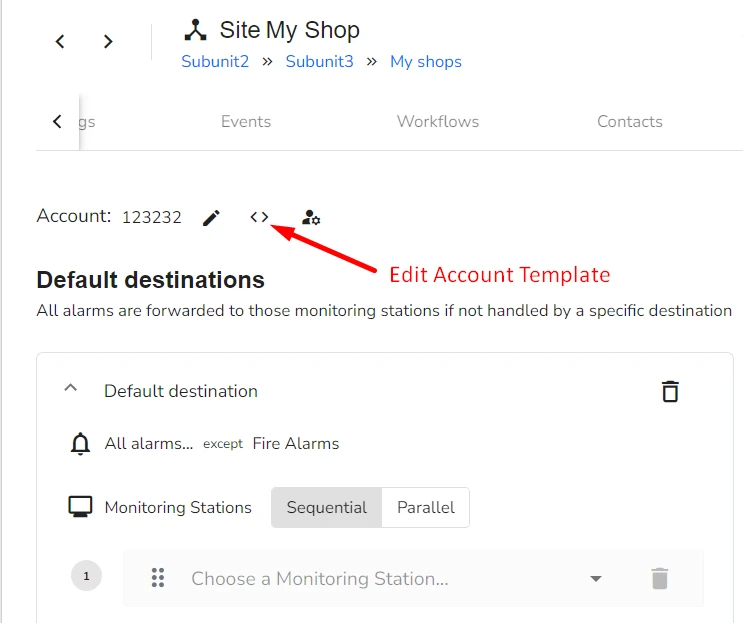
The code sample below adds an Account Template from the payload of an alarm where the original payload can be split:
{{ ((alarm.payload | split('#'))[1] | split('\|'))[0] }
The сode sample below allows you to use the account header as a dynamic account:
{{ alarm.headers['account'] }}
Add Account Overrides
Using account overrides allows you to differentiate what the origin of your dispatched alarms looks like for Monitoring Stations where you send your alarms.
It is useful when you forward alarms to several monitoring stations and want to avoid confusion when they receive alarms with the same account ID.
To add an Account Override:
-
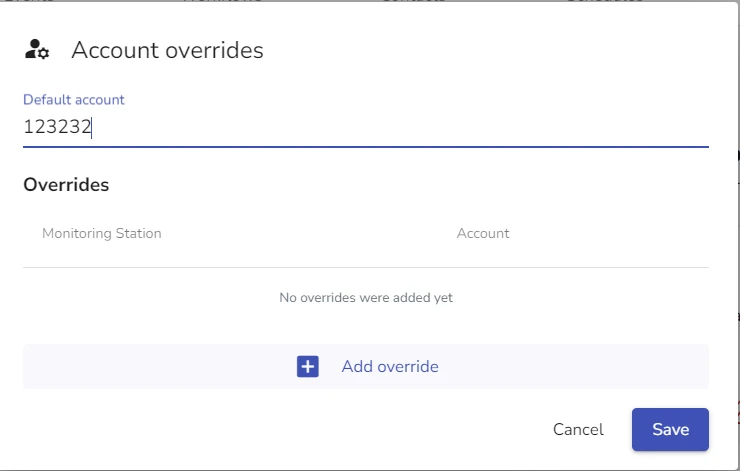
In the Alarm Dispatcher Configuration area of a site, click on the icon to manage Account Overrides
An Account Override dialog opens:
-
Click Add Override
-
From the Add Monitoring Station dropdown list, select a Monitoring Station
-
In the Account field, specify the numeric value for an Account Override
-
Click Save
infoOnce you specify the Account Override, Alarms coming from this Alarm Dispatcher, will be marked with this value instead of a regular Account.
Make sure you don't use conflicting Account values for Monitoring Stations. In this case, you will not be able to save the configuration.
Enabling / Disabling Alarm Dispatcher for a Site
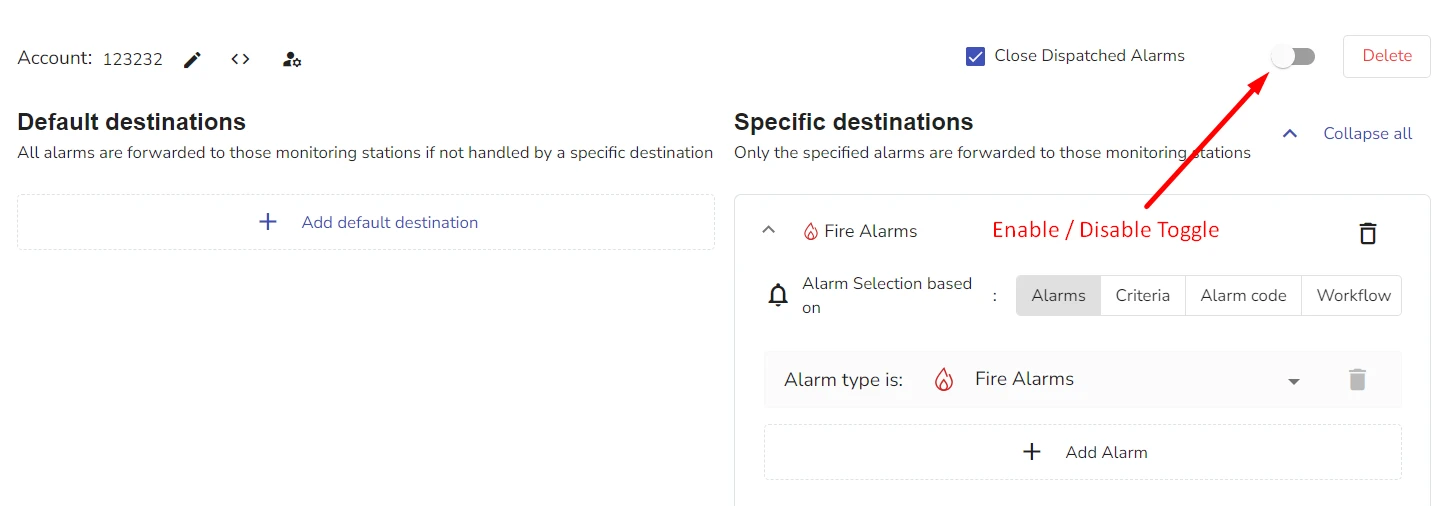
You can disable the Alarm Dispatcher for a site without deleting its configuration permanently. When you disable the Alarm Dispatcher, evalink talos stops forwarding any alarms for this site, regardless of alarm properties.
When the Alarm Dispatcher is disabled, you can still change its configuration by adding or removing Monitoring Stations and setting up Alarm Conditions.
To disable / enable the Alarm Dispatcher, use the Enable / Disable toggle at the top of the Alarm Dispatcher record:
Editing Alarm Dispatcher
Editing the Alarm Dispatcher on a site level means adding, removing or reconfiguring Default and Specific Destinations. Within Default Destinations, you can add or remove Monitoring Stations. Within Specific Destinations, you can add, edit or remove Alarm conditions, add or remove Monitoring Stations.
Use the icons to remove elements from Alarm Dispatcher configuation.
For details on how to configure Default Destinations, see section Configure Default Destinations. For details on how to configure Specific Destinations, see section Configure Specific Destinations.
Delete Alarm Dispatcher
Deleting an Alarm Dispatcher from a site permanently removes all alarm dispatcher configurations for a particular site. It doesn't delete Monitoring Stations that a Company Admin configures globally or any of the Virtual Receive instances and configurations that you can use with an Alarm Dispatcher instance.
To delete the Alarm Dispatcher for a site:
-
In the top right corner of the Alarm Dispatcher record, click Delete
-
Type the deletion confirmation and click Submit
If you do not want to use the Alarm Dispatcher for a site, but want to keep its configuration, use the Disable option.
 Link is copied