Advanced Operations with a Site
Working with Global Site Settings
Admin and Manager users can access and modify global site settings on the Company > Settings > Sites page.
Settings on this page affect all sites of the company and configurations you set up globally become available for all sites.
Site Templates
Site Templates are YAML files with site configurations which you can use to batch-create sites with a certain setup.
You can create Site Templates from scratch, make an existing site into a Site Template or import templates, for example, templates from a site from another company.
Create a New Site Template
To create a new site template:
-
Navigate to Company > Settings > Sites and scroll to the Site Templates pane
-
Click Add Site Template and select New

-
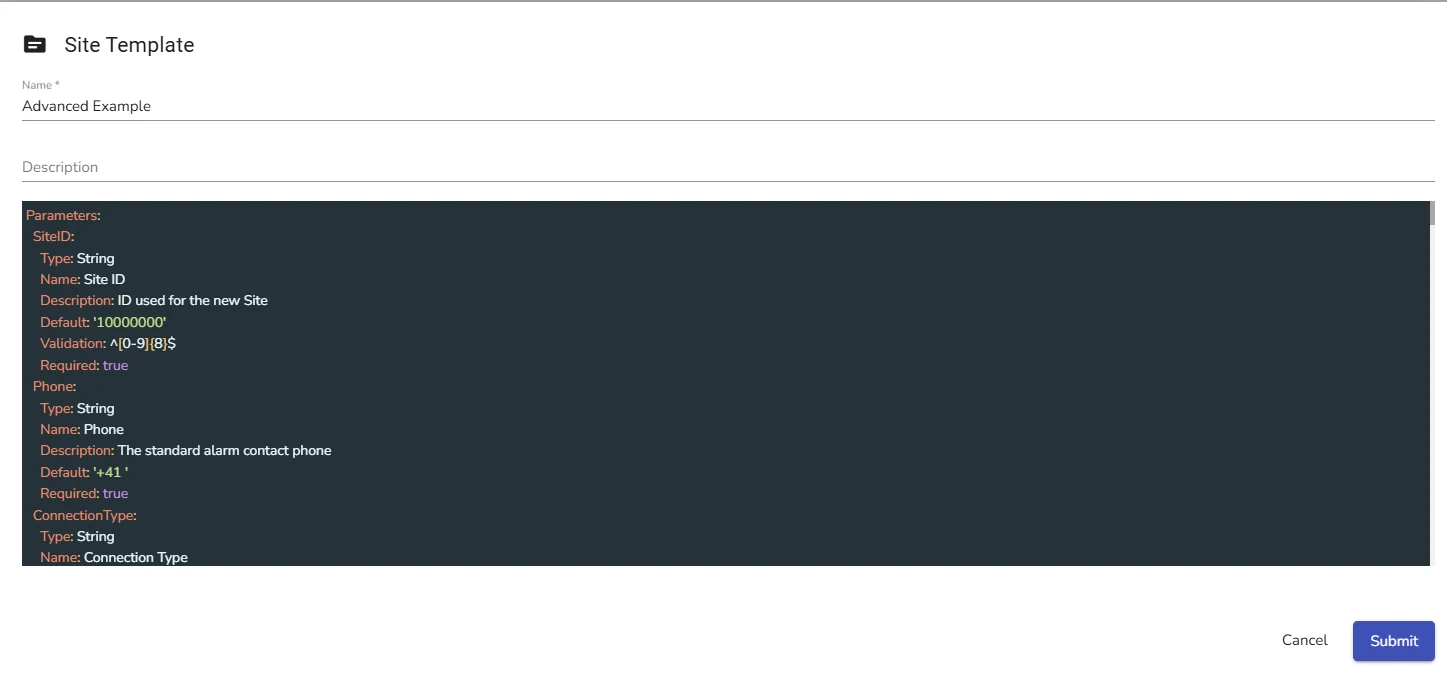
From the template creation dialog that opens, select one of the following template options:
- Basic - offers minimal configuration for a new site
- Best Practices Alarm Connection - adds a default DualPath connection type field
- Advanced Example - adds several advanced options for site configuration, such as alarm dispatcher and API tokens.
-
Click Continue
A built-in template editor dialog opens.

-
In the Name field, specify the name of the new site template
-
In the YAML editor field, alter the template as desired
infoYou can manually add or delete site parameters from the template using YAML markup.
-
Click Submit
A new template appears in the list of templates. You can use it for site creation now.
Import a New Template
-
Navigate to Company > Settings > Sites and scroll to the Site Templates pane
-
Click Add Site Template and select Import
Your file explorer opens.
-
Navigate your file explorer to locate the template file you want to import
-
Select the file and click Open
infoevalink talos continues to import the new template only if you have selected a file in YAML format.
-
Click Submit
Create a Template from Site
You can use one of your existing sites and its configuration to create a template. This is a good option if you don't want to manually add site properties using YAML, but need to implement complex site settings.
To create a template from a site:
-
Navigate to Company > Settings > Sites and scroll to the Site Templates pane
-
Click Add Site Template and select From existing site
-
In the template creation dialog that opens, select a site you want to use as a base from the dropdown list
-
Click Submit
Edit a Site Template
To edit a site template:
-
In the list of templates, locate a site template you want to edit and click on its name

-
The the YAML editing dialog that opens, change the necessary site parameters
-
Click Submit
Export a Site Template
You can export a site template if you wish to edit it outside of evalink talos or import it to another company.
-
In the list of templates, locate a site template you want to export and click on its corresponding export icon
-
Select the file saving options and save the template file to your computer.
Delete a Site Template
-
In the list of templates, locate a site template you want to delete and click on its corresponding delete icon
-
Type the deletion confirmation and click Confirm Delete
Custom Fields
A custom field is a variable that stores information related to a site and can be used in workflows. Custom fields can also be created for site groups.
For example, for a company that monitors vehicles, you can create a License plate custom field. Then, you can specify a License plate number for each monitored vehicle and use it in your workflows.
Custom Fields are created on a global level. After a custom field is created, it appears on the Settings page of all sites (or site groups) created under the Company account.
To configure a custom field:
- Go to the Company > Settings > Sites
You can go to this page directly from the Settings page of a particular site (or site group) by clicking on the Configure shortcut in the Custom Fields area of the page.
-
On the Company > Settings > Sites page, click Add Custom Field
-
In the dialog that opens, specify:
- Name – the custom field ID to be used by evalink talos internally
The name can contain only letters and numbers. It is recommended to follow the best practices used for programming language variables, such as lowerCamelCase: testRecord, invoiceNumber, etc.
- Type – determines what type of data is stored in the field
You can the select one of the following:
-
Text – the value can contain any character, including letters, digits, and keyboard symbols
-
Number – the value can contain whole numbers – positive, negative, or zero
-
Select One – one value from the list can be selected
-
Select Multiple – multiple values from the list can be selected
When you select an enumerated type (Select One or Select Multiple), an Option field appears at the bottom of the dialog. To add more options to the list, click the Add Option button.
-
Display – the custom field name to be displayed in evalink talos UI
-
Scope – determines if the custom field value is set for sites only or for site groups only
-
Sites (the default option)
- the custom field is offered for filling on the Settings page of each site
- the value of the custom field (if set) is displayed on the Overview page of the site
-
Site Groups
- the custom field is offered for filling on the Settings page of each site group
- the value of the custom field (if set) is displayed on the Overview page of each site that is included into the group and on the Overview page of the site group itself
-
(Optional) Validation pattern – an expression for user input validation
The custom field value must match the validation pattern value. Validation pattern follows regular expressions syntax. For example, the ^[0-9]*$ expression allows entering only numbers in a custom field.
Validation patterns can only be configured for Text and Number types of custom fields.
-
(Optional) select the Public checkbox to include custom field information in PDF and email reports
-
(Optional) select the Operator checkbox to display the custom field to the Operator
Operator will see custom fields for a site on the operator Workflow page when processing an alarm
- (Optional) select the Hidden checkbox to hide the custom field value from the Overview pages of the concerned sites or site groups
This option is useful for storing sensitive information.
- Click Submit
By default, custom fields are displayed on the site / site group Settings and Overview pages in the order in which they were added. To reorder custom fields, go to Company > Settings > Sites page and move the custom fields as desired by clicking on and (arrow) buttons to the right of each custom field.
Name and Type of an existing custom field cannot be edited.
To be able to delete a custom field on the Company > Settings > Sites page, first erase all the custom field values specified for all sites / site groups.
Working with Site Types
Site types allows you to assign a specific alarm severity configuration to sites or specify important site comments for operators.
Adding a Site Type
-
Go to the Company > Settings > Sites
-
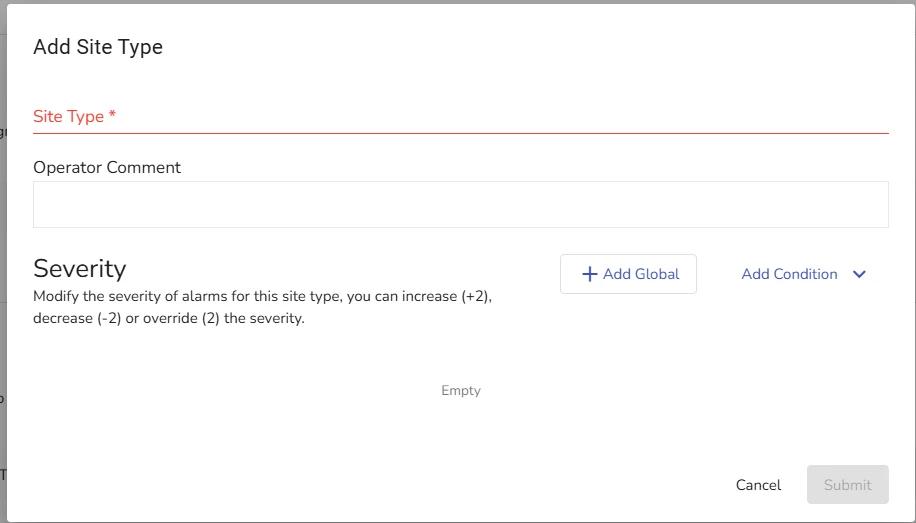
Scroll to the Site Types area and click click Add Site Type

-
In the Site Type field, specify the name of the new site type
-
(Optional) In the Operator Comment field, add a comment for operator describing the site type
-
Set up specific and / or global alarm severity:
- Add a global alarm severity for evalink talos to apply this severity level to ALL alarms on this site
- Add a specific alarm severity by specifying particular Alarm Types and / or Event Codes
You can add a combination of a global severity value for a site and specific severity values for particular alarms.
When you have a global severity value in place and have specified particular severity for specific alarms, alarm-specific configuration overrides the global severity.
- Click Submit
After a site type is added, you can assign it to new or existing sites.
Edit a Site Type
To edit a Site Type:
-
Go to the Company > Settings > Sites
-
Scroll to the Site Types area and click on the site type record you want to edit
-
In the Site Type dialog that opens, edit the site type configuration as desired
-
Click Submit
Delete a Site Type
To delete a Site Type:
-
Go to the Company > Settings > Sites
-
Scroll to the Site Types area and click on the Delete icon next to the site type record you want to delete
-
Type deletion confirmation and click Delete
Adding Countries and States
If a Country and / or State you need to attribute a site to isn't present in the standard evalink talos list, you can configure custom countries and states in the Company > Settings > Sites tab.
Once you add custom countries and / or states, they become available for selection when you create or edit a site.
Adding a custom configuration of countries and states makes the default evalink talos list of countries and states unavailable to you.
Working with Overall Site Status
The overall site status, as opposed to its functional status (see section Work with Site Statuses), is the general operational status of the site. The overall status can be one of the following:
-
Active (the default status) – a status in which the site can receive alarms
-
Inactive – a status in which the site cannot receive alarms, all incoming alarms for it are rejected by evalink talos
The overall site status is displayed on the Overview page of a site, in the Site Status area. To access the page, go to the Sites page and click on the site name in the list. If the site status is changed to Inactive, a warning message Device is Inactive, evalink talos will reject Alarms is displayed.
Only Administrator or Manager can change the overall site status.
Change the Overall Site Status
The site status can be changed on the Overview page of a site:
-
manually, when necessary
-
automatically, by setting a timer for activation and / or deactivation
To change the status of a site:
-
On the Sites > [site] > Overview page, click the Change button
-
In the Change Status dialog that opens:
-
to change the site status immediately, check or uncheck the Active option
-
to set a timer for the status change
a. Click Add in the Activation Date area and / or in the Deactivation Date area, accordingly
b. Specify the date and time for the activation / deactivation
- Click Submit
If you need to activate or deactivate a site periodically, consider using Activation / Deactivation alarms for this purpose. For details, see section Manage Sites > Edit the Site Settings, the Special Alarms pane description.
When the site status is changed, a Deactivate Device or an Activate Device event appears on the Event Logs page of the site, site group, and in the global Event Logs.
Shareable Site Links
Sharing a site allows you to create links to a site on your tenant that you can share with other users who do not belong to your tenant.
You can configure the set of permissions for each shareable link, including viewing and / or management permissions.
When someone opens your site using a shared link, they don't have to log into evalink talos and will not view any other information from your tenant, such as Company, Alarms, Events.
You can create multiple shareable links for the same site using different access and peermission configurations. All shareable links that you create are displayed on the Share subpage for each site.
You can share Regular Site Groups in a similar way.
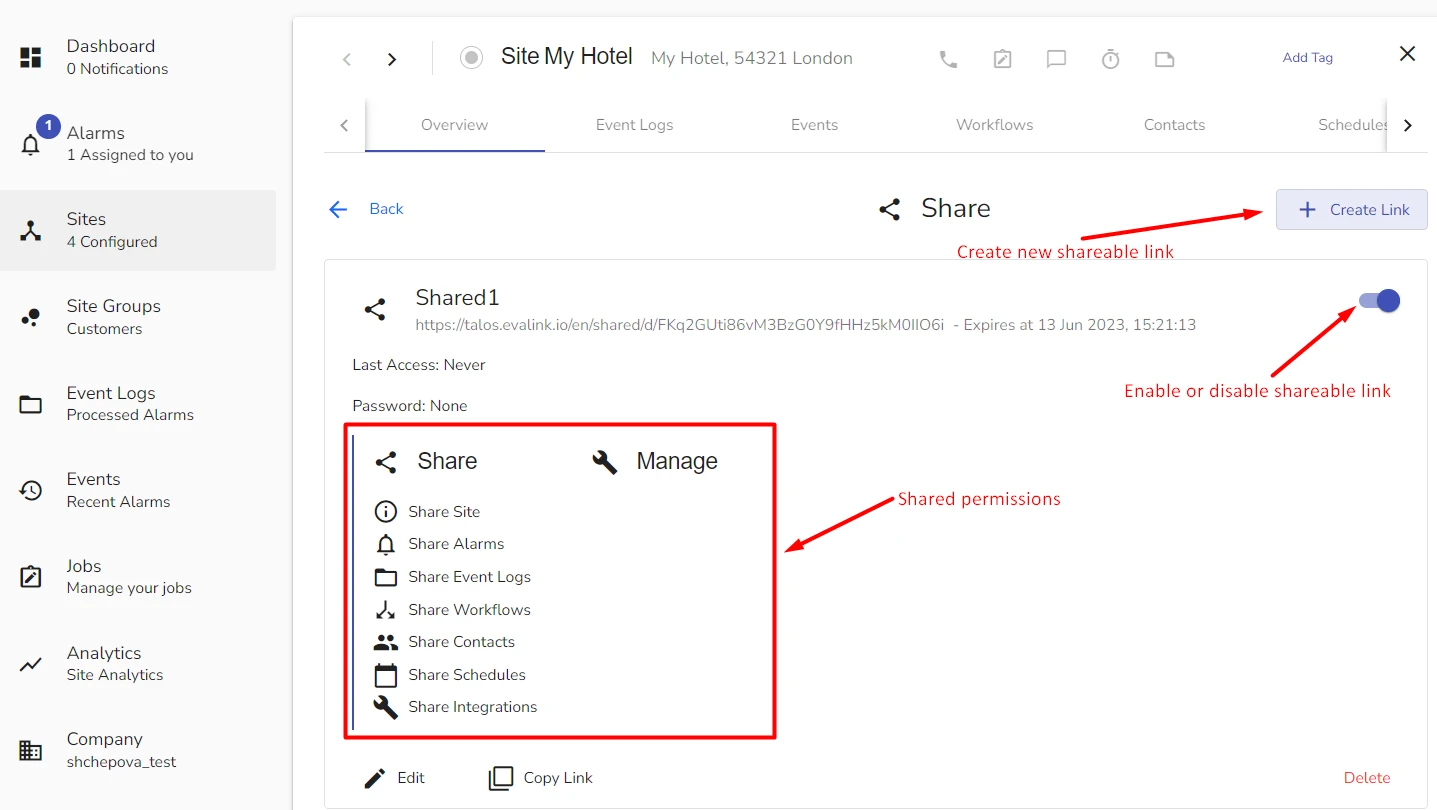
The figure below shows a record of a shareable link to a Site:

Each shareable link record includes:
-
The link itself and its expiration date, if applied
-
Information about the last time it was used for access
-
Password, if any
-
Enable / Disable toggle
When you disable the link using the toggle, the record is marked as Disabled
-
Permissions, configured for the link
-
Edit, Copy Link and Delete controls
Create a Shareable Link
To Create a shareable link:
-
Navigate to the site or a Site Group you want to share
-
In the Overview page of a Site or a Site Group, click Share
-
In the Share subpage, click Create Link or Share Site / Share Site Group.
infoThe Share Site / Share Site Group button is available only if you have no shared links for this site or Site Group. If there's at least one shareable link record, use the Create Link option.
The Site Sharing dialog opens:
-
In the Site Sharing dialog, fill out the following fields:
-
Description - a few words describing the link
-
Password - a password a user with a link has to enter for access
-
Test Type - select a test type for the shared site.
For details about Test Types, see section Working with Test Types
-
Check / Uncheck the permissions that you want the user with the link to have in Share and Manage fields
infoThe Share permission list allows users with the link to view information about the site or Site Group.
The Manage permission list allows users with the link to change information about the site or Site Group.
-
-
Select the expiration option for your link
-
Click Submit
Edit a Shareable Link
To edit a shareable link:
-
Go to the site or Site Group Overview > Share
-
For the desired shared link record, click Edit
-
Edit the shareable link as desired
-
Click Submit
Delete a Shareable Link
Deleting a shareable link immediately revokes any access to your site or Site Group through this link. If a user with a link has your site opened at the moment when you delete a link, evalink talos still lets you delete a link. The user with an opened site or Site Group will not be able to save any changes they have made.
The moment they try to save changes or refresh the page, they receive an error message.
To delete a shared link:
-
Go to the site or Site Group Overview > Share
-
For the desired shared link record, click Delete
-
Type the delete confirmation
-
Click Submit
Assign a Service Company to a Site
Service Companies can act like contact, schedule and workflow databases that you can assign to a particular site or to multiple sites instead of managing repeatedly used contacts or similar workflows and schedules for each separate site.
For more details about Service Companies, see section Working with Service Companies.
To assign a Service Company to a Site:
-
Navigate to Sites > [Site] > Settings
-
In the Site pane, select the Service Companies you want to assign to the site from the Service Companies field
-
Click Save
The Service Companies you have assigned to the site are shown in the Overview tab for your site, grouped by their type.
 Link is copied