Manage Alarm-Related User Settings
Working with Test Types
Test Types are work environment configurations that allow working in a test mode for a designated period of time on a particular site. In this case evalink talos treats alarms from this site differently: they are either marked as test or not shown on user dashboard at all, depending on configuration.
When a Test Type is added to a User Type, it becomes available to operators of this User Type to be used in tests. After this, operators can enable tests on sites that are available to them according to their Test Type settings.
Only Administrators can add and modify Test Types.
By default, a Test Type named System is available in evalink talos.
You can view a list of all Test Types for your company on the Company > Settings > Sites subpage.
The figure below shows a list of Test Types:

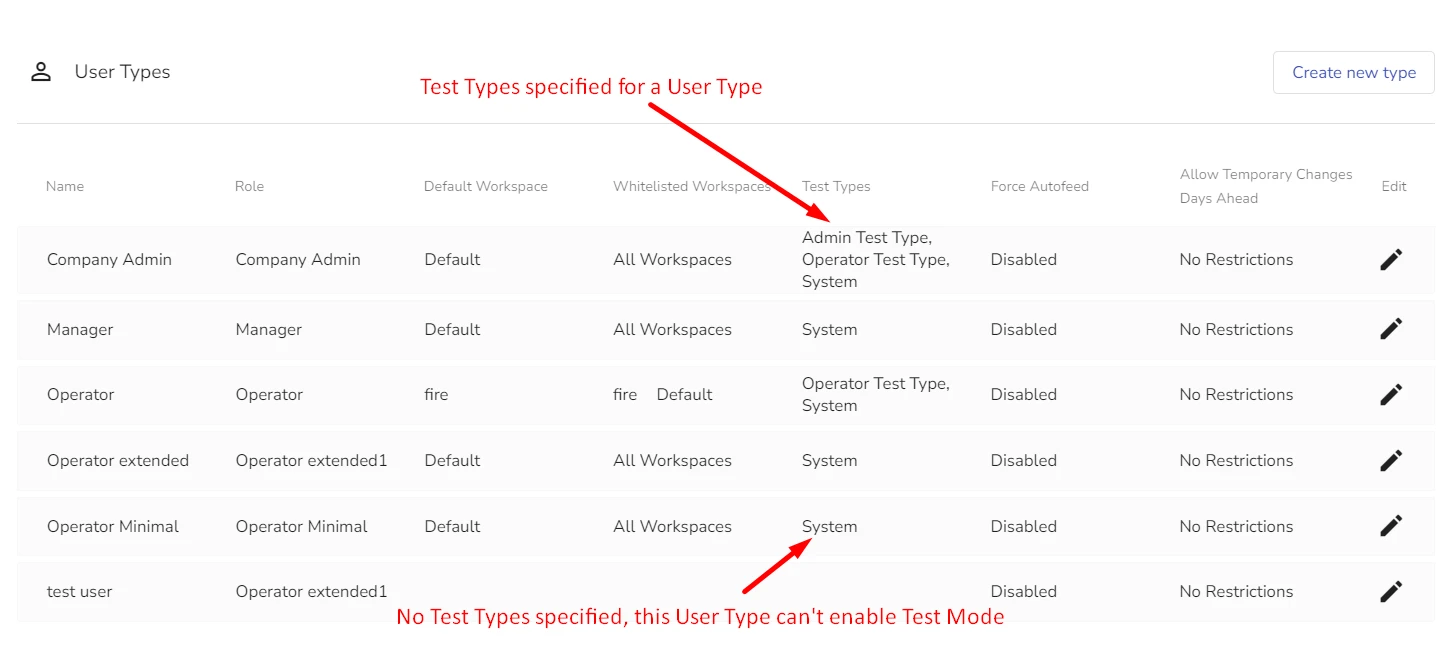
The figure below shows how Test Types are shown in User Type records on the Company > Settings > Users page:

Create a Test Type
To create a new Test Type:
-
Navigate to Company > Settings > Sites
-
Scroll to the Test Type area and click the Add Test Type icon
A Test Type configuration window opens.
-
In the Name field, type a new Test Type name
This field is obligatory.
-
(Optional) In the Max Duration field, enter the maximum duration time of your test and select measurement units from the Unit dropdown
infoThe Max Duration field accepts only numerical values.
If you specify the value for the Max Duration field, but do not specify the units (seconds, minutes, hours, days or weeks), evalink talos allows you to save the new Test Type, but it will save the Max Duration field as empty.
-
(Optional) In the Default Duration field, enter the default duration time of your test and select measurement units from the Unit dropdown
infoThe Default Duration field accepts only numerical values.
If you specify the value for the Default Duration field, but do not specify the units (seconds, minutes, hours, days or weeks), evalink talos allows you to save the new Test Type, but it will save the Default Duration field as empty.
-
(Optional) In the Alarm Code field, specify the code of the alarm that evalink talos sends when the test is finished
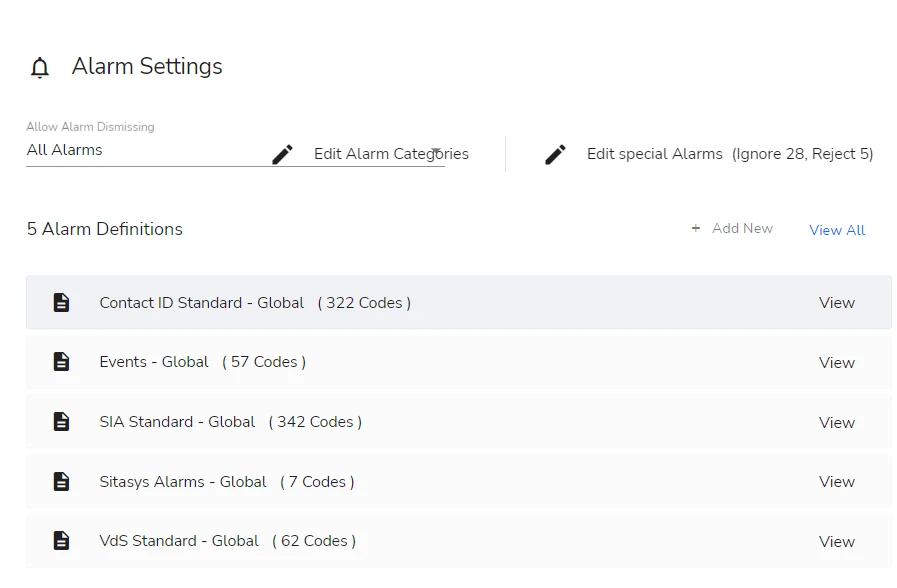
You can use any of the pre-defined standard alarms listed in the Company > Settings > Alarms page in the Alarm Settings area:

-
(Optional) In the Alarm Message field, type the alarm message that evalink talos sends when the test is finished
-
Specify one or several of the following conditions for the Test by checking a corresponding checkbox:
-
Always Trigger Alarm: when checked, evalink talos triggers an expiration alarm always, even when the test is manually deleted
-
Allow Full Test: when checked, users can create non-specific tests where any alarms coming from site running in test mode will be treated as test alarms
-
Pass-through Tests: when checked, evalink talos does not suppress test alarms and shows them on a user's dashboard
-
Pass-through Mode: when you select Close, after a pass-though alarm is processed, it's automatically closed. When you select Open, it is brought back to the operator User Interface, with a test flag.
-
-
(Optional) Enable or disable the Set Test Flag checkbox
When this option is enabled and this test mode is active, monitoring stations receive alarms with a test flag and do not treat them as real alarms.
-
(Optional) Enable or disable Send to Monitoring Stations in Parallel checkbox
When this option is enabled and if the Alarm Dispatcher is configured for a site, during a pass-through test Alarms are sent to respective monitoring stations in parallel.
- Click Submit
After you have configured a custom Test Type, you can now add it to User Types, both preset and custom.
For details on how to configure User Types, see Manage User Settings > Create a New User Type.
Editing a Test Type
You can edit any Test Type, regardless of whether it is default or custom, whether it is assigned to any User Types and particular users or not.
To edit a Test Type, click Edit next to a Test Type record on the Company > Settings > Sites page and then edit the fields accordingly.
For details on Test Type configuration, see section Create a Test Type above.
Deleting a Test Type
You can delete any custom Test Type, regardless of whether it is assigned to any User Types and particular users.
When you delete a Test Type that is used in a User Type and by particular users, it simply disappears from the User Type record and becomes unavailable to users.
You can't delete the default System Test Type.
To delete a custom Test Type, click Delete next to a Test Type record on the Company > Settings > Sites page and type the delete confirmation.
Working with Workspaces
Workspaces are sets of configurations that allow to set up a customized working environment. Workspaces use alarm channels to distribute and direct alarms with the help of rules and conditions. It helps to create more effective alarm distribution between every operator who works with evalink talos on your tennant.
Only Administrators can create and edit Workspaces.
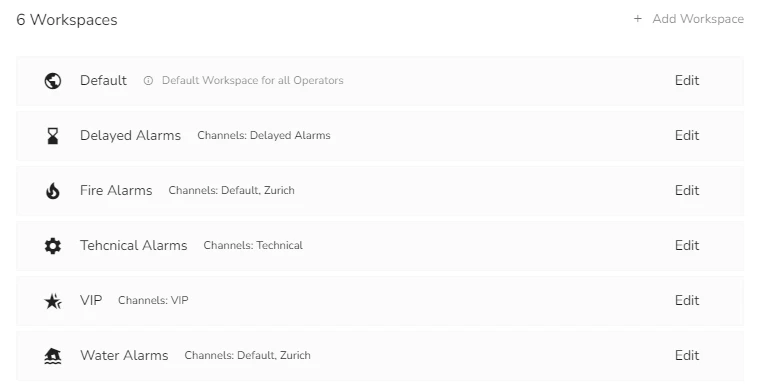
You can view a list of all Workplaces on the on the Company > Settings > Alarms subpage.
The figure below shows a list of available Workspaces:

For details on configuring Workspaces for a User Type, see section Manage User Settings > Create a New User Type.
Default Workspaces
A Default Workspace is the Workspace that is available to a user upon login. Administrators assign a default Workspace to a particular User Type, and after that all users of this User Type will be taken to that Workspace when they log in. They can later change their Workspace manually.
You can select a Default Workspace only from the list of Whitelisted Workspaces for a particular User Type.
Note that there is a difference between a preset Workspace named Default and a default Workspace assigned to a User Type. They may or may not be the same.
Any Workspace can act as a default one for any User Type. It is set by Administrator.
A preset Workspace named Default is pre-configured in evalink talos and is available to all operators. It includes all alarm channels which means no filter is applied to incoming alarms and an operator sees all alarms on their dashboard. This Workspace acts as default for custom User Types if you left the Workspace fields (Default and Whitelisted) empty in User Type configuration. It is also used by default in all preset User Types.
Whitelisted Workspaces
Whitelisted Workspaces are the Workspaces that Administrator makes available to users of a particular User Type. When you whitelist a Workspace for a User Type, it becomes available for selection to all users of this User Type.
Whitelisted Workspaces are set up by Administrator when configuring a new or editing an existing User Type. The Whitelisted Workspaces is not an obligatory field in User Type configuration, but if you set it, you also have to select a default Workspace from the Whitelisted ones.
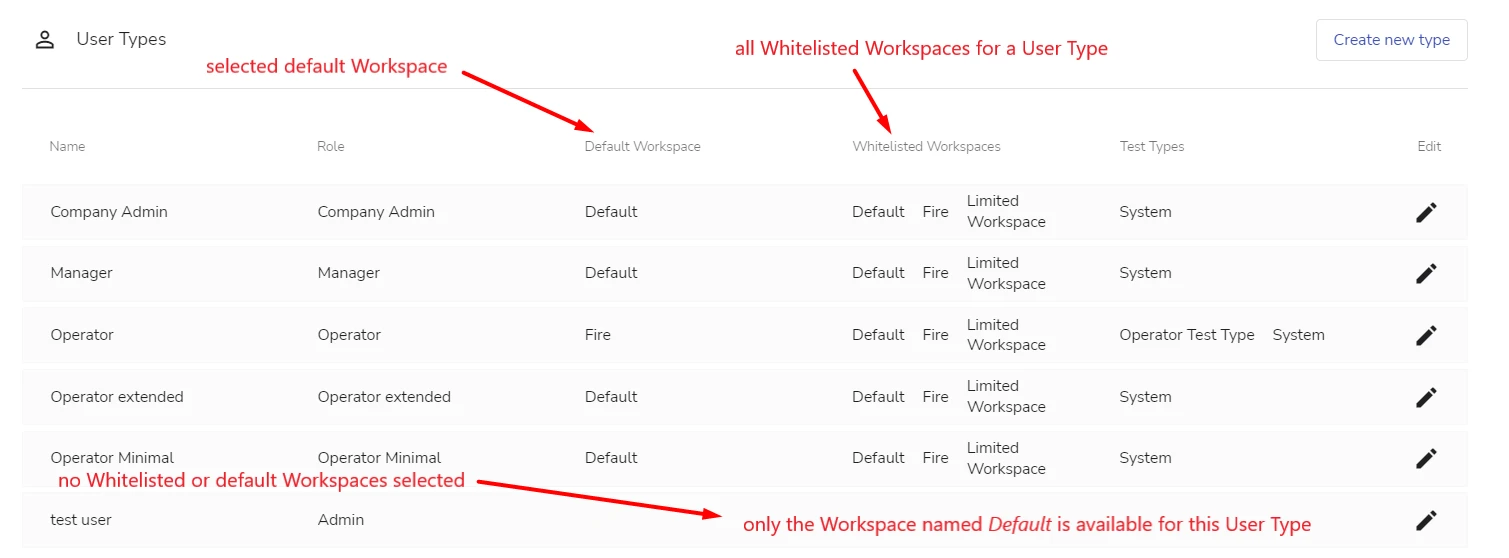
The figure below shows how Workspaces are shown in User Type records on the Company > Settings > Users page:

Any user working with evalink talos can view the list of Whitelisted Workspaces available to them and switch between them. The currently used workspace is shown in the top-right menu bar of every page in evalink talos. Clicking on the icon you can access a list of all workspaces available to you and select another one:

If only one Workspace is whitelisted for a user, this option is disabled and not shown in the top-right menu bar.
Create a New Workspace
To create a new Workspace:
-
Navigate to Company > Settings > Alarms
-
Scroll to the Workspaces area and click Add Workspace
A Workspace configuration dialog opens:
-
In the Add Workspace configuration dialog, fill out the Name field
The Name field is obligatory.
-
Type the name of the material icon to stand for your new Workspace
infoYou can see the list of supported standard material icons if you follow the link in the Add Workspace configuration dialog.
Use only lowercase letters to enter a name for an icon and a low dash between the words if your desired icon has more than one word in its name.
For example, type favorite_border for a Heart icon.
The icon you add appears next to the Workspace name in the Company > Settings > Alarms > Workspaces list and in the upper right user menu when this Workspace is selected.
-
From the Alarm Channels dropdown menu, select Alarm Channels for your new Workspace
coming soonDetails about how to configure Alarm Channels will be added in future documentation releases
-
(Optional) Alternatively, check the All Channels checkbox to make all configured Alarm Channels available for this Workspace
-
Click Submit
Edit a Workspace
To edit a Workspace:
-
Click Edit next to a Workspace record
-
Edit the Workspace details as desired
For information about configurable Workspace details, see section Create a New Workspace above.
infoAll fields are editable for a custom Workspace.
For a preset Workspace named Default, you can edit the icon and included Alarm Channels, but cannot change its name.
-
Click Submit
Delete a Workspace
You can delete any Workspace except for the one named Default.
To delete a custom Workspace:
-
Click Edit next to a Workspace record
-
In the Edit Workspace configuration dialog that opens, click Delete and type confirmation
-
Click Confirm Delete
There are no limitations on deleting custom Workspaces.
If you delete a Workspace that was whitelisted for a particular User Type, it will be removed from the Whitelisted Workspaces for this User Type.
If you delete a Workspace that was set as default for a particular User Type, the Default Workspace field for this User Type will be made blank and a Workspace named Default will act as default.
 Link is copied