Work with Partitions
Configuring zones in evalink talos is optional, by default, the Partitions subpages of all sites are empty. Partitions are configured manually by Administrator or Manager.
For details on how partitions created in evalink talos can be used, see section Overview > Explicit Zones and Partitions.
In evalink talos, zones and partitions, which can be interrelated in the real world (for example, zone A may be included in partition B) are configured independently on two separate subpages of a site – the Zones & Users and Partitions subpages, accordingly. A particular zone is associated with a partition in the alarm details only.
The Partitions Subpage
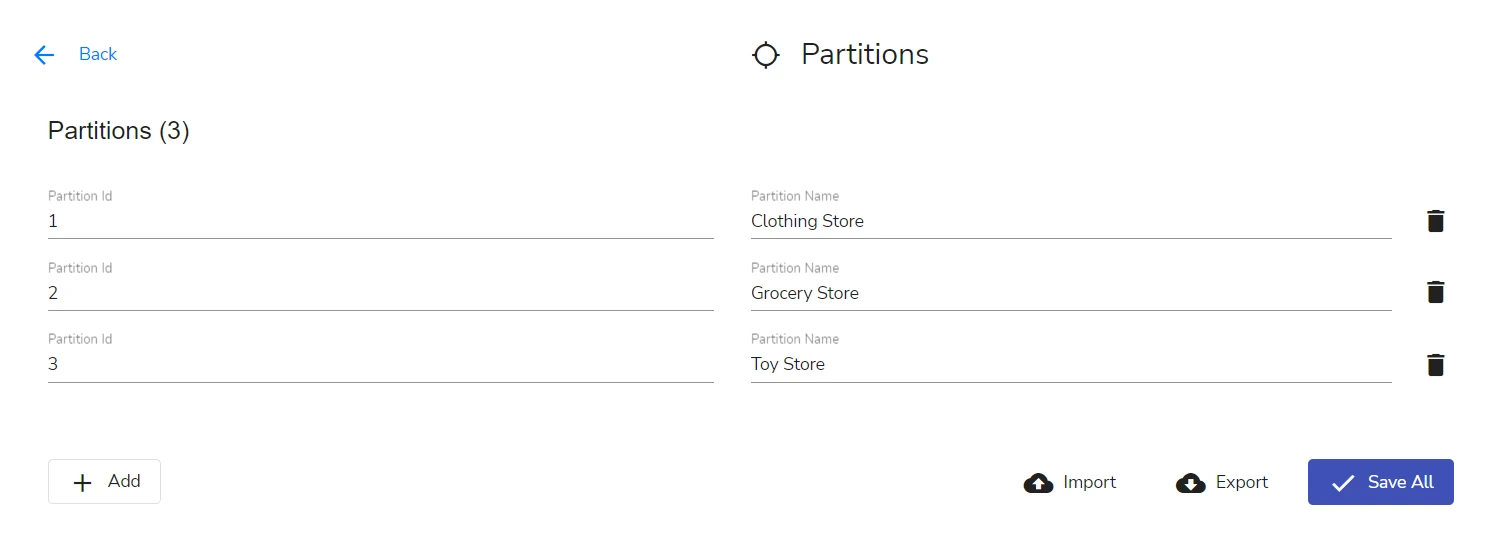
You can view the list of partitions created for a site on the site Partitions subpage.
To open the Partitions subpage:
-
Go to Sites, click the name of a particular site
-
On the site Overview page that opens, scroll down and click the Partitions button in the central part of the page
By default, no partitions are configured for a site. Only Administrator and Manager can create partitions.
See below an example of a Partitions subpage with partitions configured for a shopping mall area.

The list of zones configured for all partitions can be viewed on the Zones & Users subpage, see an example in section Work with Zones > The Zones & Users Subpage.
Operations with Partitions
The operations below are performed on the Partitions subpage, see section The Partitions Subpage for details on how to access the subpage.
Create a Partition
To create a partition:
-
Click the Add button
If no partitions have been created yet, click the Add first Partition button in the central part of the page.
The new entry appears in the list.
-
Specify the ID for the partition in the Partition Id field
The format of partition ID depends on the reason why the partition is created:
-
if partition ID is used to add a partition name
The ID is a numeric value that corresponds to the partition ID that was configured on a particular transmitter. The ID must be unique across all partition IDs on the page.
Leading zeros in the Partition Id field are ignored by evalink talos, see section Global Zone and Partition Settings > Remove Leading Zeros from Zones and Partitions.
-
if partition ID is used in Criteria Mappings only
The value set in this field is displayed in the resulting alarm that is reported, dispatched, or sent for further processing, it is not used for matching real incoming alarms. Therefore, you can set an arbitrary numeric value.
-
-
Specify the human-readable name for the entry in the Partition Name field
-
Click Save All
Repeat the procedure above to create all the partitions you need.
When changes are applied, the Save All button becomes inactive, indicating that there are no unsaved changes on the page.
Import Partitions from Another Site
You can import partitions from a file. To do so, you first need to obtain a CSV file with partitions in evalink talos format – you can do so, for example, by exporting zones from another site. For export instructions, see section Export Partitions.
To import partitions from a file:
-
On the Partitions subpage, click Import
-
In the system dialog that opens, locate the file you wish to import, select it, and click Open
All entries from the file are added to the list.
If at least one Partition Id in the imported file duplicates a Partition Id already present on the page, the import fails. The Partition Name field values can duplicate.
If you choose to edit the file before importing, make sure to save it in CSV format with a comma (,) delimiter.
Edit a Partition
To edit an entry:
-
On the Partitions subpage, modify the fields as desired
To edit the Partition Id and Partition Name fields, place your mouse cursor into the field and start editing.
-
Click Save All
Delete a Partition
To delete a partition, click the delete button for it in the list.
The partition is deleted permanently without a confirmation dialog.
Export Partitions
To export the list of partitions, click Export.
The list is exported as a CSV file with a name [Site name]-partitions. Click here to download an example.
 Link is copied