Workflow Incoming Conditions and Workflow Comment
Users with Operator permissions have read-only access to the workflow incoming conditions and to the workflow comment. To these users, the details below are provided for informational purposes.
The operations and settings described in this section are available in the Incoming Alarm step of the workflow (see section Workflow Step Reference > Incoming Alarm Step).
Workflow Incoming Conditions
The incoming conditions of a workflow are the conditions according to which an incoming alarm is matched to the workflow in order to be automatically assigned to it.
By default, no conditions are set for a workflow.
Condition Blocks
It is possible to select incoming conditions from the When all of ... and the And one of ... condition blocks.
Both condition blocks offer the same set of conditions for selection, but the way these conditions are combined with other conditions inside the block differs:
-
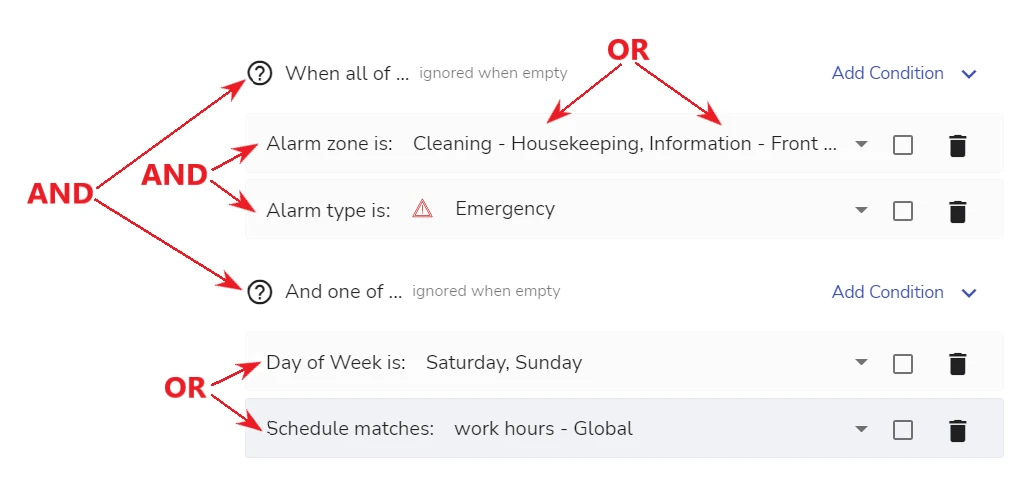
the When all of ... list is used to select the conditions that must be present together for an alarm to match. The conditions in this group have AND logical relationship with each other
-
the And one of ... list is used to select the conditions that complement the conditions in the previous block. At least one of these conditions must be present for an alarm to match. The conditions in this group have OR logical relationship with each other
The relationship between the two blocks is AND. This means that an alarm matches when it has all conditions from the When all of... list and at least one condition from the And one of ... list.
If a block of conditions (When all of ... or And one of ...) is empty, it is ignored.
Conditions and Condition Values
Conditions
The figure below shows a full list of conditions available for selection for a site-level workflow:
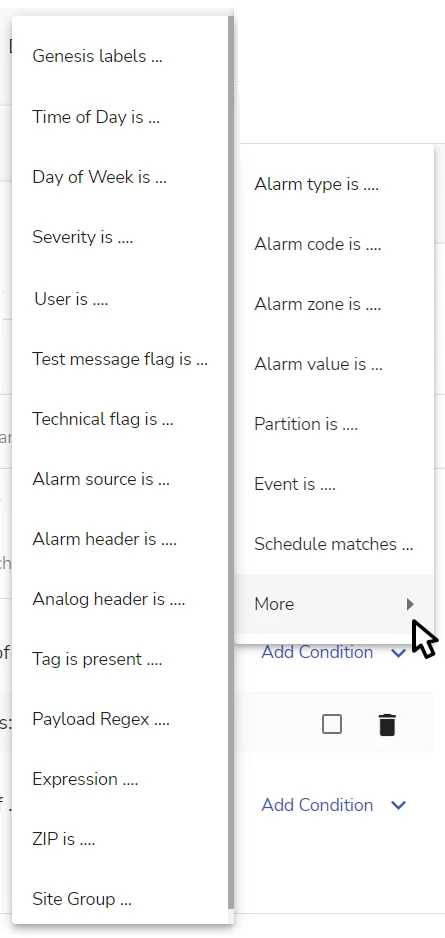
Clicking on Add condition opens the list of most commonly used conditions. You can view the full scope of available conditions by clicking on More .
Condition Values
The figure below shows an example of configured incoming conditions with values set:
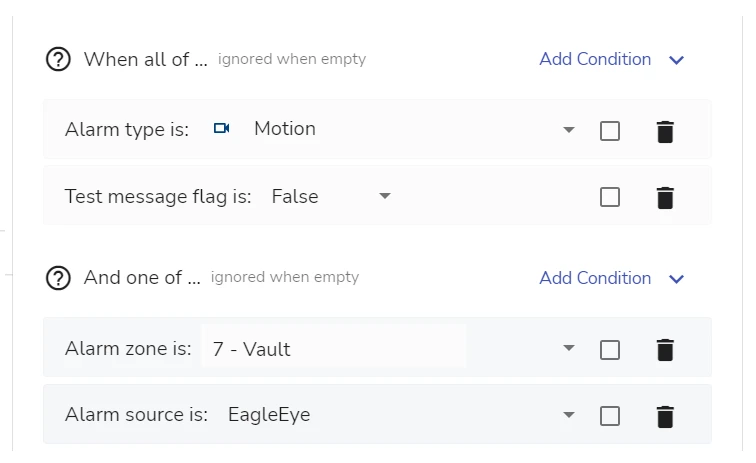
To match the workflow in the example above, an alarm must have:
-
Motion alarm type
AND
-
Test message flag set to false
AND at least one of the following parameters
-
zone 7 – Vault
OR
-
EagleEye camera as alarm source
-
Conditions can accept different types of values. There are:
-
conditions that require selecting value(s) from the list
Such conditions can be categorized into:
- conditions with a single-selection list – for example, Alarm type is ... (see the figure below)
- conditions with a multiple-selection list – for example, Alarm zone is ... (on the figure below), Partition is ...
In the example above, an alarm will be considered a match if it arrives from either zone 1- Main office space or zone 2- Reception.
-
conditions that accept arbitrary alphanumeric values
For such conditions, values are entered manually. Examples of such conditions are Alarm code is ..., ZIP is ..., Payload Regex ....
Such conditions can be categorized into:
-
conditions that support entering multiple values separated by a comma – for example, the Alarm code is ... condition (see the figure below)
In the example above, an alarm is considered a match if the alarm code is either 350, 351, or 352.
-
conditions that allow entering a single value only – for example, the Payload Regex ... condition
-
The figure below illustrates the overall relationship between condition blocks, the conditions inside the blocks, and between the values set for a condition:
Using Special Characters in a Condition
Conditions accept the use of special characters * and ?
-
*stands for any number of any charactersFor example, setting the value to
Zone*means that this condition covers all values that start withZone, likeZone101orZone Laundry Room -
?stands for any single charactersFor example, setting the value to
Zone?means that this condition covers values likeZone1orZoneA.
For more information on the use of special characters, see section Alarm Expression Syntax > Wildcard Use.
Negating a Condition
A condition can be negated – which means that any value except the specified value is considered a match.
A condition can be negated by selecting the Invert checkbox near the condition (see the figure below):
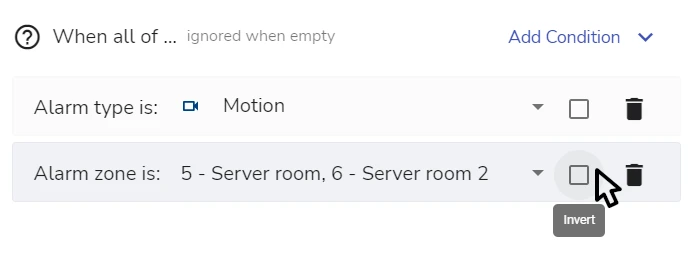
The result looks as follows:
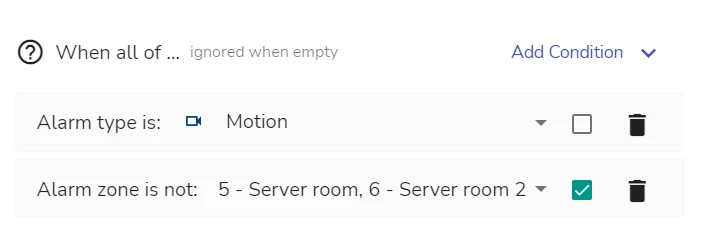
In the example above, an alarm is a match if:
-
it is of type Motion
AND
-
it comes from any zone other than 5 – Server Room or 6 – Server Room 2
Set Incoming Conditions for a Workflow
The procedure (see the figure below) is the same for all types of workflows and for workflows created on any level:
To set the incoming conditions for a workflow:
-
Go to the corresponding Workflows page (see section Operations with a Workflow > Work with Workflows > Workflows Pages and Types of Workflows Available)
-
Open the workflow
-
In the Incoming Alarm step (the first step of the workflow, opened by default)
a. Click on the Add Condition arrow in the corresponding condition block (When all of... or And one of...)
The list that is displayed can be expanded further by clicking on the More option.
b. Select a condition from the list and set a value for it
For example, click on the Alarm code is ... condition to add it to the list, and then enter the alarm code value (for example, 114) in the Alarm code is: field that appears (see the figure above).
For explanations about combining the conditions from the two condition blocks and setting condition values, see sections Condition Blocks and Conditions and Condition Values.
Some conditions also support using alarm expressions. For example, for the Alarm code is ... condition you can set F* to support FA, FR, and other alarm codes starting with F, and 12? to support all three-digit codes that start with 12. For details on using alarm expressions and wildcards, see section Advanced Features in evalink talos > Alarm Expression Syntax.
To set a negation for a condition (see section Negating a Condition), select the Invert checkbox next to the condition.
To delete a condition from a block, click the Delete icon next to the condition.
c. Repeat steps a. and b. to select and configure all the necessary conditions
- Click Save

For instructions on adding further steps to the workflow, see section Work with Workflows Steps > Manage Steps.
For instructions on configuring workflow settings, see section Work with Workflow Settings.
You can enable the auto-save option (see section Work with Workflow Settings > Enable the Auto-Save Option) to avoid manually saving the workflow after each change.
Override Incoming Conditions for a Managed Workflow Linked to a Site
It is possible to set custom incoming conditions for a Managed Workflow after it is linked to a site, see the figure below:
This operation can also be performed while linking a Managed Workflow (see section Add a Workflow > Override the Workflow Incoming Conditions or Not).
To set custom incoming conditions for a Managed Workflow after it is linked to a site:
-
Go to the Workflows page of the site (Sites > [site] > Workflows)
-
Open the linked Managed Workflow
-
In the Incoming Alarm step (the first step of the workflow, opened by default)
a. Set the Custom conditions checkbox
If a Managed Workflow was linked without overriding the incoming conditions (see section Add a Workflow > Override the Workflow Incoming Conditions or Not), the checkbox is not set by default.
b. Set the incoming conditions as desired
For incoming conditions settings tips, see section Set Incoming Conditions for a Workflow.
- Click Save

The original incoming conditions of a linked Managed Workflow can be restored at any moment later by unsetting the Custom conditions checkbox.
Workflow Comment
Each workflow provides a comment – a text field with a basic rich text editor (see the figure below).
In a Manual Workflow, the comment can be used to provide instructions to the person who processes the workflow:
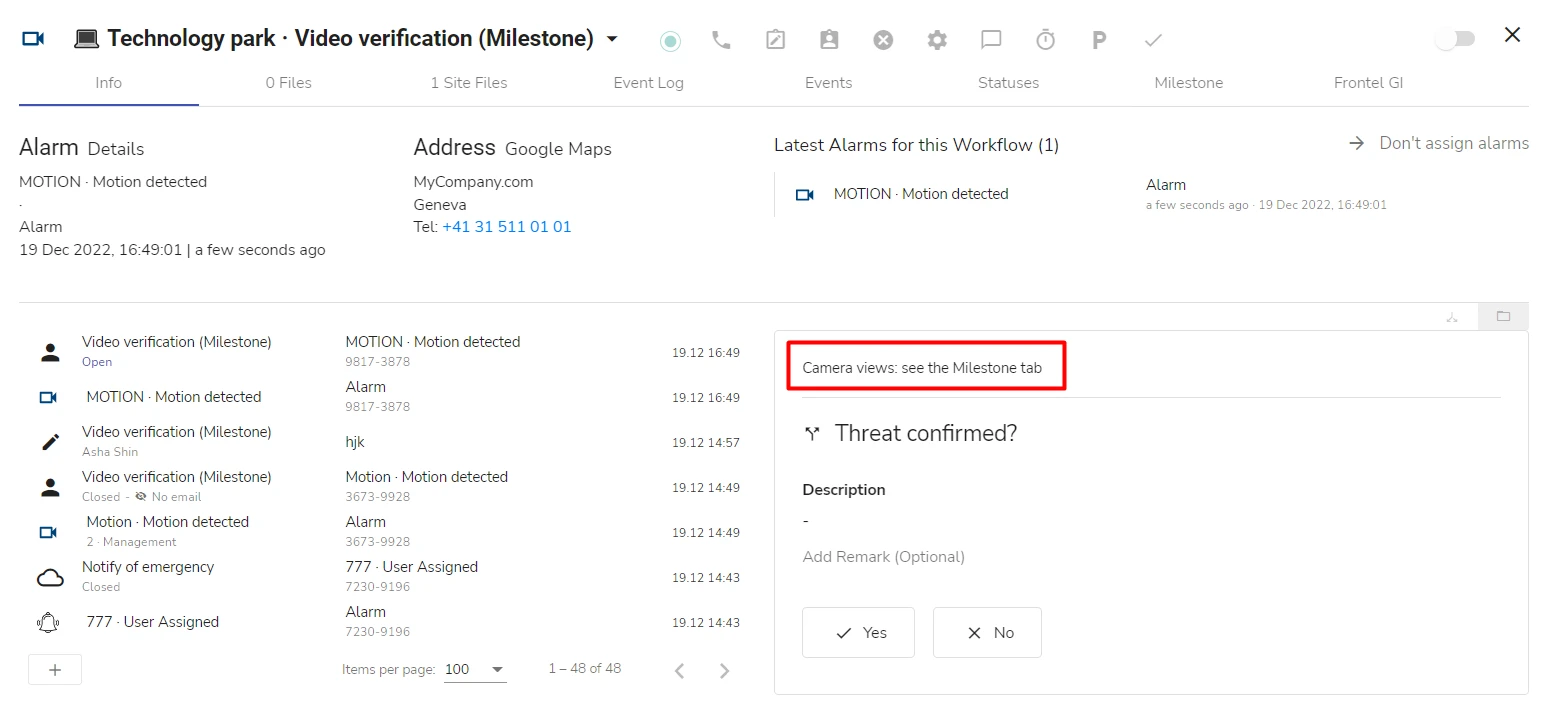
In an Automated Workflow, the comment can be used to exchange information between the users who work with the workflow in the workflow editor:
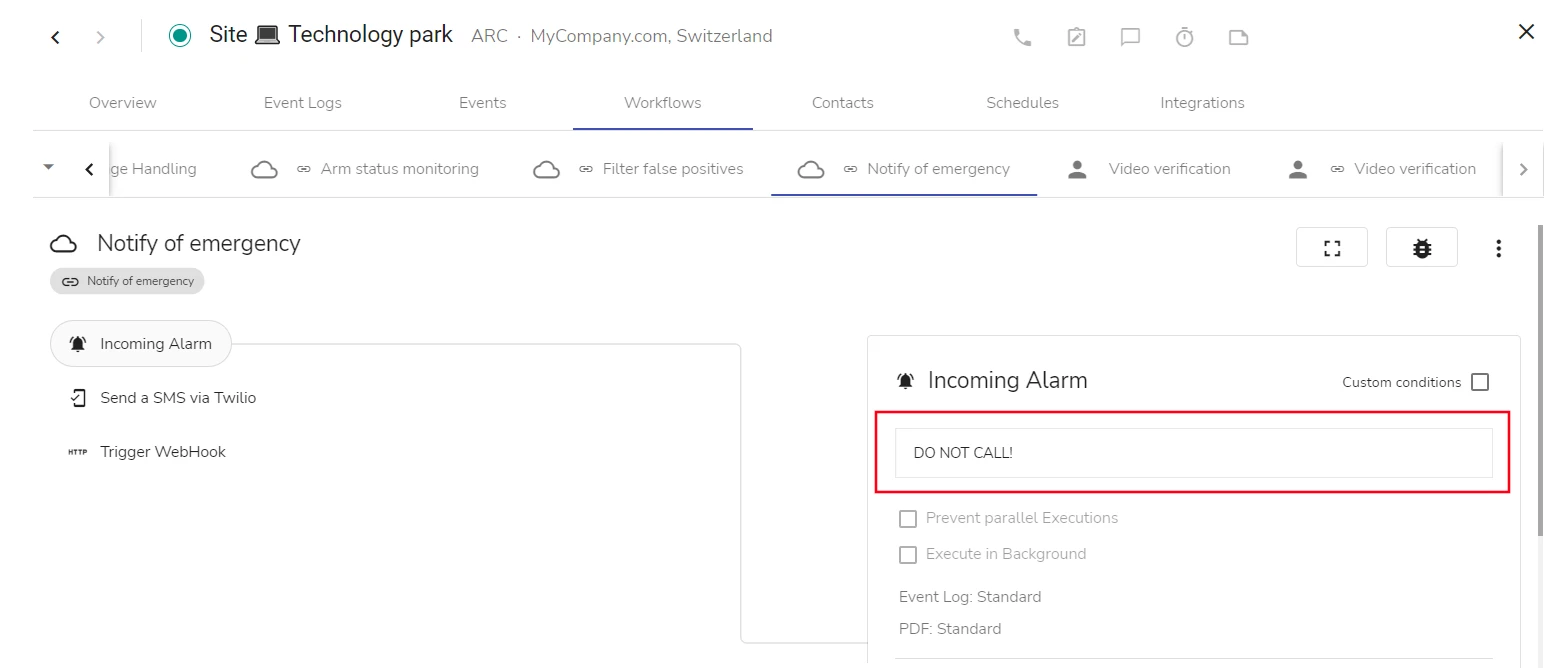
The workflow comment is editable by Administrator or Manager in all types of workflows and workflow presets, on all levels of hierarchy (site, site group, or Company). The comment of a Managed Workflow that is linked to a site is also editable on the site level.
For users with Operator permissions, the field is read-only.
The text comment can be set or edited by Administrator or Manager:
-
in the workflow adding dialog
-
after the workflow is created – in the Incoming Alarm step of the workflow, in the right pane of the workflow editor
Adding a workflow comment while creating a workflow is described in section Add a Workflow > Start Creating a Workflow.
The figure below shows adding a workflow comment to an existing workflow:
To add or edit the workflow comment, click on the text field, enter the desired text in the field and create or save the workflow.
 Link is copied