Advanced Operations with Contacts and Contact Lists
The procedures below are performed on the Contacts page of the concerned entity (a site, a site group, or Company) and are the same for all these entities. For information on how to access the Contacts page, see section View Contacts of a Site, Site Group, or Company > The Contacts Page.
Temporarily Override a Contact or a Contact List with Another One
If it is necessary to substitute one responsible person with another for a certain time period, you can do this by overriding a contact. You can also override a Contact List with another Contact List, the number of people in both Contact Lists is not taken into account.
Any of the two contacts (the overriding and the overridden one) can have not available status.
Create an Override

To override a contact or a Contact List:
-
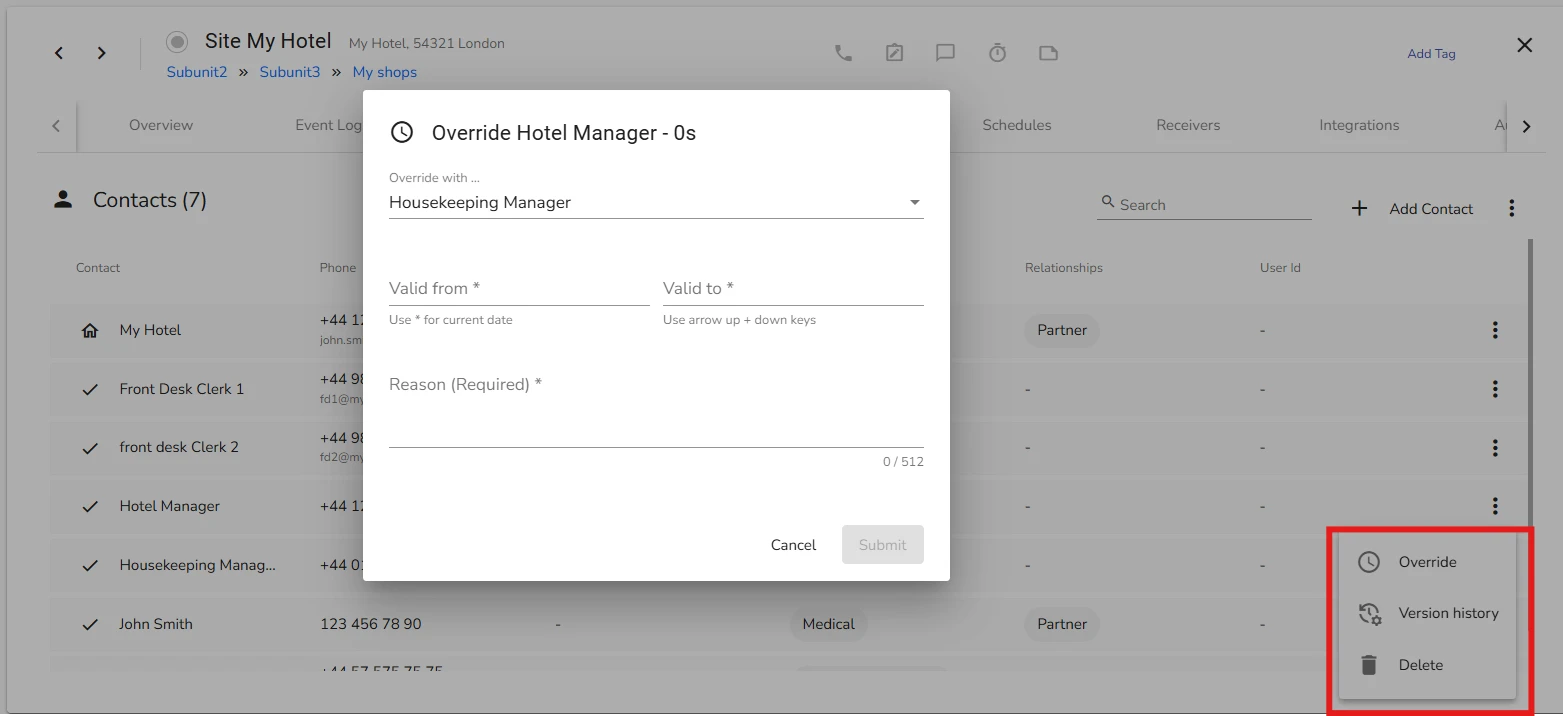
For a Contact record in the Contacts page (Contacts or Contact Lists), click the three dots icon and select Override
-
From the Override with... list, select the contact or Contact List to override the current one
-
In the Valid from and Valid to fields, specify the time period during which the replacement is valid
You can populate the fields manually, but there are a number of keyboard shortcuts:
a. Entering the wildcard
*symbol automatically fills in the current date and timeb. By pressing UP and DOWN arrows on the keyboard, you can set the time to 00:00 and the date to
-
the current day (the DOWN arrow). Each new press on the DOWN arrow shifts the date one day earlier
OR
-
of the next day (the UP arrow). Each new press of the UP arrow shifts the date one day later
infoYou cannot set the Valid to timestamp earlier than the current date and time.
You can edit the date and time populated from the keyboard as desired.
In the upper part of the dialog, the total override period length is displayed.
-
-
In the Reason field, specify the reason for the substitute
The field is mandatory.
-
Click Submit to save the changes
The same operations can be performed to override one Contact List with another Contact List.
For information on how an overridden contact looks on the page, see section View Contacts of a Site, Site Group, or Company > An Overridden Contact or Contact List on the Contacts Page.
After the override time expires, the override record in square brackets remains in the list on the Contacts page until it is deleted by the user or until another override is created for the same contact / Contact List.
Only one override entry is displayed for each contact or a Contact List at a time.
Edit an Override
To edit an override:
-
Click the override icon for the overridden record
In the dialog that opens, all the previously specified settings are preserved, except the Reason field
-
Edit the fields as desired and specify the reason of the change
The Reason field is mandatory.
-
Click Submit
Delete an Override Entry
Only one override can exist for a contact / Contact List in one moment of time. However, if you need to create a new override for a contact or a Contact List, it isn't necessary to delete the old one. The newly created override automatically replaces it. Deleting an override that is already expired isn't necessary in most cases, since it already has no effect on the contact / Contact List behavior.
Delete an override when you need to:
- cancel a override with the override period in the future
OR - partially cancel an ongoing override starting from some moment in the future or from the current moment
OR - erase the record of the past override from the Contacts page
To delete an override:
-
Click the override icon for the overridden record
In the dialog that opens, all the previously specified settings are preserved, except the Reason field
-
From the Override with.. list, select Don't Override
-
Specify the reason for the deletion
The Reason field is mandatory.
-
Click Submit.
Manage Version History
On the Contacts page, you can view the version history of a contact or a Contact List and manage it:
-
assign names to versions
-
replace the current version with the previous versions of your choice
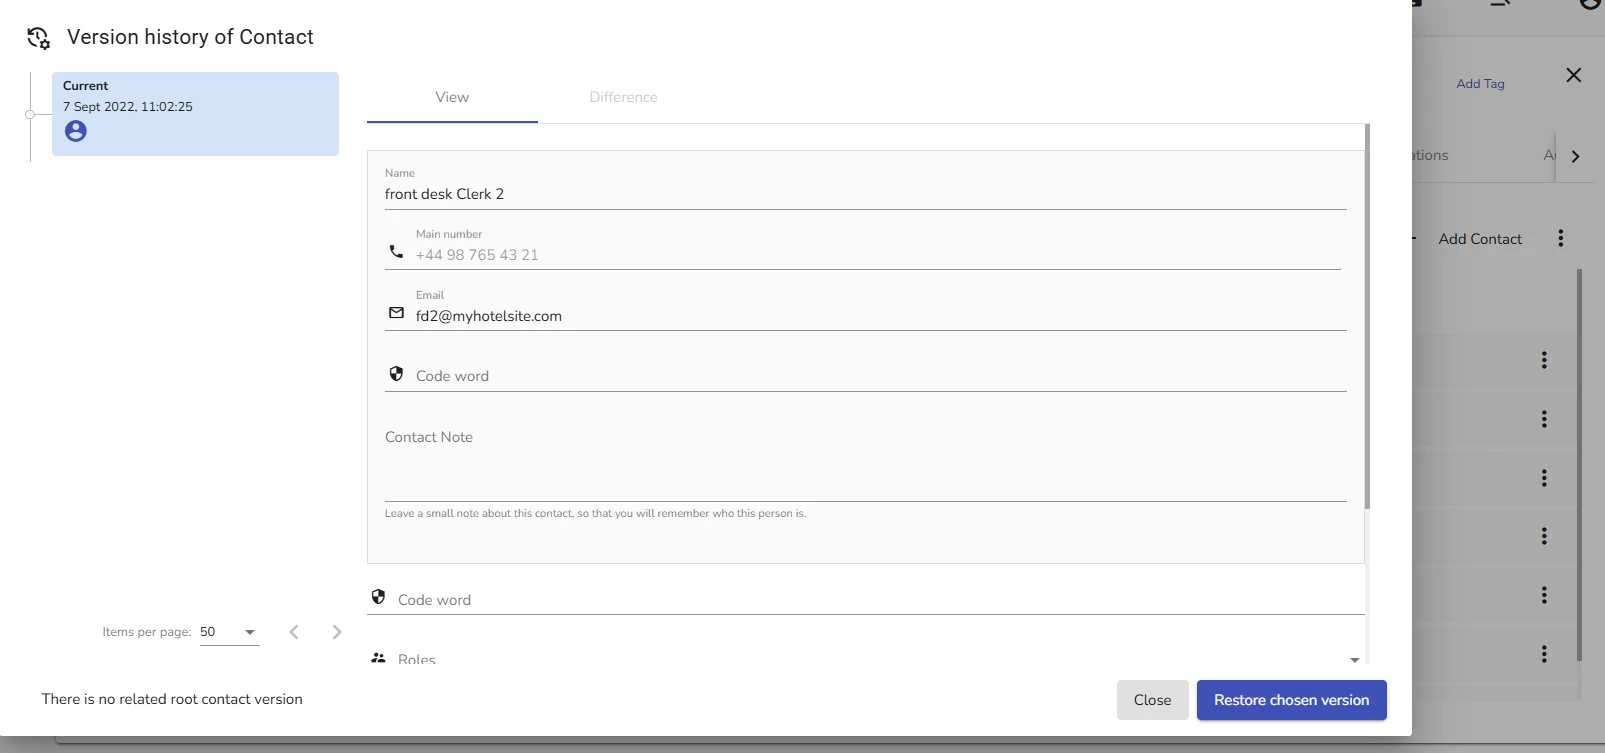
The figure below illustrates all these operations.
View Version History
To view the version history, click the version history icon for the contact or the Contact List.
In the dialog that opens, the left bar displays the list of versions in chronological order, with the most recent version on top of the list. You may view the full details of each version by clicking on a version.

Name a Version
To assign a name to a version:
-
In the version history dialog, hover your mouse over the version in the left bar that you wish to name
-
Click the three dots icon that appears on hover and select Name this version
-
In the small dialog that opens, enter a name for the version and click Restore chosen version – or just press Enter
The version name has an arbitrary format – it may include letters, digits, and special symbols. Some symbols, for example, +, are not allowed. If you attempt to enter unallowed symbols, a warning with the list of allowed symbols is displayed.
-
If you don't plan to make any other changes, click Cancel to close the dialog.
The version name is saved after you click Restore chosen version / press Enter. The version name is not shown on the Contacts page, you can only view it in the version history dialog.
Restore a Version
To restore a version:
-
In the version history dialog, in the left bar, click on the version that you wish to restore
-
Click Restore chosen version
The Restore chosen version button becomes active when any version other than the latest version (the default option) is selected.
Clicking Restore chosen version closes the dialog and brings you back to the Contacts page.
 Link is copied