Operations with Contacts
evalink talos allows to configure global, site group- and site-level contacts. For recommendations on which level to create a contact in order to solve a particular task, see the TIP in section Contacts Overview > Contact Basics.
The procedures below are performed on the Contacts page of the concerned entity (a site, a site group, or Company) and are the same for all these entities. For information on how to access the Contacts page, see section View Contacts of a Site, Site Group, or Company > The Contacts Page.
Contact Availability Status
A contact can be available or not available.
When a workflow that uses a contact is triggered:
-
if the contact is available, evalink talos reaches out to the person by the specified contact details, either automatically or by prompting an operator to do so
-
if a contact is unavailable, evalink talos cannot reach out to the person. A manual workflow displays the Not Available caption in red font near the person contact details, while an automated workflow is just aborted with an execution error
You may set the contact availability status manually or configure it to depend on a schedule, see section Create a Contact below for details.
Create a Contact
To create a contact:
-
On the Contacts page, click the Add Contact button and select Create New Contact
The contact editing dialog opens.
-
Specify the contact name
The Name field is mandatory. The name must be unique among all contact names on the page.
-
Specify the phone numbers for a contact
In the Main number, enter any phone number: mobile, landline, etc.
tipSpecify the phone with the country code (with a plus) – for example, +41 31 511 01 01. Spaces are not taken into account, you may use them or omit them. If the number format is deemed invalid by evalink talos (for example, if you specified the country code without a plus), a warning dialog pops up when you attempt to submit the contact. To edit the numbers, click No, apply the corrections and click Submit. If you still wish to save the phone numbers in their current format, confirm this by clicking Yes, save.
You can also use SIP format for a contact number. Use this format to add SIP numbers:
sip:{USERNAME}@{DOMAIN} -
(Optional) Specify a number of alternative phone numbers by which a person can be reached in case of emergency and prioritize them according to your preference
To add alternative phone numbers:
a. In the contact editing dialog, click the add icon next to the Main number field
b. Select the number type: Mobile, Home, Work, or Custom
Only one number of each predefined type (Mobile, Home, or Work) can be added. If you select Custom, specify the Type for the number. The field is mandatory and accepts any symbols, including emoji.
c. Specify the phone number in the format described above
d. Repeat the procedure for each alternative phone number you wish to specify
infoNumbers are called by a workflow in the order in which they appear in the list until the contact is reached successfully. If calling all numbers in the list fails, a workflow execution error occurs.
To change the priority of a number, grab the reorder icon of the number with a mouse and drag the number to the desired position in the list.
infoThe order can be changed for alternative phone numbers only, the main phone number is always the first number in the list.
To delete an alternative phone number, click the corresponding delete icon .
-
(Optional) Specify the contact email address
You may specify only one email address.
-
(Optional) In the Code word field, specify the code word that a contact will use to verify their identity
Code words are used in manual workflows that involve phone calls with manual interaction (the Call Someone step).
-
(Optional) From the Roles list, select the Roles that you wish to assign to the contact
The rationales of using Contact Roles are described in section Contacts Overview > Contact Roles. Contact Roles are created on a global level, see section Manage Contact Roles for details. You can assign several roles to one contact.
When a global workflow that uses a Contact Role operates on a particular site, the Contact Role is resolved to a contact or a Contact List assigned on the site level, if not specified – to the contact assigned on the level of the corresponding Site Group (if any), if not found – a workflow execution error occurs.
infoWhen selecting a Contact Role, you may see that some roles in the list are grayed out, this means that they have already been assigned to a contact or a Contact List on the current Contacts page. On each Contacts page (of a site, site group, or a Company), each Contact Role can be assigned to one record only, this record can be a contact or a Contact List.
-
(Optional) From the Relationships list, select the Contact Relationship you want to assign to the contact
infoContact Relationships are labels that allow you to attribute a contact to your customer or a particular third party.
-
(Optional) Specify a note about the contact for future reference
-
(Optional) Set the contact availability status using either of the two options:
a. To manually set the contact status to available (the default option) or not available, check or uncheck the Available checkbox in the lower part of the dialog
b. To set the contact availability depending on a schedule
i. Click on the Link to Schedule link at the bottom of the dialog
The schedule linking dialog opens.
ii. From the Schedule drop-down, select the schedule you wish to link the contact to
Only one schedule can be selected.
iii. From the Schedule State list, select the state of schedule (Active or Inactive) in which the contact will be available
iv. Click Submit
-
Back in the contact editing dialog, click Submit to save all changes
Create a Contact from a Root Contact
-
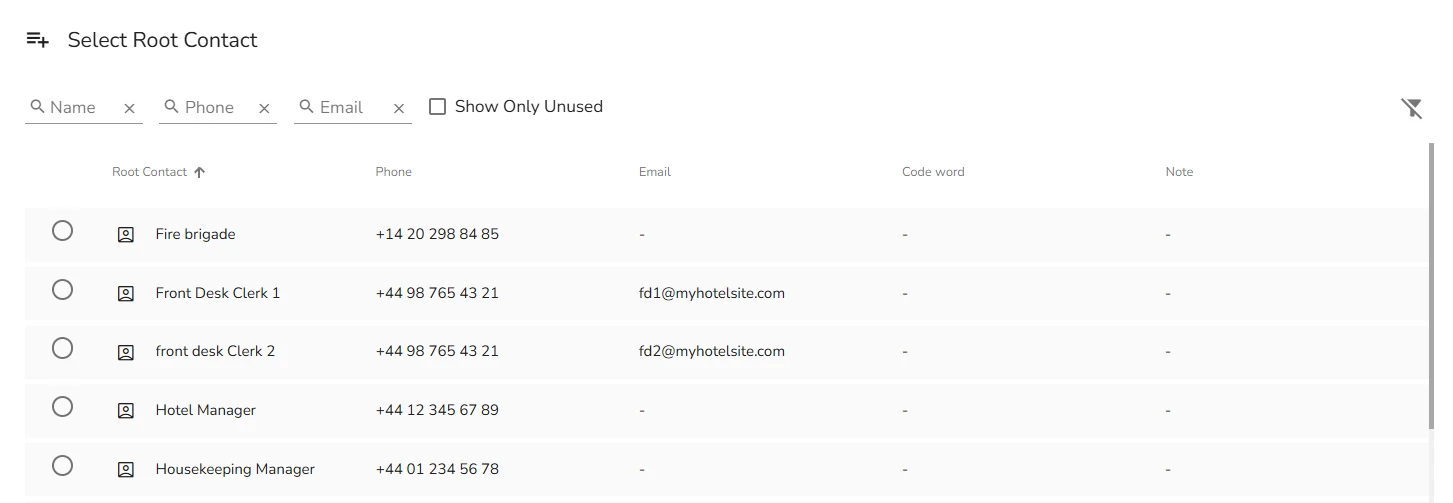
On the Contacts page, click the Add Contact button and select Create from Root Contact
The Root Contact selection dialog opens.

The dialog list contains all root contacts existing in your tenant.
-
Locate the Root Contact you want to use
infoYou can use the available search options: by name, by email, by phone. The name field accepts any word order of first and last names. If you enter
John SmithorSmith Johnevalink talos returns all results containing these names in any order. -
Use Show Only Unused checkbox to choose from contacts that aren't yet used on this site or site group
infoIf a contact associated with a Root Contact you select already exists on this site or site group, evalink talos prompts you that the contact can't be created because it already exists.
-
Select the Root Contact you want to use and click Sumbit
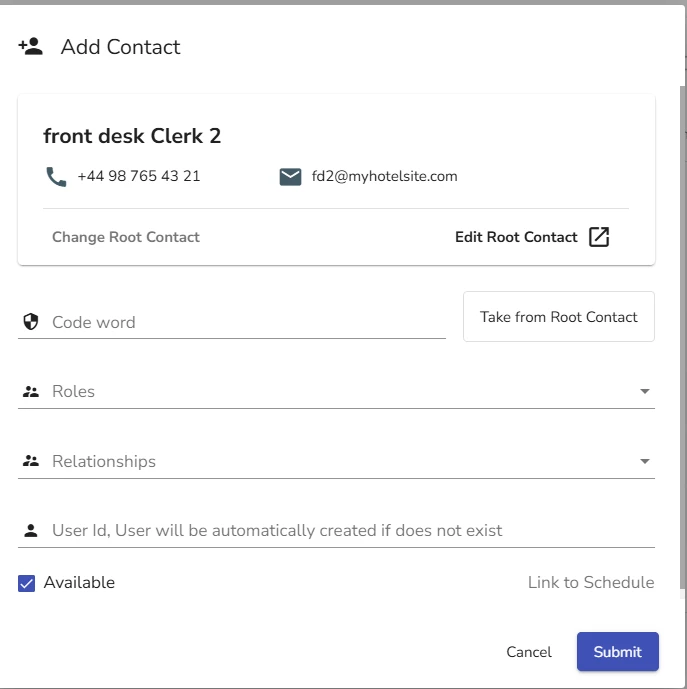
The Contact Editing dialog opens.

-
(Optional) Set the code word for the new contact using the following options:
-
Enter the new code word in the Code Word field. If you select this option, the code word is only available for the connected contact on the site, but not for the Root Contact.
-
Select the Take from Root Contact option. In this case, the new contact uses the same code word as the Root Contact.
-
-
Click Submit
If you or another user edits the Root Contact from which you have created a connected contact, this action updates all connected contacts.
Edit a Contact
To edit the details of a contact:
-
On the Contacts page, click the contact record in the list
The contact editing dialog opens.
-
Edit the details as desired
For instructions on how to fill in the fields, see section Create a Contact above.
infoFor a contact with the home icon that is automatically created for a site:
-
the name and the contact details cannot be edited in the contact editing dialog, they need to be updated on the Settings subpage of the site
-
only the Main number can be set as a phone number, specifying alternative phone numbers is not possible
-
-
(Optional) Select the Edit Root Contact field if you want to edit the Root Contact and subsequently change contact data for all connected contacts
tipIf you want to view all the connected contacts for a particular Root Contact, in the Contact Editing dialog click the icon.
-
Click Submit to save the changes
Delete a Contact
To delete a contact:
-
On the Contacts page, click the three dots icon for the contact record and select Delete
-
Enter the confirmation code and click Delete
The automatically created contact marked with the home icon cannot be deleted.
If a contact is included in some workflows, evalink talos doesn't prevent you from deleting it, it only displays a warning on the confirmation dialog. When deleting a contact, you should keep in mind which workflows are affected, and adjust these workflows manually afterwards, otherwise these workflows will be processed with errors.
If you delete a contact from a site which has been created from a Root Contact, the Root Contact remains in evalink talos.
If you delete a contact which has been used as Root to create connected contacts elsewhere, connected contacts remain and can be used as Root Contacts.
Search for a Contact
To search for a contact:
-
On the Contacts page, place the cursor into the Search field and start typing
-
Select the contact you need from the search results and click on it
The contact editing window opens.
evalink talos uses a dynamic search mechanism. The contacts are searched by Name, Phone, Roles, Code Word fields. A match in any of these fields will be listed in search results.
Export Contacts
To export all contacts from the corresponding Contacts page:
-
Click the three dots icon in the Contacts area of the page
-
Select Export
After you click Export, a file in CSV format with a name [site / site group name]-Contacts is downloaded into the Downloads folder of the browser. For global contacts, the exported file name is just Contacts.
The file contains the information from all the fields on the corresponding Contacts page in a comma-delimited format. The only exception is the availability status of contacts, this information is not exported.
For sites, the automatically created contact with the Site role (see section View Contacts > The Contacts Area) is not exported.
Import Contacts
You can import contacts from a file – for example, the file obtained previously via an export from evlink talos. For details on contacts export, see section Export Contacts.
To import contacts:
-
On the Contacts page, click the corresponding three dots icon
-
Select Import
The system dialog opens.
-
Locate the CSV file with contacts on your file system and select it for opening
The default file naming patterns for contacts CSV files are described in section Export Contacts.
The imported contacts are appended to the ones that already exist on the page. Contacts with the names already present on the page are ignored.
After a file is imported, a pop-up message displays the actual number of contacts imported as result of the operation.
All imported contacts have available status.
 Link is copied