Configure Virtual Email Receiver Integration
This section provides instructions on how to integrate virtual email receiver with evalink talos and configure it to receive alarms from incoming emails.
Virtual Email Receiver Overview
With Virtual Email Receiver integration enabled, emails that you receive to a designated email address can be converted to alarms. Only Administrator can configure Virtual Email Receiver globally.
When Virtual Email Receiver is enabled for a particular site, an alarm is triggered each time an email with specified keywords arrives in the Inbox folder.
After Virtual Email Receiver is configured globally, it is necessary to enable it for each particular site that will use it. Administrator or Manager can enable Virtual Email Receiver for a site.
Configure Virtual Email Receiver Globally
To enable and configure Virtual Email Receiver integration:
-
Go to Company > Integrations
-
Scroll to the Virtual Email Receiver and click Add Integration
The configuration dialog opens.
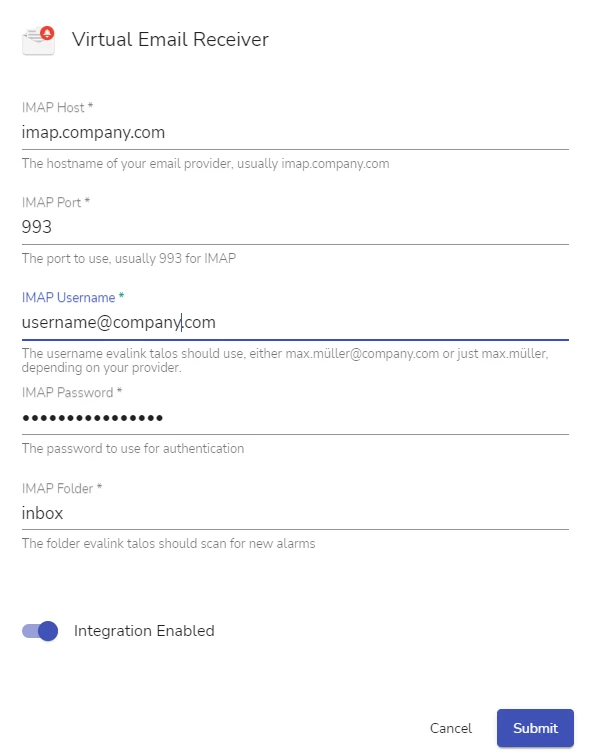
The figure below shows the Virtual Email Receiver configuration dialog:
-
In the configuration dialog, fill out the following required fields:
- IMAP Host: for example, imap.company.com
- IMAP Port: usually, it's port 993 for IMAP
- IMAP Username: a designated email address from which you want to receive alarms
- IMAP Password: the password you use to access the designated email address
- IMAP Folder: must be Inbox or inbox
If you want to use your corporate credentials and IMAP server, consult your system administrator and make sure that such connection is allowed on your server.
If you want to use free public email domains, such as Gmail, it is recommended to generate and use an app password (a password to connect your email account to third-party applications) if an email service provider has this option. For instructions on how to generate an app password, see your email account settings.
- Click Submit
If you have entered all credentials correctly, the connection status of the integration will become Connected.
Edit, Delete or Disable Virtual Email Receiver Globally
You can edit Virtual Email Receiver settings by clicking on the corresponding Edit Integration button in the Company > Integrations tab.
You can also delete or temporarily disable the Virtual Email Receiver without deleting it. To do so, click the corresponding three dots icon in the Integrations tab and select Delete or Disable.
Use the Disable option if you want to stop receiving alarms from Virtual Email Receiver, but want to keep all the configuration information.
Use the Delete option if you want to disable the Virtual Email Receiver and delete all configuration information completely.
Configure Virtual Email Receiver for a Site
When you configure Virtual Email Receiver for a site, you need to select an authentication option for your incoming emails that are converted into alarms. You can authenticate with a token or with a sender email address.
To configure Virtual Email Receiver for a site:
-
Go to Sites > [site] > Integrations > Email Receiver tab
-
Select one of the following options for email authentication:
- Authenticate with Token (the default option)
- Authenticate with Sender Email
-
Follow the instructions on the authentication page
Configure Authenticate with Token Option
If you select Token Authentication, evalink talos processes emails the following way:
- Emails arrive to a designated email address (specified globally)
- Emails can be from any sender with any subject
- Emails contain predefined parameters:
- A unique authentication token
- A user-specified alarm code
- Other user-specified alarm parameters, such as partition, geolocation, etc.
The figure below shows the Authenticate with Token configuration dialog:
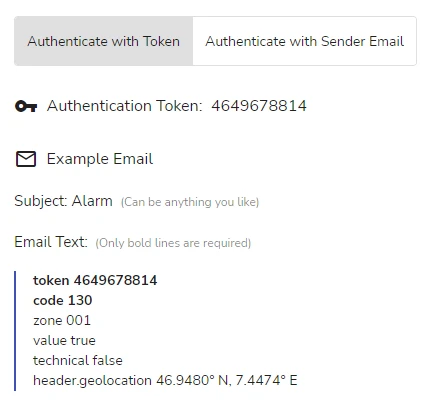
This option is selected by default. When you first open the Virtual Email Receiver tab, an authentication token is already generated. You can use it or generate a new one by clicking on Generate New Token in the bottom-right.
When you generate a new authentication token, you must reconfigure your email sending application or device to use the new token. Otherwise, the integration may not work normally for the site.
To configure Authenticate with Token option:
-
Copy the authentication token to clipboard
-
In the email sender application, configure the body of the email to be sent
The body must include the authentication token you copied, an alarm code (any value can be set), and, optionally, other relevant parameters.
The figure below shows an example of an email, sent to designated email address evalink talos listens to:
Token Authentication Email Requirements
The following requirements must be observed for evalink talos to parse the emails correctly:
- The Authentication token and an alarm code are required fields
- The words token and the Authentication ID number, code and the actual alarm code number need to be separated by a blank space
- First, you must list the authentication token, then an alarm code. Do not insert other parameter values between them
- Every alarm parameter you include must be separated by a line break
- Every parameter and its value need to be separated by a blank space
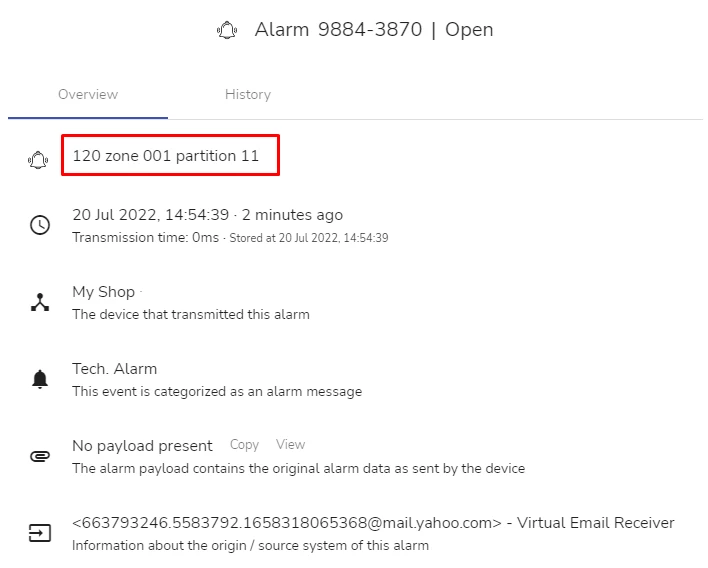
The figures below shows alarm details for an alarm that evalink talos picks up from the Virtual Email Receiver with token authentication.
Alarm code, zone and partition are shown in general alarm information (highlighted in red):
Other alarm details included in the email body are shown under Alarm Headers|Additional Data:
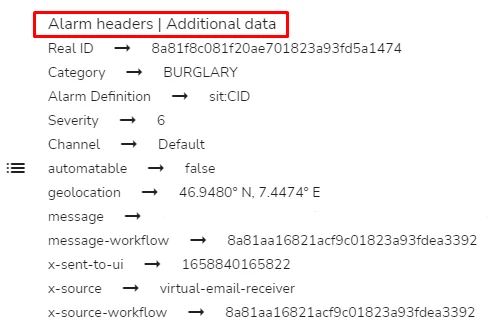
evalink talos only picks up those parameters from the email body that are configured for your site.
For example, if you have partition 11 configured for your site and your email contains the partition 11 field, evalink talos will show it in alarm details. But if you add partition 4 to your email body, and a partition with this ID is not configured for your site, evalink talos will not show any partitions.
Configure Authenticate with Sender Email Option
If you select Sender Email authentication, evalink talos processes emails the following way:
- Emails arrive to a designated email address (specified globally)
- Emails can be only from a specified email address
- Emails can optionally contain user-defined text patterns in email body and / or subject
The Sender Email authentication option is designed for handling automated email notifications, the parameters of which are not freely configurable by the user. The incoming emails processed via this option are expected to have fixed structure, and contain specific body text and / or subject.
evalink talos then uses Regular Expressions or patterns to identify, parse the email and create the expected alarms with the relevant parameters.
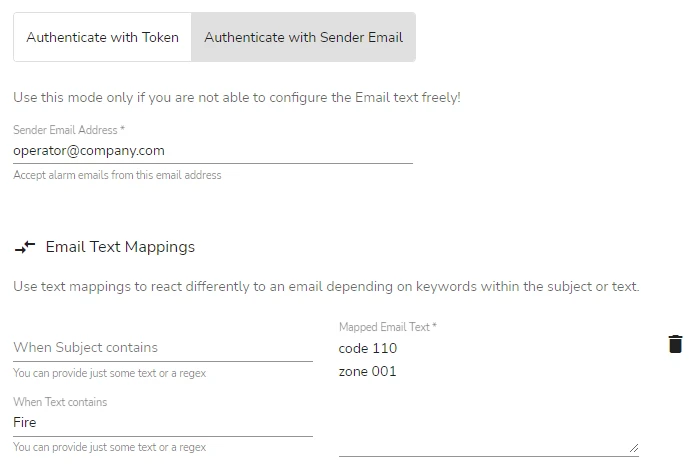
The figure below shows the Authenticate with Sender Email configuration dialog:
To configure Authenticate with Sender Email Option:
-
From the Email Receiver tab, click on Authenticate with Sender Email
-
In the Sender Email Address field, enter the email address for evalink talos to accept alarms from with Virtual Email Receiver
-
(Optional) Add one or several text mapping rules. For details on text mapping, see section Configure Authenticate with Sender Email Option > Configure Text Mappings
Configure Text Mappings
Text mappings allow you to differentiate how evalink talos treats incoming emails from the address you enter in Sender Email Address when you configure Authenticate with Sender Email option.
To configure a text mapping:
-
Click Add Text Mapping in the Authenticate with Sender Email configuration area
-
In the Text Mapping record that opens, optionally fill out the following fields:
- When Subject Contains field - enter one or several words that a subject of an email from the specified sender must contain
- When Text Contains field - enter one or several words that a body of an email from the specified sender must contain
These fields are case-sensitive. If you enter two or more words, they will be treated as a solid phrase by evalink talos, so the match must be precise to trigger a corresponding mapping rule.
If you fill out both fields, the email must contain exact matches in both fields.
For example, if you specify Fire in When Subject Contains, and the subject of the email is fire, it will not match the specified mapping rule.
If the subject is Fire alarm, evalink talos will process it as a match and use mapping rules.
- In the Mapped Email Text field, list alarm parameters that evalink talos will show in alarm details, if subject and/or email body match conditions specified in step 2
You must list alarm parameters one per line, with line breaks between, as is shown on the figure above or as is prompted by evalink talos user interface.
You can list alarm parameters in any order. Make sure that these parameters are already configured for your site for evalink talos to display them correctly in alarm details.
For example, if you specify partition 3 as one of your parameters, and your site doesn't have such a partition, evalink talos will treat this alarm as an alarm for an unknown partition.
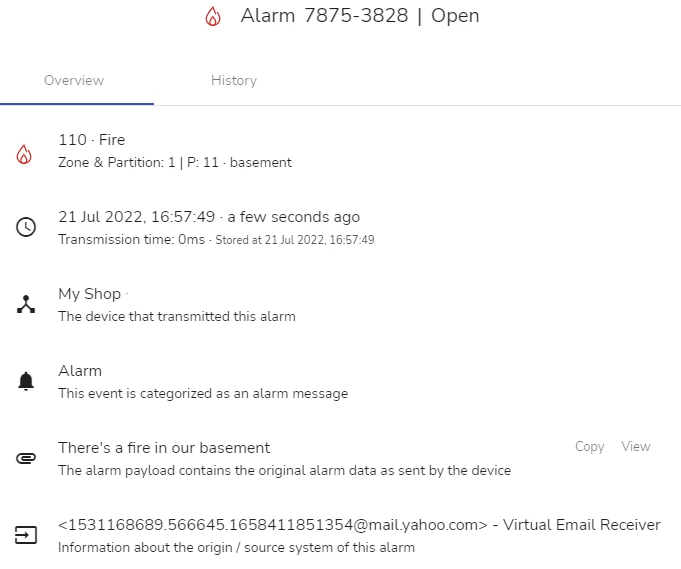
The figure below shows the alarm details for a text mapping rule that has fire as a keyword for When Text Contains, empty When Subject Contains field, an alarm code, zone and partition specified in the Mapped Email Text field:
- Click Save Configuration
You can use several mapping rules at once.
If an email sent from the Sender Email Address that you specified doesn't match any mapping rules, evalink talos marks it as EMAIL ALARM and shows its contents in the Payload field of alarm details as is.
Delete or Disable Virtual Email Receiver for a Site
You can delete or temporarily disable the Virtual Email Receiver for a particular site. To delete or disable the Virtual Email Receiver:
-
Go to Sites > [site] > Integrations > Email Receiver tab
-
Click Delete Receiver or Disable Receiver in the bottom-right of the page
Use the Disable option if you want to stop receiving alarms from Virtual Email Receiver for this site, but want to keep all the configuration information. Use the Delete option if you want to disable the Virtual Email Receiver for this site and delete all configuration information completely.
 Link is copied