Advanced Alarm Operations
Alarm Operator Distribution
There are several settings that can help you to distribute alarms effectively between all operators in your tenant who work on alarm processing with evalink talos.
Dismiss an Alarm
You can dismiss irrelevant alarms that you don't need to process.
You can dismiss only the alarms from the alarm queue: meaning, they aren't being processed yet or haven't been assigned to an operator.
To dismiss an alarm:
-
Navigate to Alarms
-
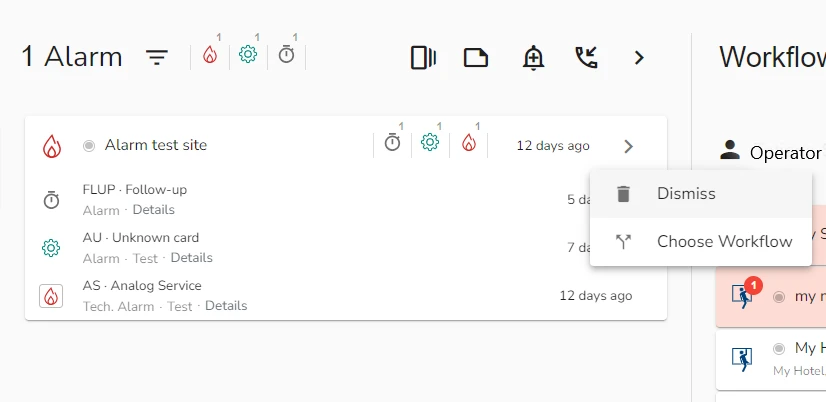
In the alarm queue, select the alarm or alam group you want to dismiss and right-click on it
-
In the context menu, select Dismiss
Note, that if there are several alarms in the alarm queue grouped for a particular site, you can only dismiss all of them at once, regardless of whether you are using the grouping visually or not.
When you dismiss an alarm, evalink talos still records it in the event log.
Cancel an Alarm
Alarms that are already assigned to operators or are being processed by manual workflows in evalink talos can be cancelled. This action places them back to the alarm queue.
To cancel an alarm:
-
Navigate to Alarms
-
In the Workflows view, select the alarm you want to cancel from the list and click the More icon

-
From the context menu, select Cancel
If the alarm you cancel was already assigned to an operator, when it is moved back to the alarm queue after cancellation, evalink talos adds a note about it:
Assign or Reassign an Alarm
Once an alarm is assigned to a user, or is picked up by a manual workflow but isn't closed yet, you can reassign it to another user.
To assign or reassign an alarm:
-
Navigate to Alarms
In the Workflows view, alarms are grouped by users they are assigned to. Unassigned alarms are displayed at the top of the list.
-
In the Workflows view, select the alarm you want to assign or reassign from the list and click the More icon
-
From the context menu, select Assign User
-
In the window that opens, select the operator you want to assign or reassign the alarm to from the dropdown list
By default, only operators that are online are available for selection. If you want to assign the alarm to a user who is currently offline, toggle Show offline users to on.
- Click Assign to
Update Alarm Severity
In the Workflow view, you can update the severity for all alarms that are processed by a particular workflow.
To do this:
-
In the Workflows view, select the alarm you want to assign or reassign from the list and click the More icon
-
From the context menu, select Update Severity
The Update Severity dialog opens
-
In the Alarm Severity field, select the new severity value
-
Click Submit
Doing this changes the severity of all alarms that are processed by the workflow at the moment.
Working with Autofeed
In evalink talos, Autofeed is a feature that allows users to automatically assign alarms from the Alarm Queue to themselves.
In the Alarm Processing Priority, Autofeed is placed after automated workflows and Alarm Dispatcher, but prior to manual workflows.
As a feature Autofeed is personalized, meaning that you can only enable or disable it for yourself as an operator and select one of the pre-configured Autofeed filters. Company Admins can add and edit Autofeed Filters.
Enable / Disable Autofeed
You can enable or disable Aurofeed for yourself only.
-
Navigate to Alarms
-
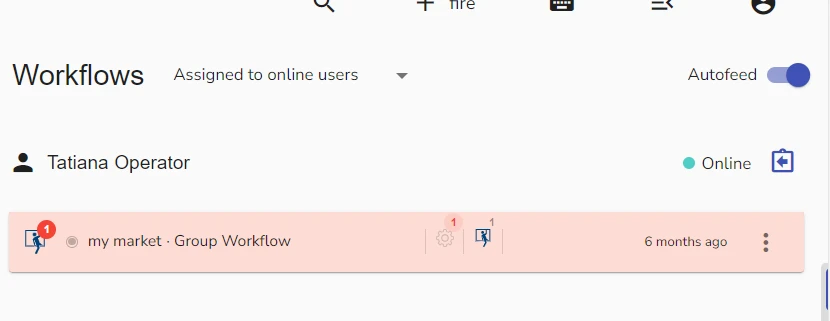
In the Workflows view of the Alarms page, enable or disable the Autofeed Toggle
Add Autofeed Filter to a User
Autofeed filters allow you to define the criteria for alarms you want to assign to a specific operator. You can apply an autofeed filter from the list of pre-configured filters. Only Managers and Company Admins can apply Autofeed Filter. You need to apply autofeed filters for each operator separately. You can apply several Autofeed filters for the same operator simultaneously.
-
Navigate to Alarms
-
In the Workflows view of the Alarms page, locate the operator for whom you need to add an Autofeed Filter
-
From the Autofeed Filter dropdown list next to the operator name in the operator record, select the filter you want to use.
evalink talos applies the filter automatically.
Select No Autofeed Filter option from this list to remove all Autofeed filters for an operator.
To remove all autofeed filters from your own profile, use the Remove Applied Autofeed Filter icon at the top-right corner of the Alarms page.
Mass Alarm Actions
Mass Alarm Actions feature allows you to handle alarms in bulk. It is helpful when you need to quickly process a large number of alarms that meet the same criteria. For this, alarms do not have to necessarily come from the same source or be exactly the same. They need to share one or several qualities.
Alarm Matching Criteria Configuration
To access the configuration tab for Mass Alarm Actions, navigate to Alarms and click Massive Alarm Actions icon.
In this window, you can configure actions you want to apply to alarms in bulk.
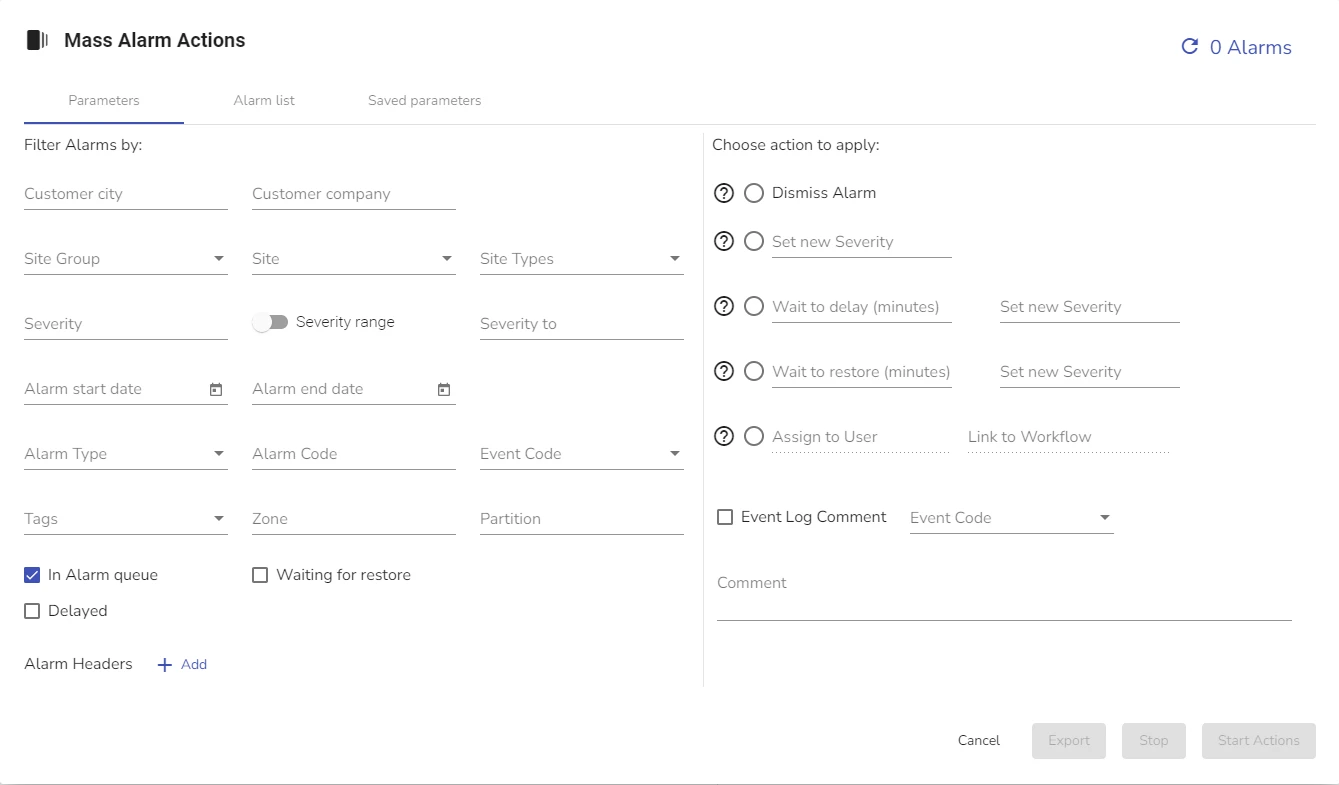
In the Parameters tab, you can:
- Select criteria for and apply filters to alarms you want to process in bulk
- Select the action you want to apply to a group of alarms that meet certain criteria
The following Mass Alarm Actions are available:
- Dismiss Alarms in bulk
- Set New Severity for alarms in bulk
- Delay alarms in bulk
- Set alarms in bulk to wait for Restore
- Assign multiple alarms to a particular user and link them to workflow
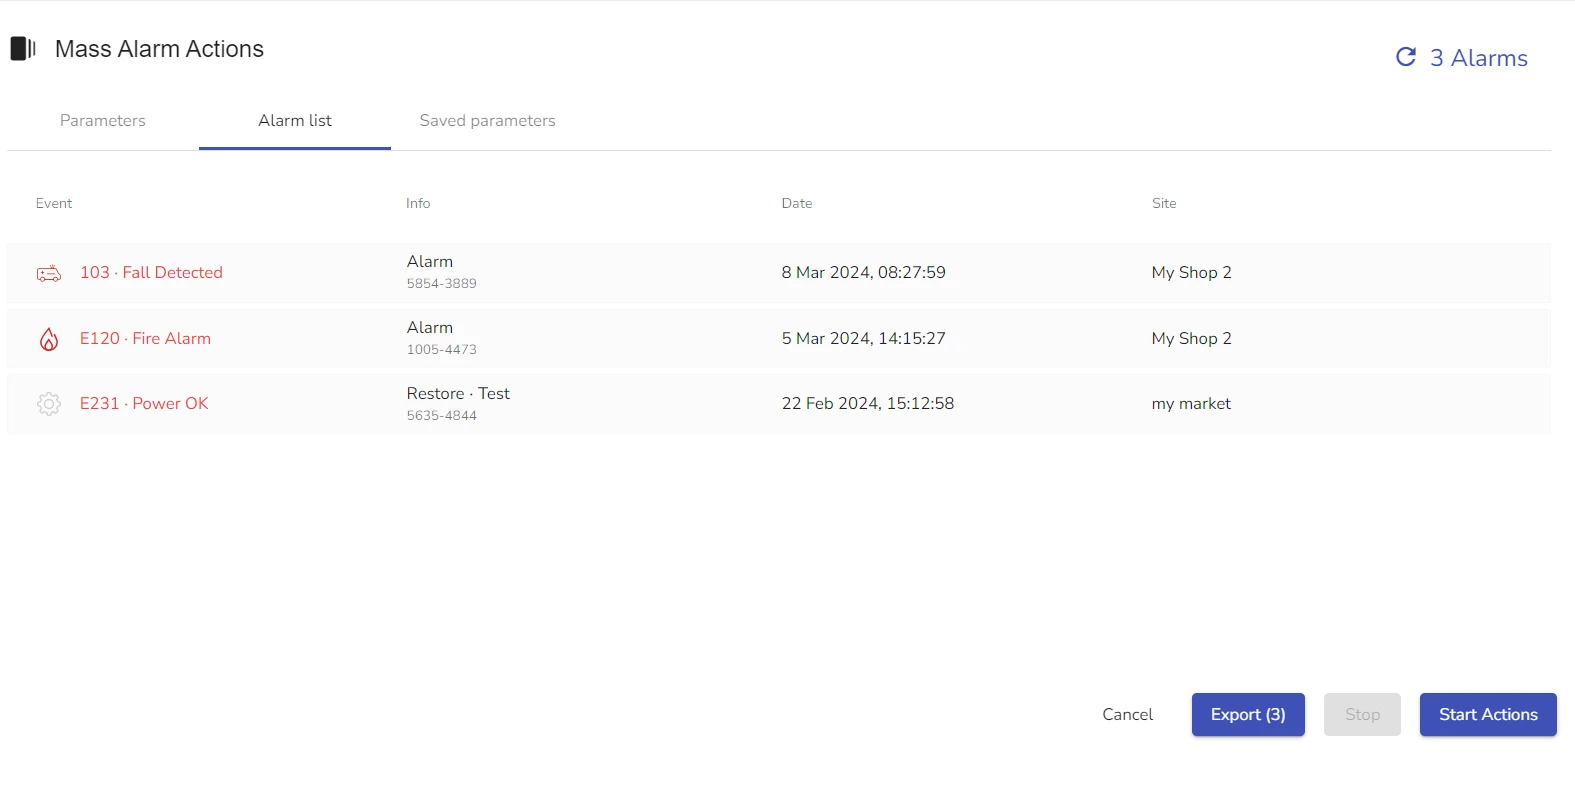
In the Alarms List tab, you can:
- View all alarms in the list that match the current criteria filter settings
In the Saved Parameters tab, you can:
- View saved filter configurations for mass alarm actions
- Save new configurations for mass alarm actions
- Edit existing filter configurations
- Delete existing filter configurations
In all tabs, you can:
- Export processed alarm list to CSV
- Start and stop mass alarm actions
- Refresh filters and alarm lists
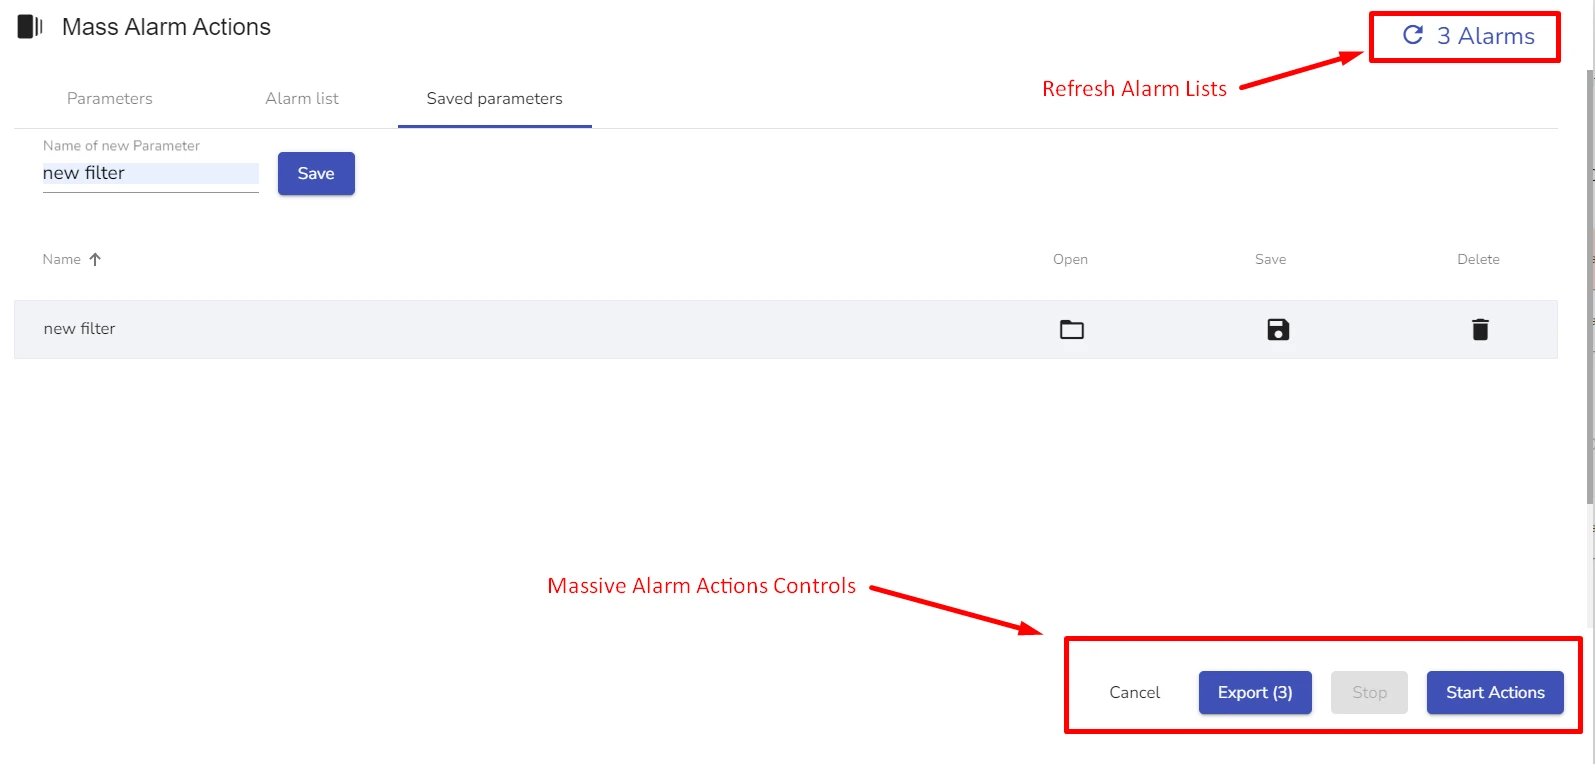
Edit and Save Mass Alarm Actions Filter Configurations
You can save your mass alarm action settings as separate profiles and have several such profiles for each site which you can later edit or delete.
To save a Mass Alarm Actions Configuration:
-
In the Parameters tab of the Mass Alarm Actions configuration dialog, configure the parameters you need to save
infoThe relationship between separate alarm parameters is AND, this means that if you specify several alarm parameters for Mass Alarm Actions, the coming alarms need to match all of them at once.
-
Switch to the Saved Parameters tab
-
In the Name of the New Parameter field, type the new filter name and click Save
The new filter record appears in the saved list.

To edit a Mass Alarm Actions Configuration:
-
In the Saved Parameters tab of the Mass Alarm Actions, select a saved filter configuration you want to edit
-
Click the Open icon next to the record
The saved filter configuration opens in the Parameter tab.
-
Change the configuration as desired
-
To save the chages, do one of the following:
- To overwrite the existing configuration with new changes, switch to Saved Parameters tab and click the Save icon next to its record
- To save changes to a new configuration profile, type the new filter name in the Name of the New Parameter field, and click Save
Dismiss Alarms in Bulk
To dismiss several alarms in bulk, create the following configuration:
-
Navigate to Alarms and click Mass Alarm Actions icon
-
In the Parameters tab, configure the alarms you want to dismiss in the Filter Alarms By pane
infoFor example, you can select to dismiss all Technical alarms by selecting Technical in the Alarm Type or you can dismiss all alarms with a specific Alarm Code or Event Code.
-
In the Choose Action to Apply view, check Dismiss Alarm
-
For the Event Log Comment option, type an event log comment for all dismissed alarms.
infoThis option is checked by default when you select Dismiss Alarms action.
You can either add an event log comment or uncheck this option.
-
Click Start Actions
evalink talos now automatically applies the configured actions to all the existing alarms that fit the conditions. You can view these alarms in the Alarms List tab.
-
(Optional) Save the existing configuration
For details, see section Edit and Save Mass Alarm Actions Configurations above.
Delay Alarms in Bulk
Delaying alarms is a way to unload and reduce stress for operators during peak hours of work. If you delay an alarm, it disappears from the Alarm queue and reappears again at the assigned time of delay.
-
Navigate to Alarms and click Mass Alarm Actions icon
-
In the Parameters tab, configure the alarms you want to delay
-
In the Choose Action to Apply view, check Wait to Delay option and specify delay time in minutes
infoYou can also set new severity for the delayed alarms when they reappear in the Alarms Queue after the delay.
You can add an Event Log comment for the delayed alarms. This option is checked by default.
-
Click Start Actions
Workfolw Attachment Rules for Non-attachable Elements
In some ARC setups, alarm events and follow-up events must always be processed in separate workflows, even when both originate from the same site. evalink talos supports this through the use of a special header:
x-workflow-attachable=false
This header prevents specific events from being automatically attached to an existing workflow.
evalink talos enforces the following rule:
If an event in the Alarm Queue contains x-workflow-attachable=false, it will not be attached to any newly created workflow — even when the workflow grouping mode is Group alarms by Site.
For details on how to attach new alarms to a manual workflow in progress, see section New Alarms Attaching for Manual Workflows.
This ensures that workflows for main alarms and follow-up events always remain separated.
 Link is copied