Work with Alarm Settings
Alarm Settings Overview
You can view a variety of alarm settings in evalink talos. Most of the settings are company-wide and you can configure them on the Company > Settings page. Only Company Admins can configure these settings, Manager users have view-only access to them.
There are also site-specific alarm settings that you can be configured for each particular site within your tenant separately. For example, site-specific Alarm Dispatcher configurations, Test Modes which suppresses alarms for a particular site. For details, see section Site Alarm Settings.
You can also select alarms that evalink talos considers stale by applying conditions.
Enable / Disable Stale Alarms Escalation
This feature allows you to prioritize alarms that stay in the queue without processing for a long period of time. When you escalate an alarm, operators receive a new notification about it.
To set up escalation of stale alarms:
-
Navigate to Company > Settings > Alarms and scroll to Escalation of Stale Alarms pane

-
Set the Enabled / Disabled toggle to the desired position
-
If you set the toggle to Enabled In the Escalation Delay field, select the delay time.
The time period you set is used by evalink talos to define alarms as stale. If an alarm stays in queue this length of time, evalink talos sends a notification to operators.
-
Select the Notification Channel from the following available options:
- Slack Notifications
- Twilio SMS
infoThese options become available if you configure corresponding integrations in evalink talos.
-
(Optional) Configure Conditions for stale alarms
infoIf you don't select any conditions for stale alarms, all alarms that stay in the alarm queue longer than the set period of time are considered stale and trigger notifications.
If you configure alarm conditions, only those alarms that meet the set conditions are considered stale and will trigger notifications. All other alarms stay in queue without any escalation until they are processed by an operator.
-
Click Save
Alarm Dismissal and Ignore Settings
There are several ways to dismiss and ignore alarms that are available to evalink talos users. Any alarm can be dismissed manually when it arrives. For details, see section Dismiss an Alarm.
You can also set up alarms to be ignored for a particular site. For details, see section Working with Site-based Alarm Settings.
You can also configure certain company-wide Alarm dismissal and ignore settings in Company > Settings > Alarms on the Alarm Settings pane.
-
You can allow all operators to dismiss any alarms or only test messages in Allow Alarm Dismissal
-
You can select, which version of Alarm Definitions evalink talos uses
For details, see section Work with Alarm Definitions.
-
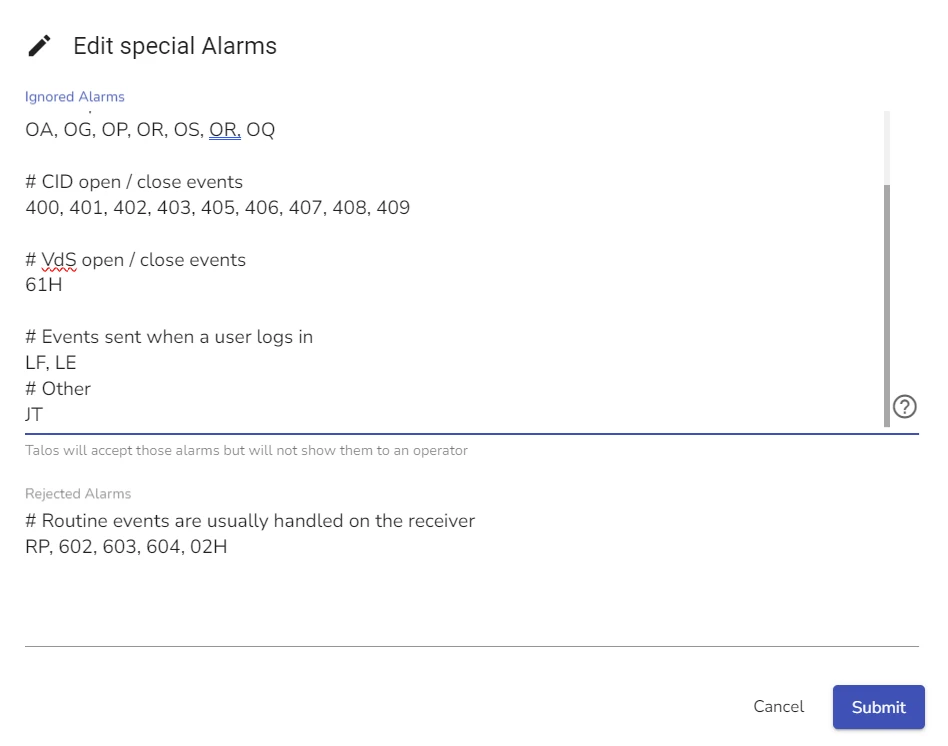
You can edit Special Alarms (Ignore, Reject) on the company level
Edit Special Alarm Settings
To edit special alarm settings:
-
Navigate to Company > Settings > Alarms and scroll to Alarm Settings pane
-
Click Edit Special Alarms
Special Alarms Editing window opens.

-
Use the expression syntax to add alarms you wish to ignore or reject in the corresponding panes
infoYou can add just alarm codes or alarm codes with specific parameters, for example
FA {Zone=3}stands for fire alarms from zone 3.Add comments that start with # to make your additions more readable.
For details about expression syntax, see section Alarm Expression Syntax.
-
Click Submit
Working with Alarm Channels
Alarm Channels enable you to create additional distribution and filtration means that you can use to customize the working environment of your operators. Alarm channels direct alarms with the help of rules and conditions. evalink talos uses alarm channels to define Workspaces for different User Types.
For details about working with Workspaces, see section Manage Advanced User Settings > Working with Workspaces.
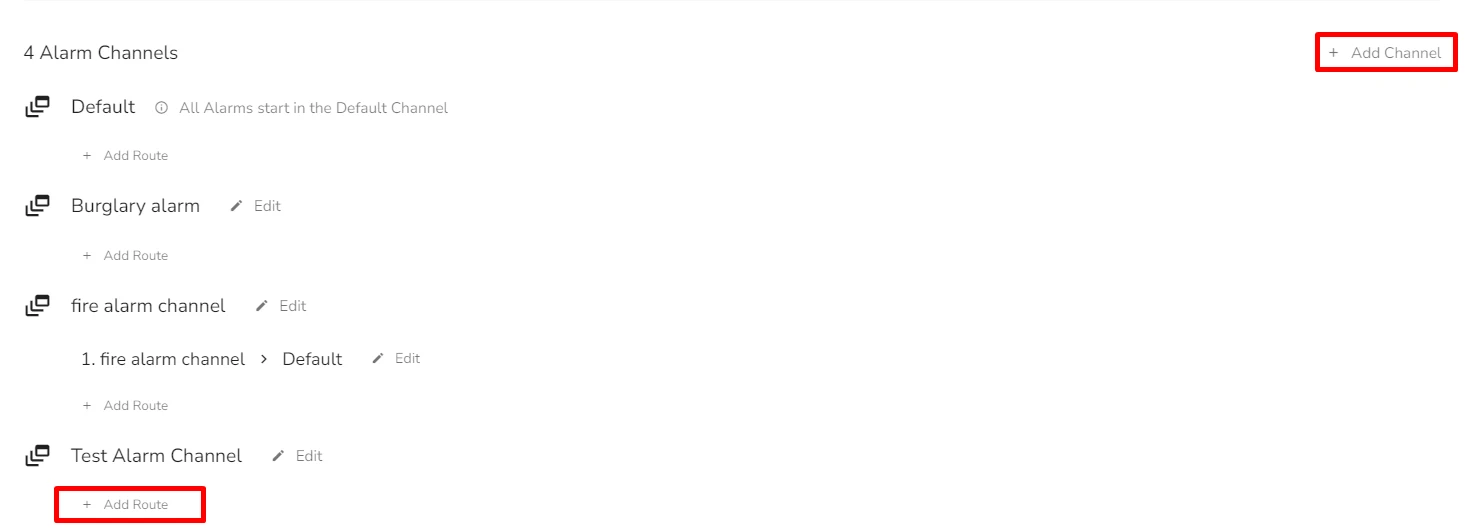
By default, all alarms start out in the Default alarm channel. When you configure additional alarm channels, evalink talos routes the alarms from the default channel according to the rules set in additional channels.
Alarm Channels use Alarm Channel Routes to direct alarms from one channel to another. By default, you don't have any Alarm Channel Routes created in the Default channel, so adding them allows you to redirect alarms from the Default Channel to your custom Alarm Channels.
Add an Alarm Channel
To add a new alarm channel:
-
Navigate to Company > Settings > Alarms and scroll to Alarm Channels pane

-
Click Add Channel
-
In the dialog that opens, enter the name of the new channel
-
Click Submit
The new channel is created. Now it can be used in various Workspaces. However, to connect it to other Alarm channels, you need to add Alarm Channel Route to it that leads to the desired channel.
Add an Alarm Channel Route
Alarm Channel Routes are sets of rules that allow you to direct alarms from one channel to another. If you want to properly use your custom channels, you need to add routes to the Default Alarm channel to connect it to your custom Channels.
You can add multiple Alarm Channel Routes with different conditions and different target channels to create a complex redirection setting.
Make sure you add necessary routes to the Default channel. All alarms first arrive to the Default channel and you need to specify routes for it to distribute the alarms to other channels.
To add an Alarm Channel Route:
-
In the Alarm Channels pane, locate the Alarm Channel to which you want to add a new Alarm Channel Route and click Add Route
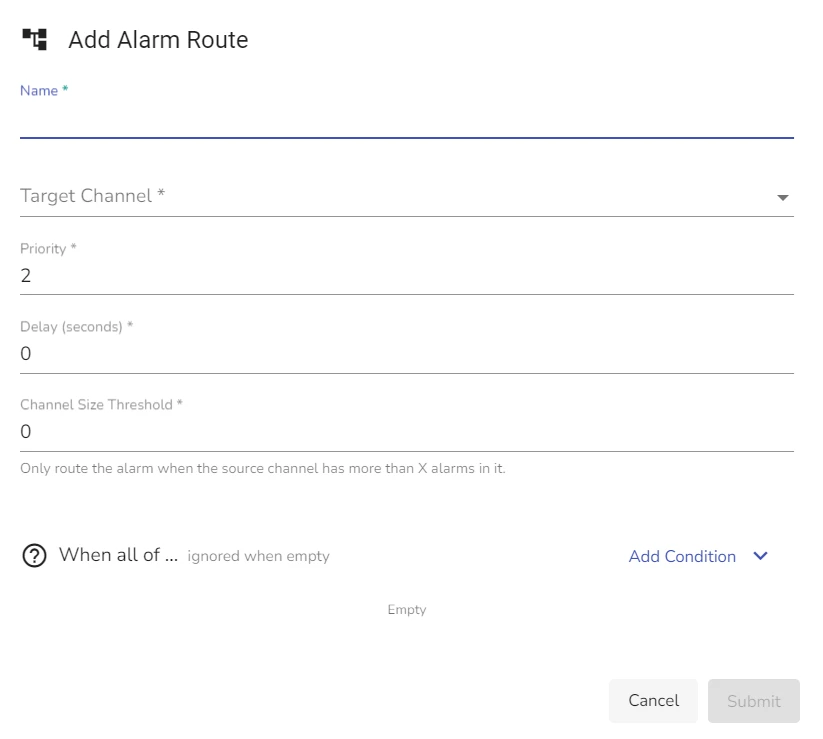
Add Alarm Route dialog opens.

-
In the Name field, specify the Route name
-
In the Target Channel field, select the channel to which alarms are redirected by this route
-
In the Priority field, specify the new priority for the redirected alarms
-
In the Delay, specify the delay time in seconds
infoThe Delay Time denotes the time Alarms stay on the current channel before evalink talos redirects them to another channel via this route.
-
In the Channel Size Threshold field specify the number of alarms after which the channel starts redirecting alarms via this Route
infoExample: If you set this parameter to 5, evalink talos uses the route you configure only when there are at least 5 alarms in the channel.
-
Add a condition to the Route by clicking Add Condition and selecting a condition and value from the dropdown
infoYou can add 2 conditions to a single route. The relation between conditions is always AND, which means, if you add two conditions, both of them need to be observed for evalink talos to redirect an alarm by this route.
For example,
when all of the Alarm Codes are FAandZone is 3conditions mean that all Fire Alarms from Zone 3 in this channel are redirected to the target channel you have specified for this route.If you leave conditions empty, evalink talos redirects all alarms from this channel by this route.
-
Click Submit
Edit an Alarm Channel Route
To Edit an Alarm Channel Route for a Particular Channel:
-
Locate the Alarm Channel and the Route you want to edit and click Edit next to the Route record
-
Edit the data in the Alarm Channel Route as desired
-
Click Submit
Delete an Alarm Channel Route
You can delete any Alarm Channel Routes from your custom created Alarm Channels or from the Default Channel.
To delete an Alarm Channel Route:
-
Locate the Alarm Channel and the Route you want to delete and click Edit next to the Route record
-
In the Edit Alarm Channel Route dialog that opens, click Delete in the bottom left corner of the dialog
-
Type the deletion confirmation and click Confirm Delete
When you delete an Alarm Channel Route, the redirection scheme that you use can be broken.
Edit an Alarm Channel
To edit an Alarm Channel:
-
Locate the Alarm Channel you wish to edit in the Alarm Channel list and click Edit next to its record
-
Change the Name of the Alarm Channel and click Submit
infoYou can't change the name of the Default Alarm Channel.
-
Add or delete Alarm Channel Routes as desired
Delete an Alarm Channel
You can delete any Alarm Channels except for the Default Alarm Channel.
To delete an Alarm Channel:
-
Locate the Alarm Channel you wish to edit in the Alarm Channel list and click Edit next to its record
-
In the Edit Alarm Channel dialog that opens, click Delete in the bottom left corner of the dialog
-
Type the deletion confirmation and click Confirm Delete
If this alarm channel was used in any Workspaces, you can still delete it.
Working with Alarm Sounds
You can customize sound notifications that evalink talos uses for various types of alarms. You can upload custom sounds in .wav and .mp3 format that do not exceed the size of 204800 bytes and assign them to various alarm types.
If a custom sound is assigned for specific Alarm Type, then evalink talos plays it else a sound is searched by severity. For example if new alarm has severity 6, but you have added only custom sounds for severity 3 and 5, then it evalink talos plays the sound for severity 5.
Upload a Custom Alarm Sound
To upload a Custom Alarm Sound:
-
Navigate to Company > Settings > Alarms and scroll to Custom Sounds pane
-
Click Upload New Sound
-
In the dialog that opens, click Choose Sound File
-
In your PC file explorer, navigate to the sound file you want to use and click Open
-
Configure new sound designation options:
- Select Alarm checkbox and select the Alarm Type for new sound
- Select Severity checkbox and select a Severity value
-
Click Submit
You can Delete your custom sounds by clicking the Delete icon next to their records. In this case evalink talos will use a default sound for this type of alarms.
Working with Advanced Alarm Settings
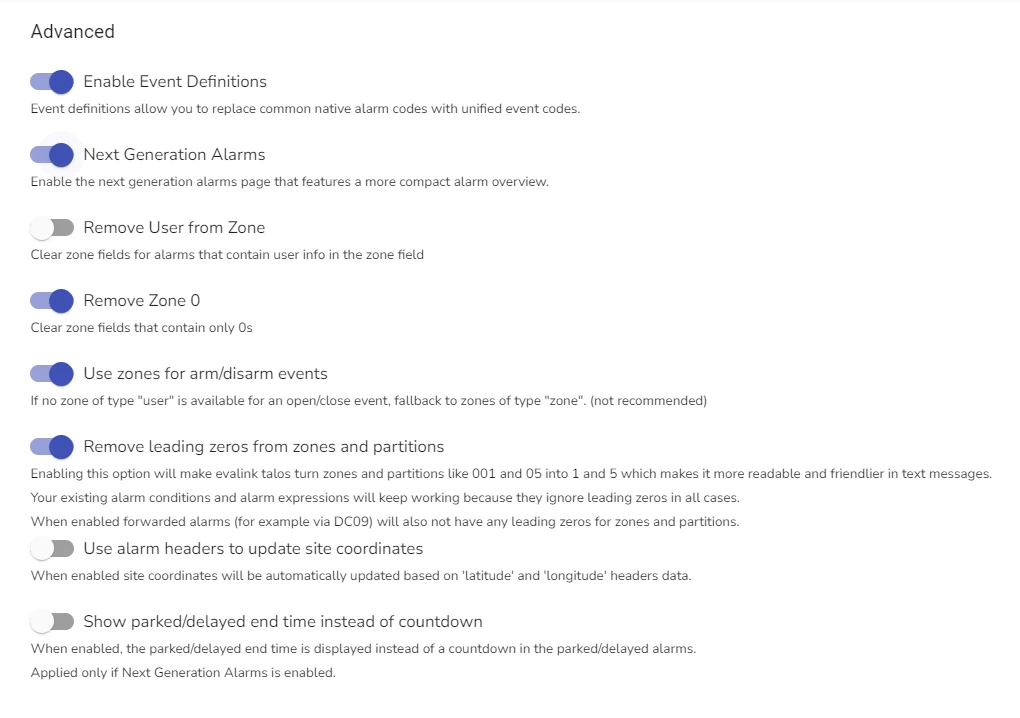
You can enable and disable several Advanced Alarm settings company-wide.

-
Enable Event Definitions
Enables or disables the use of evalink talos Event Definitions. For details about working with Event Definitions, see section Work with Event Definitions.
infoIf you disable this feature, all operations with Event Definitions become inaccessible on your tenant. For example, you will not be able to select the Event Is step or condition in workflows.
-
Next Generation Alarms
Enables Next Generation Alarms view, which is more compact and informative. By default, this option is enabled for all new Companies.
-
Remove User from Zone
Clears all
Zoneattributes from alarms that contain the valurUserin this field. -
Remove Zone 0
Allows to disregard zone values that contain only zeroes.
-
User Zones for Arm/Disarm Events
If no
Usertype zones are used for open/close or arm/disarm events, theZonetype is used. It is not recommended to enable this option when option Remove User from Zone is enabled. -
Remove Leading Zeroes from Zones and Partitions
When this option is enabled, evalink talos removes zeroes from zone and partition values like
005or0089leaving only non-zero numbers in the beginning.It doesn't change the settings of existing alarm conditions and alarm expressions, because they ignore leading zeroes in all cases. When this toggle is enabled, your forwarded alarms don't have leading zeroes as well.
-
Use Alarm Headers to Update Site Coordinates
When enabled, your site coordinates that evalink talos displays are taken from
latitudeandlongitudeheaders, if applicable. -
Show Parked/Delayed end time instead of countdown
Using this toggle, you can alternate between how timers are shown for parked workflows and delayed alarms. You can select between a countdown timer and an actual end time of parking or delay.
 Link is copied