Site-Based Alarm Operations and Settings
Working with Alarm Supervision
Alarm Supervision feature allows you to keep track of periodic alarms that you expect to receive and get notifications when expected alarms do not arrive. Using this feature, you can unload your operators from processing such periodic alarms as regular alarms. The most common use case for Alarm Supervision is managing heartbeat signals from various sources where you only need to take action if they do not arrive.
Alarm Supervisions are a site-level setting and you need to configure them for each particular site. You can add several independent Alarm Supervisions to a site.
Only Company Admins and Managers can configure Alarm Supervisions.
As Alarm Supervisions are best used with periodic heartbeat alarms, it is best practices to ignore such alarms so that they do not overload operators.
For details on how to add alarms to the Ignore list, see section Edit the Site Settings below.
Add an Alarm Supervision
To add a new Alarm Supervision:
-
Navigate to Sites > [Site] > Overview
-
In the site Overview page, scroll to the Settings section and click Alarm Supervision

The Alarm Supervision subtab opens
-
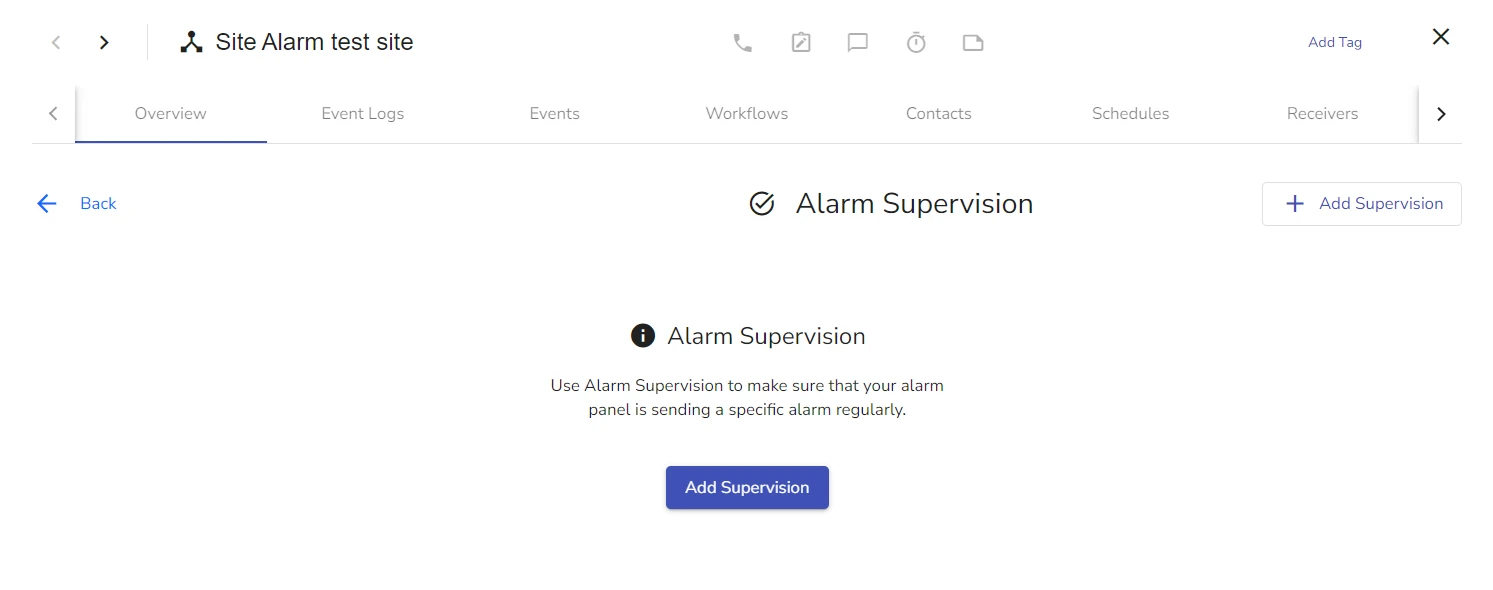
In the Alarm Supervision subtab, click Add Supervision
-
In the Name field, specify the name of the supervision
-
(Optional) In the Virtual Device field, select the virtual device from which the supervised alarms come
infoIn the dropdown list, you can select a device from those that are configured for this site. If you select a specific device, only alarms from this device are monitored.
If you select empty alarms are supervised sitewide.
-
In the Expected Alarm specify the alarm that you are supervising.
infoThe value that you can enter here is arbitraty alfanumerical. Make sure that when you specify this value, it corresponds to that of expected alarm.
-
In the Expected Interval in Minutes, provide the expected rate at which supervised alarms arive
-
In the Timeout Alarm, specify the alarm evalink talos sends when supervision fails (when supervised alarms do not arrive at the expected time)
-
(Optional) Check the Repeat of Timeout Alarm checkbox and specify the following values:
- Repeat Timeout Interval in Minutes: time interval in minutes between repeated timeout alarms sent after supervision failure.
- Repeat Timeout Alarm: alarm evalink talos sends repeatedly after supervision fails.
-
(Optional) In the Restore Alarm, specify the alarm evalink talos triggers when the supervision switches back to OK status
infoIf you leave this field blank, evalink talos uses the Timeout Alarm with
alarmValue = falseflag. This means, it still sends restore signal, but not a specific Restore alam. Evalink talos uses the same alarm code but with a restore message. -
Click Submit
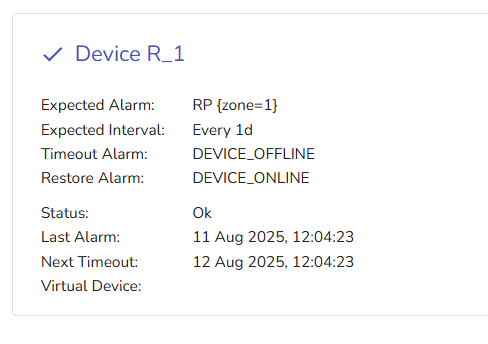
If supervised alarms arrive at the expected rate, the Site > Alarm Supervision tab has the following view:
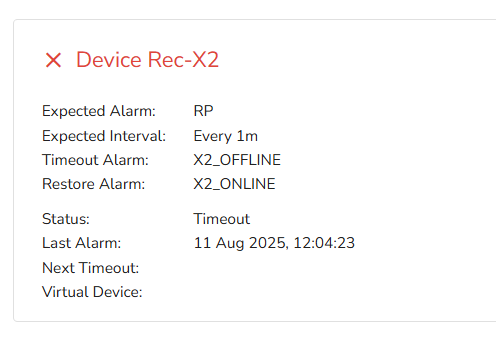
If a supervised alarm doesn't arive at the expected time, evalink talos sends a Timeout alarm and the supervision tab has the following view:
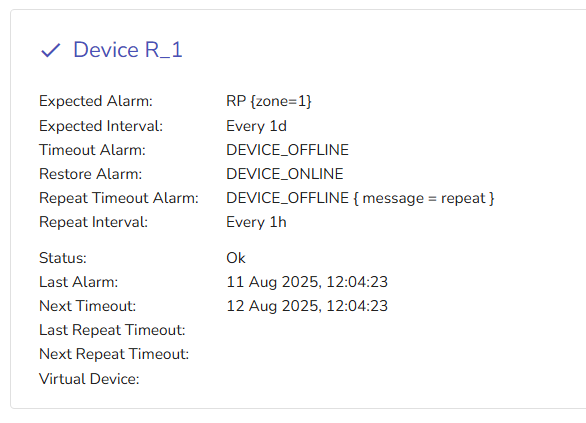
If you have configured the Repeat Timeout Alarm option for the supervision, evalink talos sends the pre-defined timeout alarm repeatedly until the supervision is restored and the alarm supervision record in Site > Settings > Overview has the following view:
Edit an Alarm Supervision
To edit an alarm supervision:
-
Navigate to Navigate to Sites > [Site] > Overview > Alarm Supervision
-
Select the alarm supervision record you want to edit and click the More icon next to it and select Edit
Alarm Supervision Editing dialog opens.
-
Edit the alarm supervision as desired
-
Click Submit
View Alarm Supervision Version History / Restore to Version
You can view all the previous edits made to an existing alarm supervision with dates of edits and users who made them and restore the existing record of alarm supervision to a selected version.
To view alarm supervision version history:
-
Navigate to Navigate to Sites > [Site] > Overview > Alarm Supervision
-
Select the alarm supervision record you want to edit and click the More icon next to it and select Version History
Alarm Supervision Version History dialog opens.
-
(Optional) From the list of edits, select the edit you want to revert to
-
Click Close to exit the dialog without saving changes or click Restore chosen version
Set Alarm Supervision Status
To set a particular status to an Alarm Supervision:
-
Navigate to Navigate to Sites > [Site] > Overview > Alarm Supervision
-
Select the alarm supervision record you want to edit and click the More icon next to it and select Set Status
Alarm Supervision Status dialog opens.
-
In the Status field, specify one of the following values:
- OK
- Timeout
-
Set the Alarm Supervision Timeout by either moving your up and down keyboard arrow keys or selecting particular time and date from the calendar view
-
Click Submit
Delete an Alarm Supervision
To delete an alarm supervision:
-
Navigate to Navigate to Sites > [Site] > Overview > Alarm Supervision
-
Select the alarm supervision record you want to edit and click the More icon next to it and select Delete
-
In the dialog that opens, type deletion confirmation and click Confirm Delete
The alarm supervision is deleted along with its version history.
Working with Test Modes
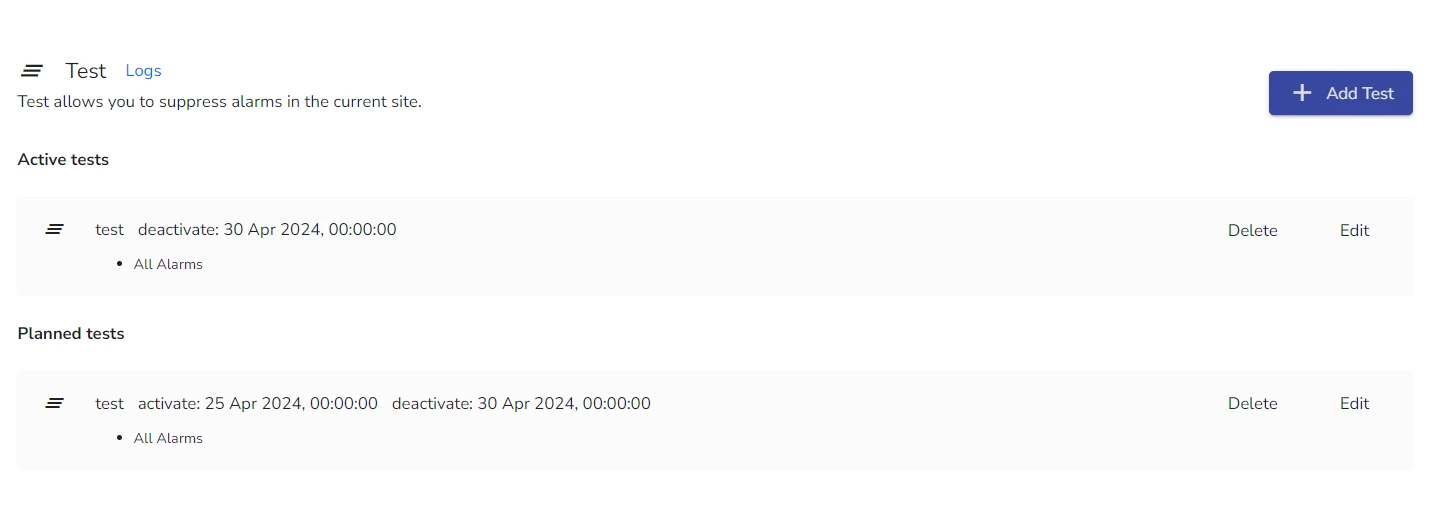
Test modes allow you to apply temporary alarm conditions to sites. When a test mode is active, all alarms coming from a particular site are suppressed as the site is in 'Test Mode'. Test modes are site-specific configurations and can be added only at a site level. However, you can include Test Modes when creating a Site Template. The Logs option in the Test view of each site shows all actions with Test Modes, such as adding, activating, updating, deleting, with time stamps and operators who performed the action.
Add a Test on a Site
To add a Test Mode for a site:
-
Navigate to Navigate to Sites > [Site] > Overview
-
Scroll to the Test area of the site overview and click Add Test
Test dialog opens.
-
In the Select Test Type field, select a Test Type from the dropdown list
infoBy default, the System test type is available for all sites in evalink talos. Company Admins can configure additional test types which afterwards become available for selection.
For details, see section Working with Test Types.
Test configuration dialog opens.
-
Select date and time for test activation and deactivation
-
In the Reason field, provide a reason for the use of the Test Mode you are creating
-
(Optional) Toggle the Specific Test Mode on or off
infoBy default, this toggle is set to off. It means that when the Test Mode is active, all alarms from this site are considered test messages and are suppressed.
-
If in Step 6, you toggled Specific Test Mode to on, configure conditions for test alarms
infoWhen this toggle is on, evalink talos considers only alarms that match specified conditions as test messages. All other alarms are treated as regular alarms.
You can add 2 conditions for test messages. The conditions logic follows the same rules as that for workflow conditions. For details, see section Workflow Incoming Conditions.
-
Click Sumbit
If the start time of your test mode is immediate, evalink talos lists it in the Active Tests record. If the start time is not immediate, the newly added test record is placed in Planned Tests and evalink talos automatically moves it to the Active Tests when it starts.
Edit a Test Mode for a Site
To edit an active or a planned test:
-
Navigate to Navigate to Sites > [Site] > Overview
-
Scroll to the Test area of the site overview and locate the desired Test record
-
Next to the Test record, click Edit
-
Edit the test configuration as desired
-
Click Submit
Delete a Test Mode for a Site
-
Navigate to Navigate to Sites > [Site] > Overview
-
Scroll to the Test area of the site overview and locate the desired Test record
-
Next to the Test record, click Delete
-
Confirm the Deletion
Working with Site-based Alarm Settings
Special alarm settings can be configured only on the site level for each particular site. Company Admins and Managers can configure Site Settings and Alarm Settings for sites.
For details on how to configure site settings, see section Manage Sites > Edit Site Settings.
You can add the following Special Alarms for each site:
- Ignored Alarms:
evalink talos accepts these alarms and logs them into Event logs, but doesn't show them to operators. Examples of ignored alarms are regular technical alarms informing on the connection status of an alarm panel.
- Rejected Alarms:
evalink talos rejects these alarms completely and doesn't log them into Event logs. Examples of rejected alarms are automatic communication test reports.
It is best practices to add alarms to the Reject list with caution. Once you add any alarm codes there, these alarms do not appear anywhere, leaving no auditable trace in any logs.
- Alarms for Activation
When evalink talos received this alarm, it activates the site.
- Alarms for Deactivation
When evalink talos receives this alarm, it deactivates the site. When in Inactive state, a site rejects all alarms, except for the alarm specified in the Alarm for activation field.
In evalink talos, alarms that are ignored and / or rejected by default are specified in the globally-configured list of ignored and rejected alarms.
To edit the list of alarms that are ignored and / or rejected by default, go to the Company > Settings > Alarms and click Edit Special Alarms. After you made changes, click Submit.
Adding Alarms to Ignore / Reject Lists
To add an alarm to Ignore / Reject list, do the following;
-
Navigate to Navigate to Sites > [Site] > Settings and scroll to Special Alarms pane
-
In the Ignored Alarms or Rejected Alarms field, add the alarms you want to ignore using one of the following:
-
Alarm codes as provided by CID, SIA, VdS and Sitasys definitions
-
Alarm expressions
infoFor more information about alarm expressions, see section Alarm Expression Syntax.
To stop ignoring / rejecting a globally specified ignored or rejected alarm for a particular site, in the Ignored Alarms / Rejected Alarms field for this site, enter ! immediately followed by the alarm code, for example: !302.
- Click Save
 Link is copied