Operations with Dynamic Contacts
evalink talos allows you to create Dynamic Contacts on all levels: global, site and site group. For recommendations on which level to create Dynamic Contacts for a particular task or workflow, see section Dynamic Contacts Overview > Using Dynamic Contacts: a Summary.
The procedures below can be performed on the corresponding Contacts page of a site, a site group or the Company and are the same for every level. For information on how to access the Contacts page, see section View Contacts of a Site, Site Group, or Company > The Contacts Page.
Dynamic contacts are created using regular contacts and Contact Lists. You need to have at least one global contact or a Contact List to be able to create dynamic contacts of any level.
Create a Dynamic Contact
To create a Dynamic Contact:
-
On the Contacts page, scroll down to the Dynamic Contact area and click the Add Dynamic Contact button
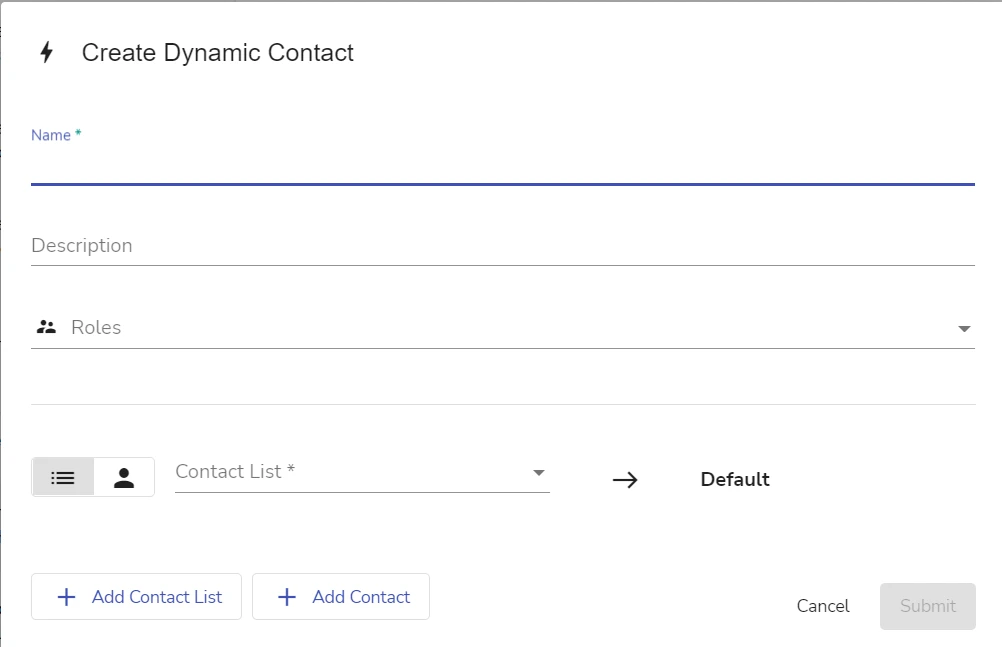
The Dynamic Contact editing dialog opens.
The figure below shows the Dynamic Contact editing dialog:
-
Specify the Dynamic Contact Name
The Name field is mandatory. The name must be unique among all contact names on the page.
tipAs Dynamic Contacts are usually a collection of regular contacts and Contact Lists grouped for a purpose, you can use a purpose-related name. For example, Security or Fire Brigades.
-
(Optional) Add a Dynamic Contact description
-
(Optional) Specify one or multiple Contact Roles for the Dynamic Contact
infoYou need to assign a Contact Role to a Dynamic Contact to use it in workflows.
Contact Roles that you specify for a Dynamic Contact override the roles that have been previously specified for each particular regular contact within a collection.
For details, see section Use of Contact Roles in Dynamic Contacts
-
Add a default contact
a. Specify the type of a default contact
- To specify a single contact, toggle the Contact button
- To specify a Contact List, toggle the Contact List button
b. Select the necessary contact from the dropdown list or by entering a query in the search field
infoA default contact option of the Dynamic Contact doesn't have any conditional settings.
evalink talos reaches out to the default contact if the settings of an incoming alarm processed by a workflow where this Dynamic Contact is used, do not match with conditions specified for other contacts or Contact lists within this Dynamic Contact.
If you only specify a default contact option within a Dynamic Contact, its functionality will be similar to that of a regular contact or Contact List.
-
(Optional) Add regular contacts and Contact Lists to the collection by clicking Add Contact or Add Contact List
infoFor details about which contacts and Contact Lists can be added to a Dynamic Contact, see section Which Contacts Can Be Added to a Dynamic Contact below.
-
Add conditions to contacts in the Dynamic Contact
For details about adding conditions, see section Set Conditions for a Dynamic Contact below.
-
(Optional) If you need to remove a contact or a Contact List from the Dynamic Contact, click on the corresponding Remove button next to the contact record
infoYou can remove any contact or a Contact List within a Dynamic Contact collection except for the default one.
To remove a default contact entry, you need to delete the entire Dynamic Contact record. For details, see section Delete a Dynamic Contact below.
-
Click Submit to create a Dynamic Contact
Which Contacts Can Be Added to a Dynamic Contact
You need to have at least one regular contact to be able to add it to a Dynamic Contact. For information on how to create a contact, see section Operations with Contacts > Create a Contact.
Depending on the level where you create Dynamic Contacts, different rules apply:
- for the global level: only global contacts are available to add to Dynamic Contacts
- for the site group level: global and site group contacts are available to add to Dynamic Contacts. Contacts from individual sites in a site group are not available
- for the site level: global and site contacts are available to add to Dynamic Contacts. If a site belongs to a site group, the contacts of the site group are also available
You can add multiple contacts or Contact Lists to a Dynamic Contact. A single contact or a Contact List can be added to multiple Dynamic Contacts.
When added to a Dynamic Contacts, regular contacts or Contact Lists will be marked as global or belonging to a particular site group, for global and site group contacts respectively. Site contacts are available only on the site level and are not marked.
Set Conditions for a Dynamic Contact
To set conditions:
-
Create a Dynamic Contact and add a default contact option
See section Create a Dynamic Contact above for details.
-
Add a contact or a Contact List by clicking Add Contact or Add Contact List
-
Select the necessary contact from the dropdown list or by entering a query in the search field
A condition editing area with two condition blocks opens.
-
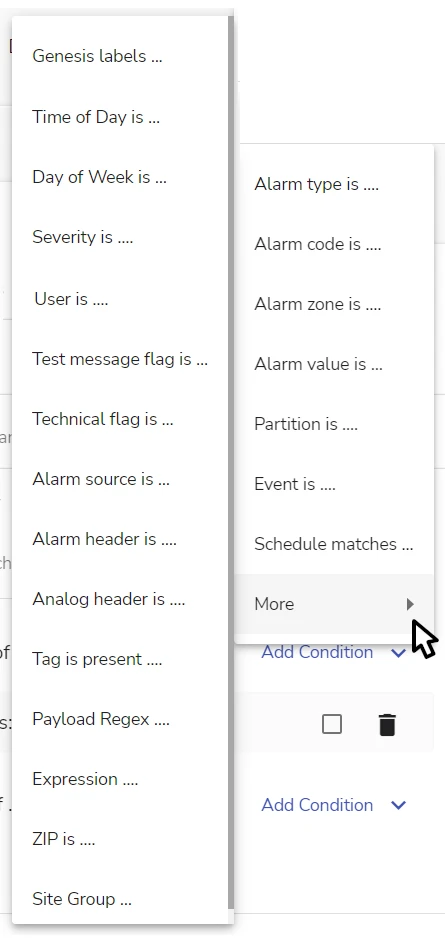
Click on the Add Condition dropdown list to select a condition from the condition list
The figure below shows a condition editing area with a list of available conditions:
 info
infoSome conditions are available only if a corresponding integration is enabled and configured properly.
The most popular conditions are listed first. You can view all conditions in the list by clicking More.
You can add multiple conditions to a condition block by clicking Add Condition.
For details on condition matching rules, see section Dynamic Contacts Conditions Matching below.
-
Set the value for each condition
infoFor example, if you want to define the type of the alarm as a condition, you need to select the alarm type.
-
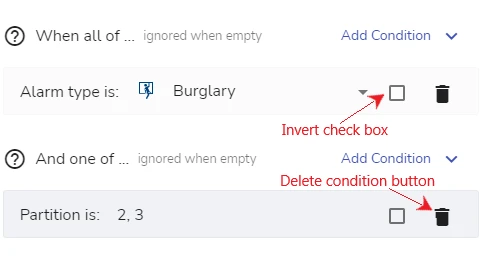
(Optional) Use the Invert checkbox if you want the condition rule to match any value except the selected one
-
(Optional) Use the Delete icon to remove a condition so that you can add a different one
The figure below shows the condition editing area with the Invert checkbox and the Delete icon:
 info
infoIf you leave either condition block empty, evalink talos ignores it when executing a workflow.
You can have just one or both condition blocks configured.
The figure below shows how to add several conditions to a single condition block in a Dynamic Contact:
-
Repeat steps 4 through 8 for each contact or Contact List you add
-
Click Submit
Dynamic Contacts Conditions Matching
When you use a Dynamic Contact in a workflow, setting conditions for individual contacts or Contact Lists within this Dynamic Contact allows you to differentiate who to contact in case of an incoming alarm.
There are two condition blocks that can be added to a contact or a Contact List within a Dynamic Contact.
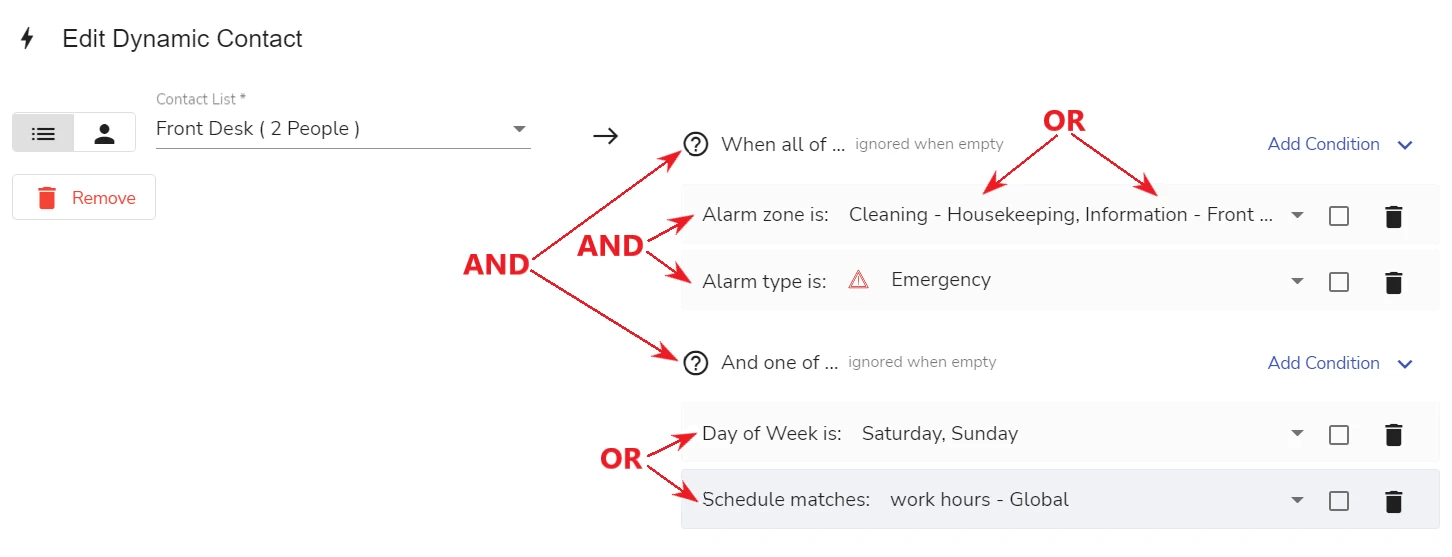
- the When all of condition block: conditions added to this block must be observed simultaneously to be considered a match. The relationship between separate conditions in the block is AND
- the And one of condition block: any one condition added to this block must be observed to be considered a match. The relationship between separate conditions in the block is OR
If you configure both condition blocks for a contact or a Contact List within a Dynamic Contact, both blocks must be observed. The relationship between the blocks is AND.
Separate conditions can have different value types:
- a set value: for some conditions, you can select values from existing settings, such as Alarm code
- an arbitrary alphanumeric value: you have to type them manually, such as ZIP code or Payload regex
- a multiple choice value: you can select several values at once for some conditions, such as Zone or Partition
For multiple choice values, if you add more than one, only one value will have to match when processing an alarm for evalink talos to observe the condition. The relationship between multiple values of a single condition is OR.
For example, you select Zone to be added as a condition to the When all of block. Your site has several zones and you add Basement and Hall as selected condition values. For this condition to be considered a match, only one of these zones has to be present in alarm details.
The figure below illustrates the condition matching rules:
Edit a Dynamic Contact
To edit the details of a Dynamic Contact:
-
On the Contacts page, click the Dynamic Contact record in the list
The Dynamic Contact editing dialog opens.
-
Add or delete contacts and Contact Lists as desired
For instructions on how to add and delete contacts, see section Create a Dynamic Contact above.
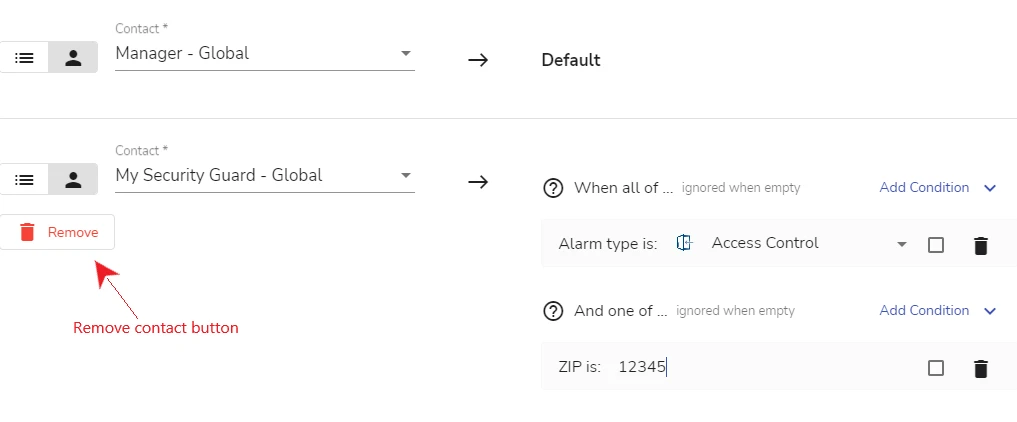
The figure below shows the Dynamic Contact editing dialog:
-
Click Submit
Use of Contact Roles in Dynamic Contacts
Contact Roles allow you to use Dynamic Contacts in workflows.
You can assign one or several Contact Roles from the list of global Contact Roles to a Dynamic Contact. For information on how to create a Contact Role, see section Manage Contact Roles > Create a Contact Role.
You can only assign those Contact Roles to Dynamic Contacts that haven't previously been assigned to a regular contact or a Contact List.
The role or roles that you assign to a Dynamic Contact override roles assigned to individual contacts or Contact Lists within a Dynamic Contact.
For example, you have a contact named John Smith with the Contact Role Manager and you include it in a Dynamic Contact with the Contact Role Security. You want to use this Dynamic Contact in case of a burglary alarm. When you add this Dynamic Contact to a workflow, you should use the Contact Role Security. It takes precedence over the Manager Contact Role of John Smith. John Smith will be contacted even if you don't specify the role Manager when adding the Dynamic Contact.
When you add several Contact Roles to a single Dynamic Contact, you can use this Dynamic Contact in various workflows, selecting different Contact Roles for each workflow.
Each regular contact or Contact List can be a part of multiple Dynamic Contacts on a global, site or site group level and have different Contact Roles within each Dynamic Contact. This helps you to use the same contacts differently, depending on your purpose, and not to create too many contact entities.
Instead of creating a separate workflow for each particular event type and contacts with varying Contact Roles, you can create a single workflow and use a Dynamic Contact with a blanket Contact Role. You can conditionalize various contacts within this Dynamic Contact collection so that they can be reached depending on conditions you set.
evalink talos doesn't prevent you from deleting Contact Roles that are used in Dynamic Contacts. If you delete a global Contact Role that is being used in a Dynamic Contact of any level, it will simply be removed from the Dynamic Contact. However, if this Dynamic Contact is used in a workflow, the workflow may not work correctly, as Dynamic Contacts are attached to workflows through Contact Roles.
Use of Dynamic Contacts in Workflows
When you use a Dynamic Contact in a workflow, it is handled the same way as a regular contact. If you have enabled and properly configured certain integrations, such as Email Integration, Twilio SMS Notifications, or Twilio VoIP calls, respective manual and automated steps become available in workflows. This way, you can use several communication means, such as a prompt to call, an automated call, an email or a text message.
Workflow steps that imply contacting include:
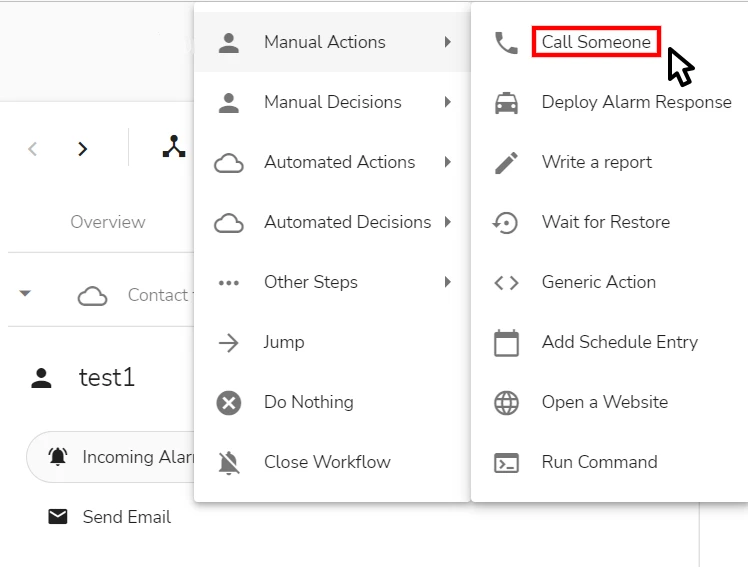
- Manual Actions > Call Someone
- Manual Decisions > Call Someone
- Automated Actions > Send Email
- Automated Actions > Twilio Send SMS
On each of these workflow steps, you can select a Dynamic Contact to use by means of a Contact Role. For details, see section Add a Dynamic Contact to a Workflow below.
Some workflow steps that deal with contacting, such as, for example, Twilio Group Call don't support Dynamic Contacts.
You can use Dynamic Contacts in all types of workflows.
Make sure that appropriate contact information is configured for your contacts, depending on the means of communication you want to use, otherwise the workflow may be processed incorrectly.
For example, if you want to contact someone by means of an email, make sure the contact has an email specified.
Add a Dynamic Contact to a Workflow
Before you begin, make sure that you have created at least one Dynamic Contact and assigned a Contact Role to it.
- Create a new workflow or open an existing one
Information about how to create and edit a workflow will be available in further documentation releases.
-
Add a workflow step which uses Contacts, such as Send Email, Call Someone or Send Twilio SMS
The figure below shows the configuration of a workflow step that implies contacting someone:
-
In the step configuration area, select a Contact Role that you have assigned to the Dynamic Contact you want to use
The figure below shows how to attach a Contact Role used in a Dynamic Contact to a workflow step:
-
Save your workflow.
Search for Dynamic Contacts
You can search for Dynamic Contacts on a site, a site group or a global level on the Contacts page of the respective entity (see section View the Contacts of a Site, Site Group, or Company).
To search for a contact:
-
Go to the Contacts page and scroll down to the Dynamic Contacts area
-
Place your cursor in the Search field and start typing
infoThe search mechanism is dynamic and filters suggestions as you type. It searches by Contact Name, Description, Contact Lists and Roles simultaneously. A match in any of these fields will show in search results.
-
Select the necessary contact from the search results suggested by evalink talos
Once you have located the necessary contact, you can edit it or delete it.
Delete a Dynamic Contact
To delete a Dynamic Contact:
-
On the Contacts page, scroll to the Dynamic Contacts area and click the delete icon for the contact record
-
Enter the confirmation code and click Delete
There is a known issue that sometimes a Dynamic Contact can be deleted only when all contacts and Contact Lists are removed from it.
If a contact is included in some workflows, evalink talos doesn't prevent you from deleting it, nor does it warn you of a Dynamic Contact being used in a workflow. When deleting a contact, you should keep in mind which workflows are affected, and adjust these workflows manually afterwards, otherwise these workflows can be processed with errors.
 Link is copied