Alarm Reports
Information about generated PDF reports on this page concerns alarm reports in the First Generation Reporting system.
For details about alarm reports in the Next Generation Reporting system, see section Next Generation Reporting > Alarms Report.
Alarm Reports Basics
An alarm report provides the list of alarms that were triggered during a selected period of time. The list displays alarms in all statuses (open, closed, etc.).
Reporting the details of a single alarm is not available.
The following types of alarm reports are available:
-
CSV alarm reports generated from an Events page of a site, site group, or Company (see section The Events Page)
These alarm reports can be downloaded or distributed by email to specified recipients.
Site group and Company alarm reports provide an aggregated list of alarms:
-
site group alarm reports – received by all sites in the site group
-
Company alarm reports – received by all sites
The figure below shows an example of a CSV alarm report:

For more details, see section CSV Alarm Reports.
-
-
monthly PDF site / site group alarm reports downloadable from the Overview page of a site or a site group
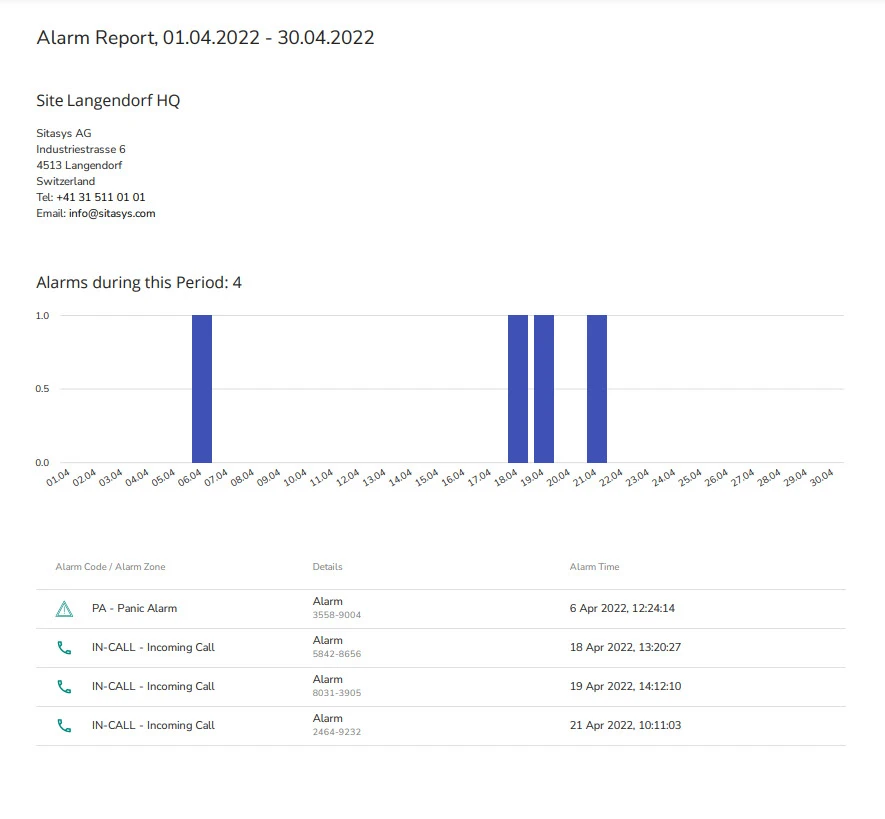
A monthly PDF alarm report includes the site details, a chart, and the list of alarms for the selected month. The figure below shows an example of a PDF alarm report:

For more details, see section PDF Alarm Reports.
The default template for PDF alarm reports can be customized. For more information about customizing PDF report templates, see section Customize PDF Templates.
The Events Page
The Events page lists the alarms that arrived for an entity. By default, alarms for the last week are shown.
The following Events pages are available, with the following navigation steps to access them:
-
the Events page of a site – go to Sites > [site] > the Events tab
-
the Events page of a site group – go to Site groups > [site group] > the Events tab
-
the global Events page – go to the Events page in the left menu
On the Events page, it is possible to view the alarms for a selected period, filter them as necessary, and download / distribute the resulting alarm report in CSV format.
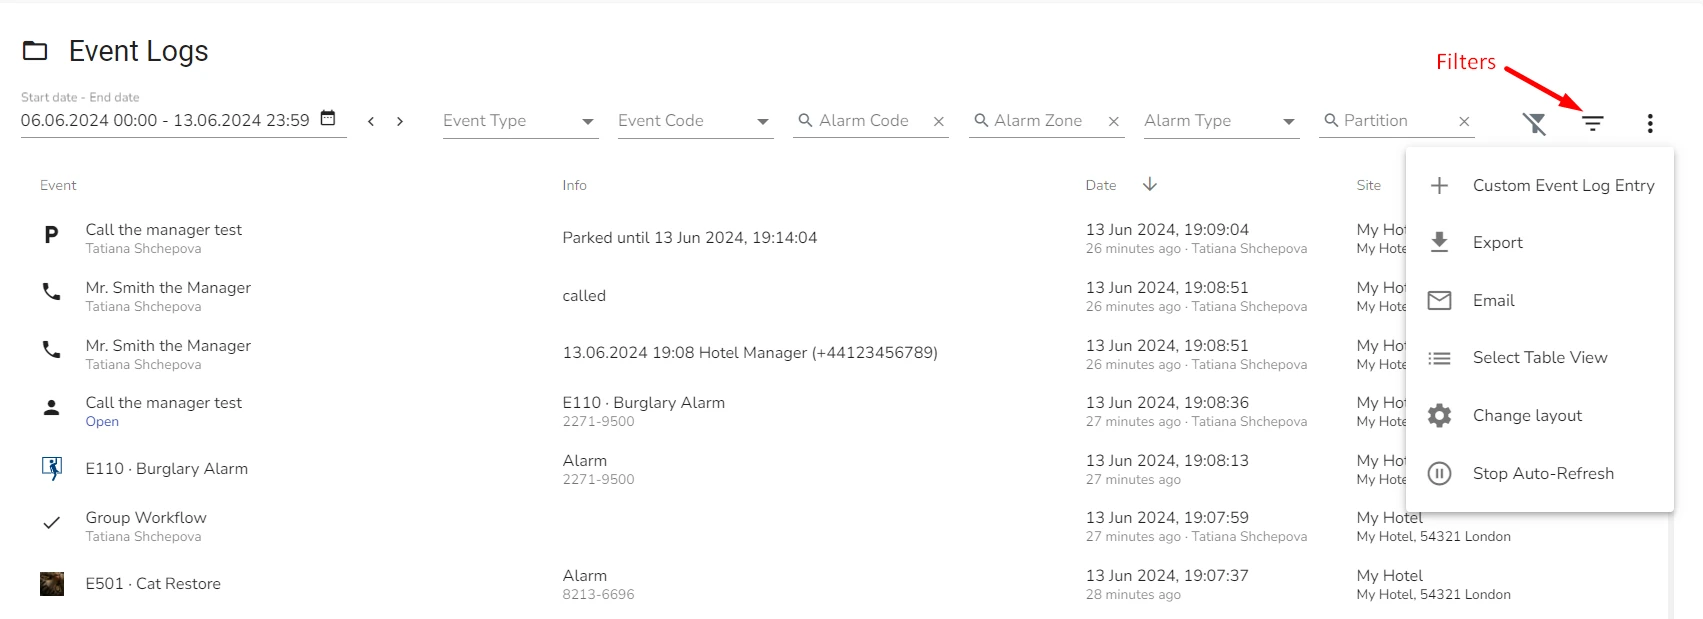
The figure below shows the control elements available on the Events page:

Before generating an alarm report, it is possible to:
-
Add a Custom Event Log Entry
A custom event log entry is an arbitrary text comment you can add as an event to a particular site.
-
Select Table View
This changes the table layout for the report.
-
Сhange Layout
Add or remove various Report elements.
-
Toggle Auto-Refresh
Toggling this option enables or disables automatic refresh of the Event Logs page and addition of new entries. It is also possible to toggle this option using Alt+Shift+U shortkey.
-
close all new alarms with certain parameters
To close alarms, filter the list to include the alarms to be closed (no filter to close all alarms), click the three dots icon at the right side of the page, select Dismiss, and confirm the operation.
Closed alarms remain in the list.
-
delete the alarms you don't want to include in the report
Only Administrator can delete alarms.
To delete alarms, filter the list to include only the alarms you want to delete, click the three dots icon at the right side of the page, select Delete, and confirm the operation.
warningAn alarm is deleted permanently. After an alarm is deleted, the event log of the workflow that processed the alarm is deleted permanently from the Event Logs page.
-
filter the list of alarms
To filter the list, you can use:
-
the search fields at the top of the page (see the figure above)
-
a set of Additional filters – available by clicking on the icon at the top right of the Events page (see the figure above)
The Additional filters dialog is shown on the figure below:
tips- In the Additional filters dialog, the Standard option (see the figure above) is used to denote regular alarms, as opposed to specific ones
On the figure above, selecting the two Standard options will filter alarms that are not Technical and not Test Messages, accordingly.
- The Reset filters icon in the Additional filters dialog resets only the filters in this dialog. Filters on the main Events page have their own reset icon
-
PDF Alarm Reports
You can export a PDF alarm report for a site or a site group for the selected month – for example, December – 2022. The operation is available on the site / site group Overview page (Sites > [site] or Site Groups > [site group]).
This alarm report includes the full list of alarms for the selected month, as it would be displayed on the site or site group Events page (see section The Events Page), without any filters applied. For the month currently in progress, the report displays alarms received from the first day of the month until the current moment.
For this type of reports, the only filtering option available is including or not including test messages.
The figure below shows exporting a PDF alarm report for a site group:
To export a PDF alarm report:
-
Open the Overview page
- of a site – go to Sites > [site]
- of a site group – go to Site groups > [site group]
-
Scroll down to the middle of the page and click Export PDFs
-
From the list that appears, select Alarm Report
-
In the Download Alarm Report dialog that opens:
-
in the Month field, select the month
-
(optional) select the Include Test Messages checkbox to include test messages in the report
By default, test messages are not included.
-
-
Click Download
The PDF alarm report is downloaded to your default Downloads folder.
There is a known issue with PDF reports download if your operation system doesn't receive data for Date and Time settings automatically from the time server. A solution for the issue on Windows OS is described in evalink talos Knowledge Base: Failed to export PDF in evalink talos.
 Link is copied