More Operations with a Workflow
View a Workflow in Fullscreen Mode
To open a workflow in full screen, click the  button in the top pane of the editor.
To exit the fullscreen mode, click on the  button.
Test a Workflow
The test workflow option allows to simulate the workflow execution directly in the workflow editor without triggering an alarm with matching conditions.
No people are contacted during the test. The respective workflow steps (for example, Call Someone, Send Email) and other steps that cannot be simulated display the Unavailable while Testing message.
The workflow test doesn't create a record on the Event Logs page.
To test a workflow:
-
Open the workflow in the editor (see section Work with Workflow Steps > Workflow Editor)
-
In the top pane of the editor, click on the
 button
Watch the workflow test run.
While testing the steps that require user input (typing some text or selecting an option), provide the necessary input.
When Unavailable while Testing message is displayed, click Continue to proceed with the test.
- Finish the test
Depending on the settings configuration, in order to finish the test and close the test window, you may need to:
- click Close workflow
- select a Workflow Outcome
- click Close Test Window at the top right
Export a Workflow
To export a workflow:
-
Open the workflow in the editor
-
Click on the three dots icon at the top right
-
Select Export to File to start the download
The workflow is downloaded as a JSON file with a name Talos-Workflow-[workflow-name].
You can later import the downloaded workflow to any level of the workflows hierarchy and thus create a global, site group or site-level workflow.
Note that a Managed Workflow cannot be imported to a site, only to the Workflows page of a site group or Company. For a definition of a Managed Workflow, see section Standard, Managed Workflows, and Workflow Templates > Managed Workflows in Workflows Overview > Workflow Types.
View Workflow Version History
This operation is performed in the workflow editor or a particular workflow. The procedure is the same for global, site group- and site-level workflows.
To view the version history of a Managed Workflow, open it on the original Workflows page where it was created. For instructions, see section Work with Workflow Settings > Open a Managed Workflow on Its Original Workflows Page.
You can view the workflow version history and restore one of the previous versions – for example, to undo the unwanted changes.
To view the version history of a workflow:
-
Open the workflow in the editor
-
Click on the three dots icon at the top right
-
Select Version history
On the version history page that opens, you can:
-
scroll the list of workflow versions
-
assign a name to a version. To do so:
- click on the three dots icon that appears to the right of the version on mouse hover
- specify the version name in the field that expands
- press Enter
-
restore one of the previous versions. To do so, select the version you wish to restore and click Restore chosen version
Clicking Restore chosen version closes the dialog. Note that the button is active only when a version different from the current one is selected.
To return to the workflow editor without restoring a version, click on the <- Back link in the upper-left part of the dialog.
Work with Workflow Overrides
Administrator or Manager can create one or several overrides for a workflow. An override is an alternative version of the current workflow that substitutes the original workflow for the specified time period.
When an override is created, it initially has the same name, steps, and settings as the original workflow. After an override is created, Administrator and Manager can edit any of its parameters, except the incoming conditions.
It is possible to create a site-level override for a Managed Workflow that is linked to a site. For information on Managed Workflows, see section Standard, Managed Workflows, and Workflow Templates > Managed Workflows in Workflows Overview > Workflow Types.
A site-level override of a linked Managed Workflow can also be edited.
On the Workflows page, a workflow for which an override was created is marked with a blue dot with an hour plate, see the figure below.
In the workflow editor, an active override icon is displayed, with the number of active overrides displayed in a blue circle above it.
If a workflow is opened in the editor while an override is in progress, the override is displayed instead of the original workflow. This is indicated by a bubble with the override duration that is displayed in the top pane of the editor, see the figure below:

After an override expires, it is automatically deleted from evalink talos.
Create an Override
The figure below shows the creation of an override:
To create an override for a workflow:
-
Open the workflow in the editor (see section Work with Workflow Steps > Workflow Editor)
-
In the top pane of the editor, click on the override
 icon
icon -
Set the date and time of the override start and end
-
Click Submit
The workflow editor switches to the overriding workflow that was just created. The bubble with the override duration is displayed in the top part of the editor, and an override indication is added to the workflow tab on the Workflows page.
-
Edit the overriding workflow as desired
-
Click Save
 to save the override
Add Another Override
To add a new overriding workflow:
- In the workflow editor, click on the active override icon in the top pane
An inactive override icon  indicates that the workflow currently has no overrides.
-
Select Add Override from the list
-
Repeat the procedure in section Create an Override
Switch between an Override and the Original Workflow
To switch between the original workflow and an overriding workflow:
- In the workflow editor, click on the override icon in the top pane
An icon surrounded by a solid line indicates that at least one override was created.
-
Select the appropriate option from the list:
- the entry with the icon indicates the original workflow
- an entry with the icon indicates an override
Edit an Override
To edit an overriding workflow:
-
In the workflow editor, switch to the overriding workflow as described above
-
Click on the bubble that displays the override duration and select Edit Override
-
Apply the changes and click Submit
Delete an Override
To delete an overriding workflow:
-
In the workflow editor, switch to the overriding workflow as described above
-
Click on the bubble that displays the override duration and select
 Remove Override
 -
Enter the confirmation code and click Confirm Delete
Workflow Parking
Parking a workflow allows you to pause processing alarms with a particular workflow and switch to other activities.
You can use this feature in the following situations:
- When there's an emergency situation at the site of the alarm origin and you need to wait for a specialist or emergency team visit before you proceed with the workflow
- Per instructions, you need to contact a customer, but they aren't reachable at the moment
- Offline activiy on site is in progress and as an operator, you need to wait for its outcome to create a report
You can only park a Manual Workflow, from the Workflow View. Once you park a workflow, all alarms that are processed by this workflow are parked as well.
There are several ways evalink talos displays parked workflows in the user interface:
- If you have a parked workflow, it is shown in the Alarms view as parked
- The Alarms menu also features a blue Parked Workflows notification flag

Park a Workflow
To park a workflow:
-
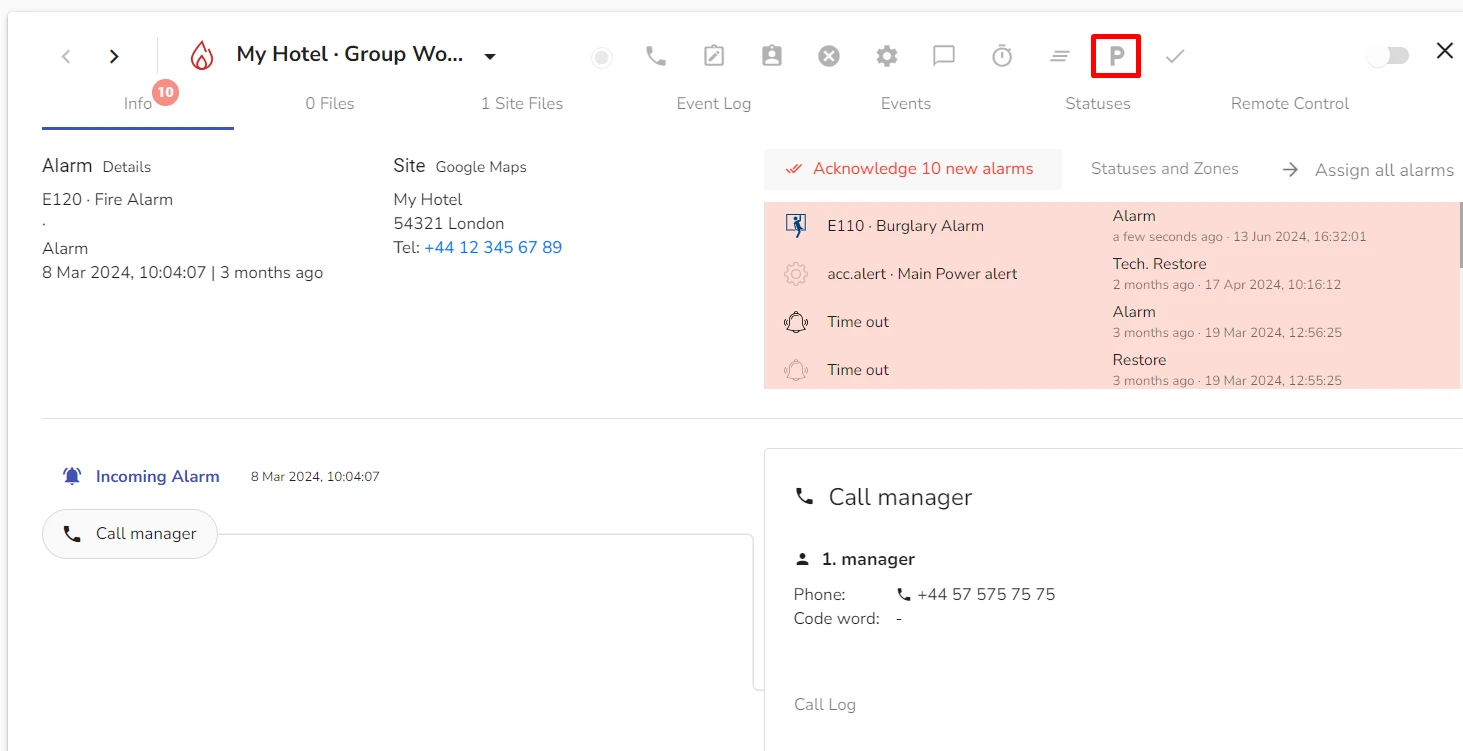
Open the active Workflow you want to park.
-
In the Workflow view, click the Park icon in from the menu bar

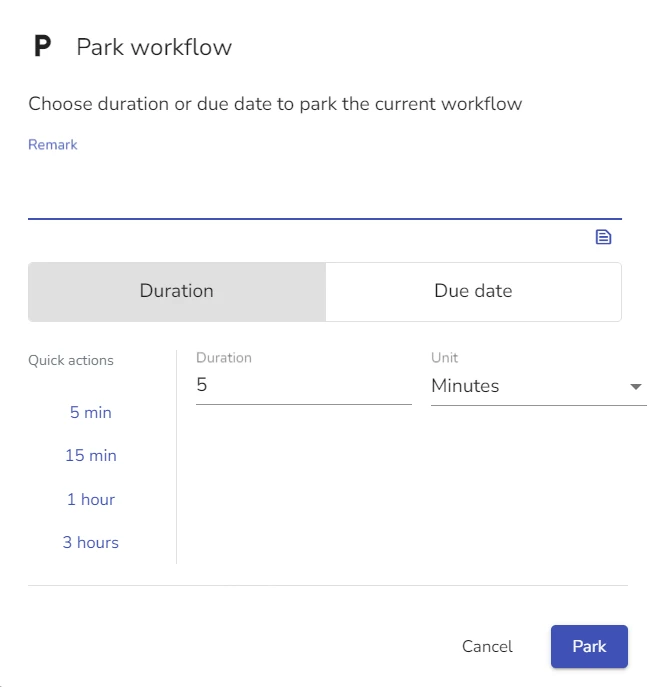
The Park Workflow dialog opens.
-
In the Park Workflow dialog, select the parking time period in the Duration tab or Due Date tab

-
(Optional) In the Remark field, add an informational remark for the log
-
(Optional) Check the Update Severity checkbox and select the new Severity value
When you apply this setting, all the alarms currently attached to the workflow have their severity changed.
- Click Park
The workflow now is listed as Parked in the Workflow view of the Alarms page.
Unpark a Workflow
To unpark a workflow:
-
In the Workflow view of the Alarms page, select the parked workflow you want to unpark.
-
Next to the workflow record, click the Properties icon
-
From the dropdown menu, select Unpark
Park a Workflow Step
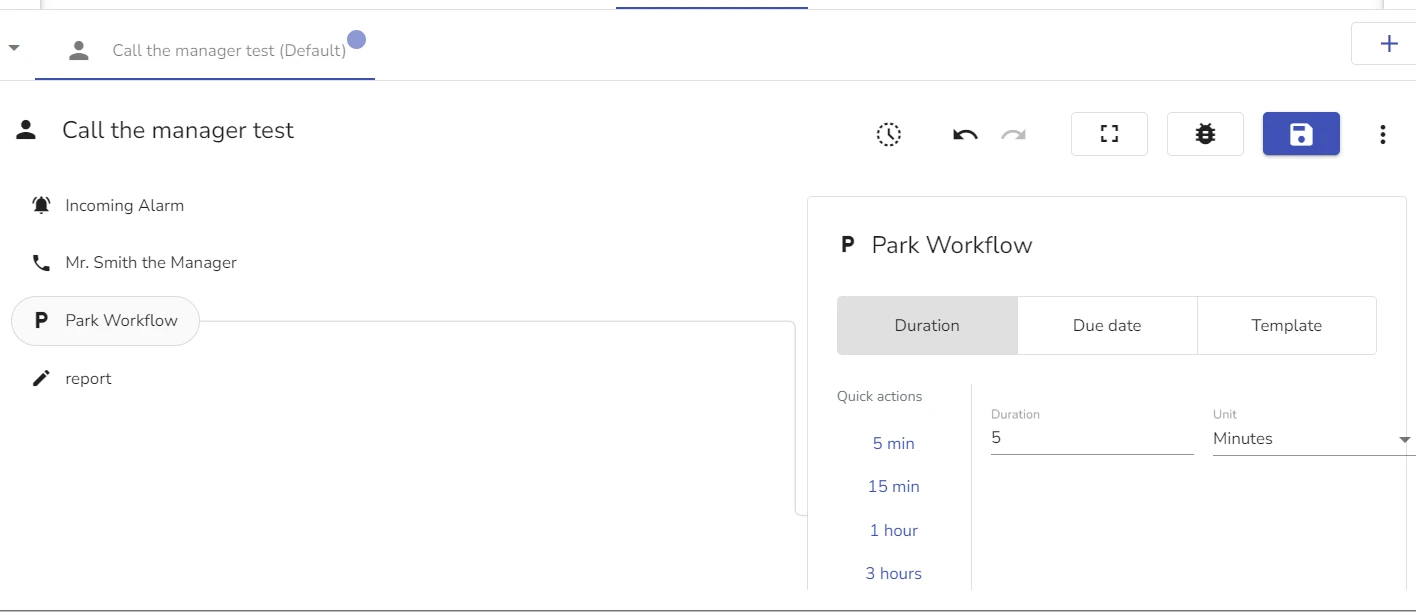
You can include workflow parking in your workflow sequence as a step. This step is available under Manual Actions. For details, see section Workflow Steps > Manual Actions.
The figure below illustrated configuration of a Manual Workflow with the Park a Workflow step.

When you add a Park a Workflow step, all conditions on workflow parking apply. When an alarm gets picked up by a workflow with Park a Workflow step, an operator is prompted to park the workflow when they are working on it.
 Link is copied