Work with Workflow Steps
This section describes the operations that can be performed with a workflow in the workflow editor. These operations include managing workflow steps and configuring step parameters. The parameters and operations described in this section are common for most steps.
Only Administrator and Manager can apply changes in the workflow editor.
Users with Operator permissions can only view workflows. To these users, the information below is provided as a reference.
For information on how to configure workflow settings, see section Work with Workflow Settings.
Workflow Editor
All operations described in this section are performed in the workflow editor.
The term workflow editor is introduced in order to distinguish between the two workflow views:
- the workflow processing view in which the operator processes a workflow (opened from the Alarms page when the operator starts processing an alarm)
- the workflow editor – the view in which a workflow can be edited by Administrator or Manager (opened from the Workflows page)
To open a workflow in the editor:
-
Go to the corresponding Workflows page (see section Work with Workflows > Workflows Pages and Types of Workflows Available)
-
Click on the name of the desired workflow
The workflow opens in the editor, with the first step (the Incoming Alarm step) selected by default.
Save Workflow
An active Save button  at the editor top-right indicates that there are unsaved changes in the workflow. Make sure to save the changes before navigating away from the editor.
You can enable the auto-save option (see section Work with Workflow Settings > Enable the Auto-Save Option) to avoid manually saving the workflow after each change.
Undo and Redo Changes
You can undo or redo the operations performed in the editor using the and icons. A gray icon indicates that there are no actions to undo or redo, accordingly.
Manage Steps
Workflows have sequential organization. When Decision steps are used (see section Workflow Step Reference > Actions and Decisions), each conditional branch formed by these steps is also organized as a sequence of steps.
Each step of a workflow or of its conditional branch, except the first and the last ones, has a preceding step and a following step.
Add a Step
A new step is added to the workflow using the icon of an existing step that you choose to be the preceding step (see the figure below):
To add a workflow step:
-
In the left pane of the workflow editor, hover your mouse over the preceding workflow step and click on the icon that appears
-
Select the desired step from the lists that expand
Steps are categorized into several lists for selection convenience.
Steps in the Manual Decisions list, Automated Decisions list, and step Parallel Flow from the Other Steps list require follow-up actions to be configured for each conditional branch offered by these steps.
The full scope of workflow steps and the options available for each step will be described in further documentation releases.
-
Configure the options of the selected step as desired
-
Click Save

Some steps have limitations associated with them – for example, it is not allowed to add steps after the Close Workflow step. When such limitations are violated, the workflow editor displays the appropriate warnings.
Copy and Paste a Step
It is possible to copy a workflow step and paste it to the same workflow or to another workflow on the same Workflows page (see section Work with Workflows > Workflows Pages and Types of Workflows Available). All parameters of each copy can be edited independently afterwards.
Copying a step to a workflow on a different site is not supported.
To copy & paste a workflow step:
-
In the left pane of the workflow editor, select the desired step
-
To copy the step, press Ctrl+C on the keyboard or right-click the step and select Copy.
-
(Optional, if copying to a different workflow) Open the target workflow for editing
-
In the left pane of the editor, select the preceding step and paste the copied step after it
To paste, Press Ctrl+V on the keyboard or right-click the preceding step and select Paste.
- Click Save

If necessary, adjust the order of steps as desired, see section Change the Order of Steps.
Change the Order of Steps
To reorder steps, use the and arrows as shown on the figure below:
Delete a Step
To delete a step:
-
In the left pane of the workflow editor, hover your mouse over the step and click on the icon that appears
-
Click Save

To remove a step, you can also use the Ctrl+X keyboard shortcut or right-click on the step and select Cut.
Step Parameters
Workflow Outcome of a Step
This option is displayed when the Advanced Settings mode is used for workflows (see section Work with Workflow Settings > Toggle between Advanced Settings and Simple Settings Modes).
Setting a Workflow Outcome (see section Event Logging for Workflows > Global Event Logging Settings) for a step allows to set the event logging option that can be applied automatically for the whole workflow after the workflow execution is completed.
For details on workflow event logging, see section Event Logging for Workflows > Workflow Event Logging Overview.
By default, no Workflow Outcomes are set for any of the steps.
A Workflow Outcome configured for a step is applied to the whole workflow if:
-
this step is executed
If the step with a Workflow Outcome is included in a conditional branch that is not activated during the workflow execution, the Workflow Outcome is not applied.
-
this steps is the last executed step that has a Workflow Outcome set
The Workflow Outcome of the last executed step overwrites the Workflow Outcomes of all previously executed steps.
The None value (the default option, corresponds to no Workflow Outcome set for a step), doesn't overwrite the Workflow Outcomes of other steps.
To make use of Workflow Outcomes, you first need to create the necessary Workflow Outcomes in evalink talos (see section Event Logging for Workflows > Global Event Logging Settings > Workflow Outcomes).
Workflow Outcomes Priority over Other Event Logging Settings
There is always only one event logging option that is applied after a workflow is executed. Out of all event logging settings (see section Event Logging for Workflows > Workflow Event Logging Overview), Workflow Outcomes have the highest priority.
For details, see section Event Logging for Workflows > Workflow Event Logging Overview > Event Logging Settings Interdependencies.
Steps to Set a Workflow Outcome For
When applying a Workflow Outcome in a Manual Workflow, it is recommended:
-
if you wish to set a common Workflow Outcome for all cases – set the Workflow Outcome to the Incoming Alarms step (the initial step of a workflow, see section Operations with a Workflow > Work with Workflows > Workflow Incoming Conditions Workflow Comment)
-
to differentiate Workflow Outcomes for different conditional branches – set the necessary Workflow Outcomes to any steps in each conditional branch at your convenience
In an Automated Workflow, it is recommended to set a Workflow Outcome to a step as close to the workflow completion as possible. Otherwise, there is a chance that evalink talos will skip applying the Workflow Outcome due to the high speed of Automated Workflows processing.
Therefore, in an Automated Workflow, it is recommended to set a Workflow Outcome to the last step in the workflow or to the last step of each conditional branch.
Set a Workflow Outcome for a Step
The figure below shows adding a Workflow Outcome:
To set a Workflow Outcome for a step:
-
Open the workflow in the workflow editor (see section Workflow Editor)
-
In the left pane of the editor, click on the workflow step
-
In the right pane, scroll to the bottom of the screen and click on the arrow near the Workflow Outcome field
-
Select the desired Workflow Outcome from the list
To set the step to use no Workflow Outcome, select None.
- Click Save

If later you wish to remove the Workflow Outcome from the step, perform the same steps and select None from the list.
If a No Email event logging option is applied to a workflow via a Workflow Outcome or via a Workflow Outcome List, the workflow steps that involve sending emails are not affected.
Custom Report Template of a Step
This option is displayed when the Advanced Settings mode is used for workflows (see section Work with Workflow Settings > Toggle between Advanced Settings and Simple Settings Modes).
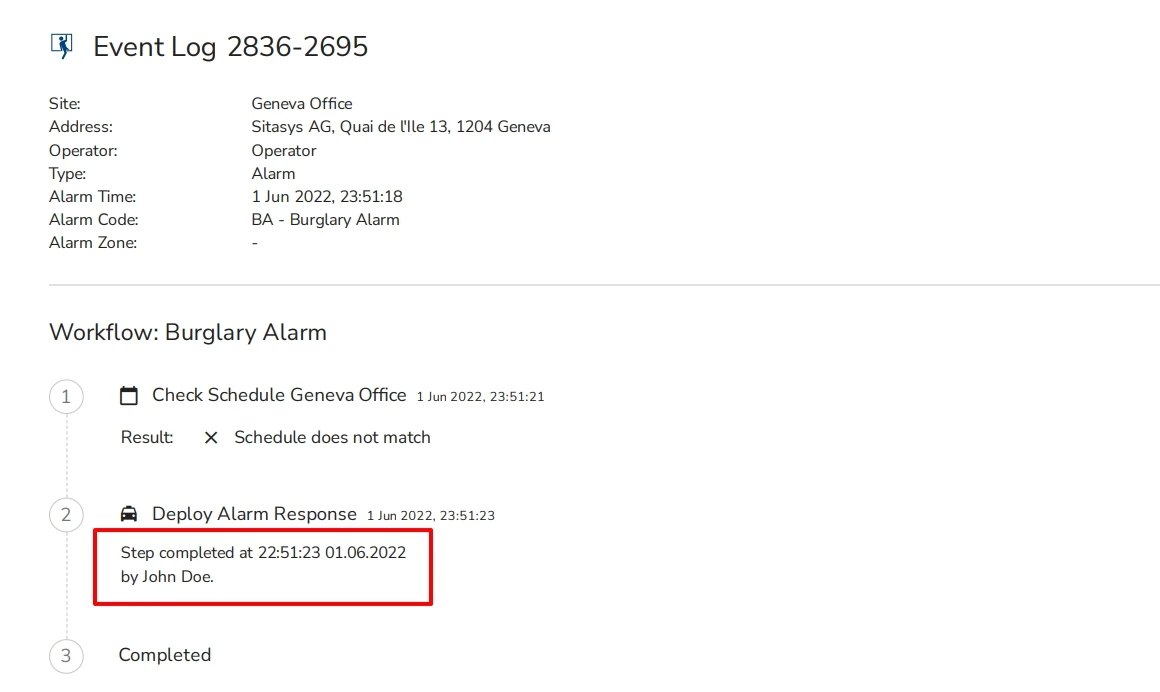
For some workflow steps, it is possible to set a custom report template – a custom message that is displayed under the step in PDF event log reports, see the figure below:

A custom report template is referred to as a template, since it can contain variables that can be included into the message by means of Pebble expressions. During the workflow execution, these variables are resolved to the details of a particular workflow, workflow step, alarm, site, etc. For details on dynamic text messages generation using Pebble expressions, see section Dynamic Text Messages Generation in Workflows.
In the PDF event log report, a custom step output replaces the default information that evalink talos logs for the step, including:
- the log messages of automated steps (for example, < date, time > SLACK_MESSAGE_SENT)
- (for manual steps) the text entered by the operator when completing the step
A workflow can be configured to include only the steps that have a custom report template (see the section below).
The setting doesn't affect the step outputs displayed on the Event Logs page.
Configure a Custom Report Template
To set a custom report template for a step:
-
Open the workflow in the workflow editor (see section Workflow Editor)
-
Select a step
-
Scroll down to the Custom Report Template field
The field is located in the right pane of the editor.
-
Configure the step output
To open the list of the variables available, press the Ctrl+Space hotkey.
You can view some preconfigured step output patterns by clicking the Paste template example link.
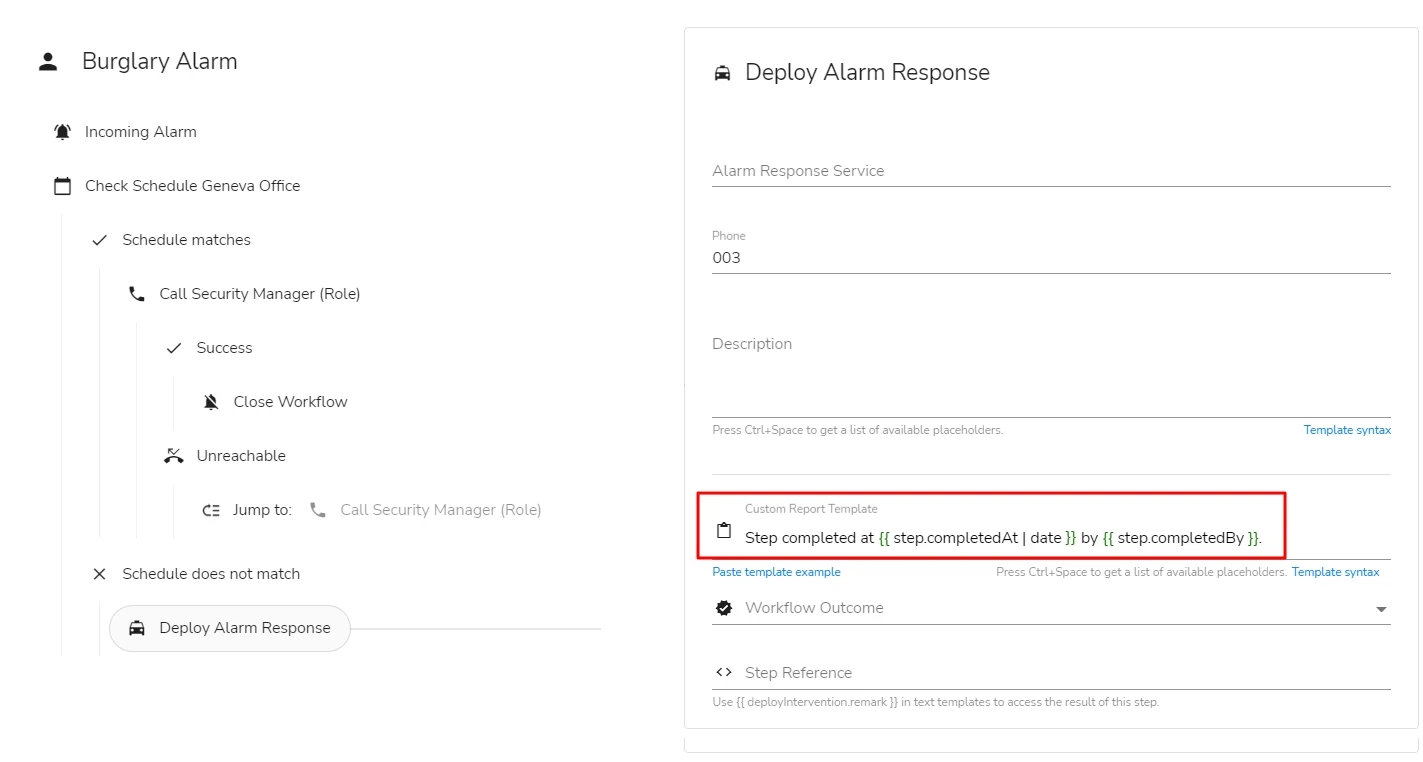
An example of a configured custom report template is shown on the figure below:
 info
infoWhen using variables that work with the step data (
step...., see section Dynamic Text Messages Generation in Workflows > Step Data), mind the following principles:- to use the data of the current step, you can enter the parameters in format
step.[attribute] - to use the data from one of the previous steps, enter the parameters in format
[step_parameter_name].[attribute]
For details on finding out the step parameter name, see section Step Reference below. - to use the data of the current step, you can enter the parameters in format
-
Click Save

Step Reference
This option is displayed when the Advanced Settings mode is used for workflows (see section Work with Workflow Settings > Toggle between Advanced Settings and Simple Settings Modes).
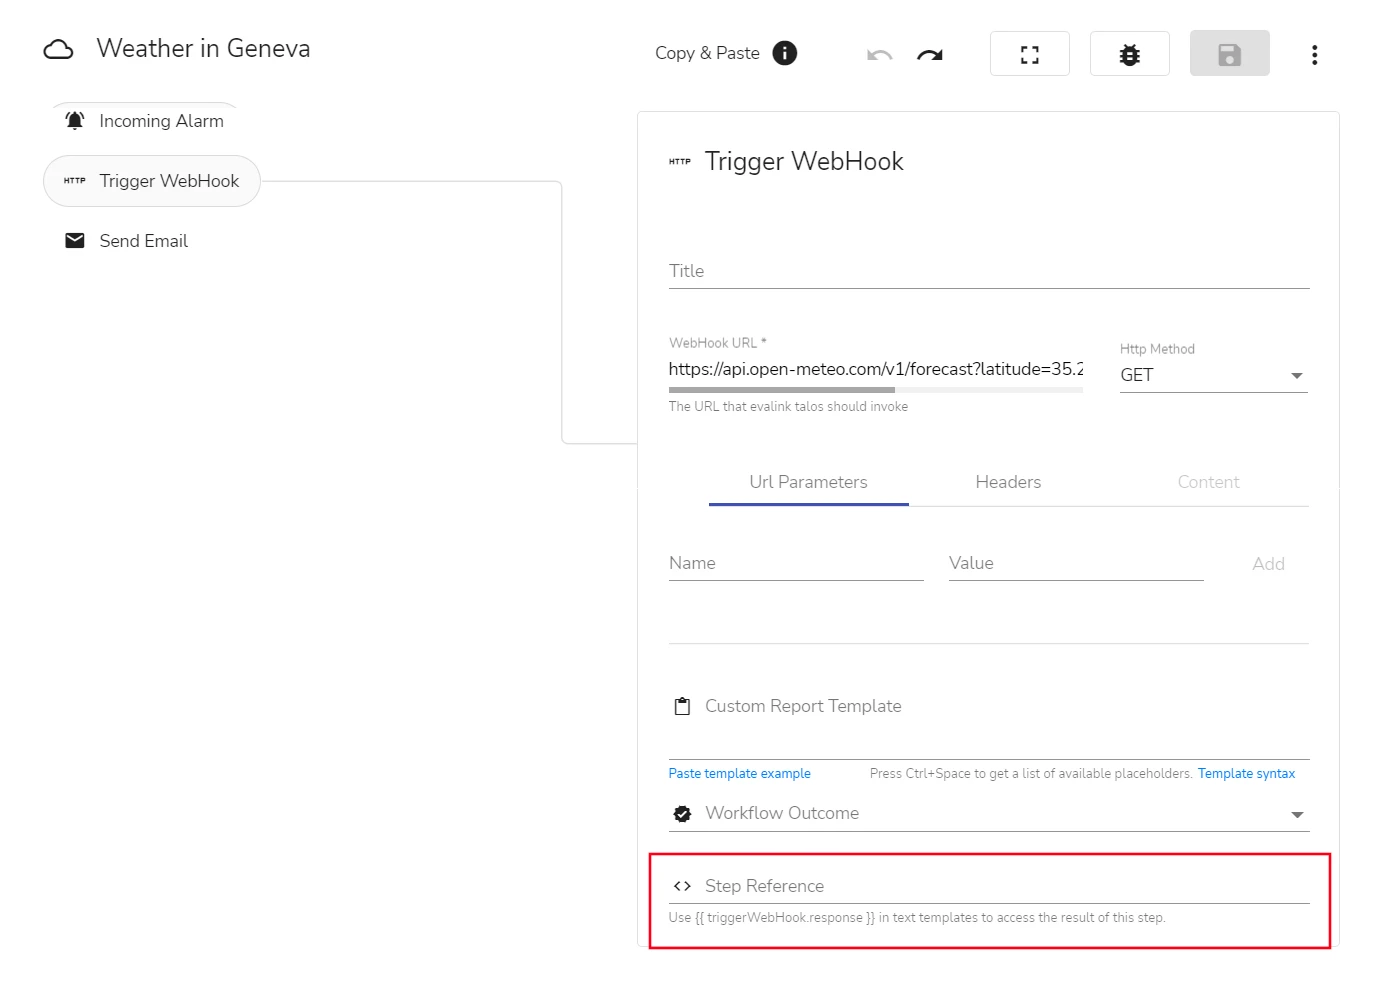
The Step reference field of a step can be used to retrieve the parameter name that corresponds to each step of the workflow, see the figure below:

The step parameter name, together with one of the step attributes, can be used to include the relevant step data in a dynamic text message generated by the workflow, see section Dynamic Text Messages Generation in Workflows > Step Data.
An example of a dynamic text message is the custom report template of a step (see section Custom Report Template of a Step).
To get the step reference of a workflow step:
-
Open the workflow in the workflow editor (see section Workflow Editor)
-
Select a step
-
To view the parameter name of a step, in the right pane, scroll down to the Step Reference field
Step Parameter Name
Each step has a default parameter name, see the figure above for an example. Administrator and Manager can customize the step parameter name by entering a custom value in the Step Reference field.
An example of an overridden (customized) step parameter name:
In the example above:
- the underlined part of the expression is the step parameter name (overridden)
- the other part is one of the standard attributes available for most of the steps (see the section below)
Step Attributes
All step parameters have a more or less common scope of attributes, with some exceptions. For a list of most commonly used attributes, see section Dynamic Text Messages Generation in Workflows > Step Data. Attribute names cannot be customized.
Get a Step Reference and Use It in Further Steps
To obtain a step reference and use it for dynamic text generation:
-
Open the workflow in the workflow editor (see section Workflow Editor)
-
Select a step
-
In the right pane, scroll down to the Step Reference field
-
(Optional) To customize the step parameter name, enter the new name in the Step Reference field
Customization can be applied, for example, if you have several Call Someone steps and wish to gather operator notes (remarks) from all these steps.
The step parameter name must not contain spaces.
- Copy the step parameter value (the original or the customized one) from the UI hint that is displayed under the Step Reference field (see the figure in section Step Reference). Understand which attribute you need to access the relevant step data
For a list of most commonly used attributes, see section Dynamic Text Messages Generation in Workflows > Step Data. Note that some of the attributes may not be supported by some parameters.
-
Go to the target step of the workflow and enter the data in the appropriate text field:
a. Enter the constant part of the message
b. Insert step data where applicable using Pebble expressions
For example, in a Manual Workflow that contains a Deploy Alarm Response step, you can have the following message:
Alarm response deployed at {{ deployIntervention.completedAt | date }} by {{ deployIntervention.completedBy }}. Message from the operator: {{ deployIntervention.remark }}.
-
Click Save

When a workflow is executed, the message in step 6 might resolve to, for example:
Alarm response deployed at 06.09.2022 08:40:43 by John Doe. Message from the operator: Loitering confirmed. Called the police.
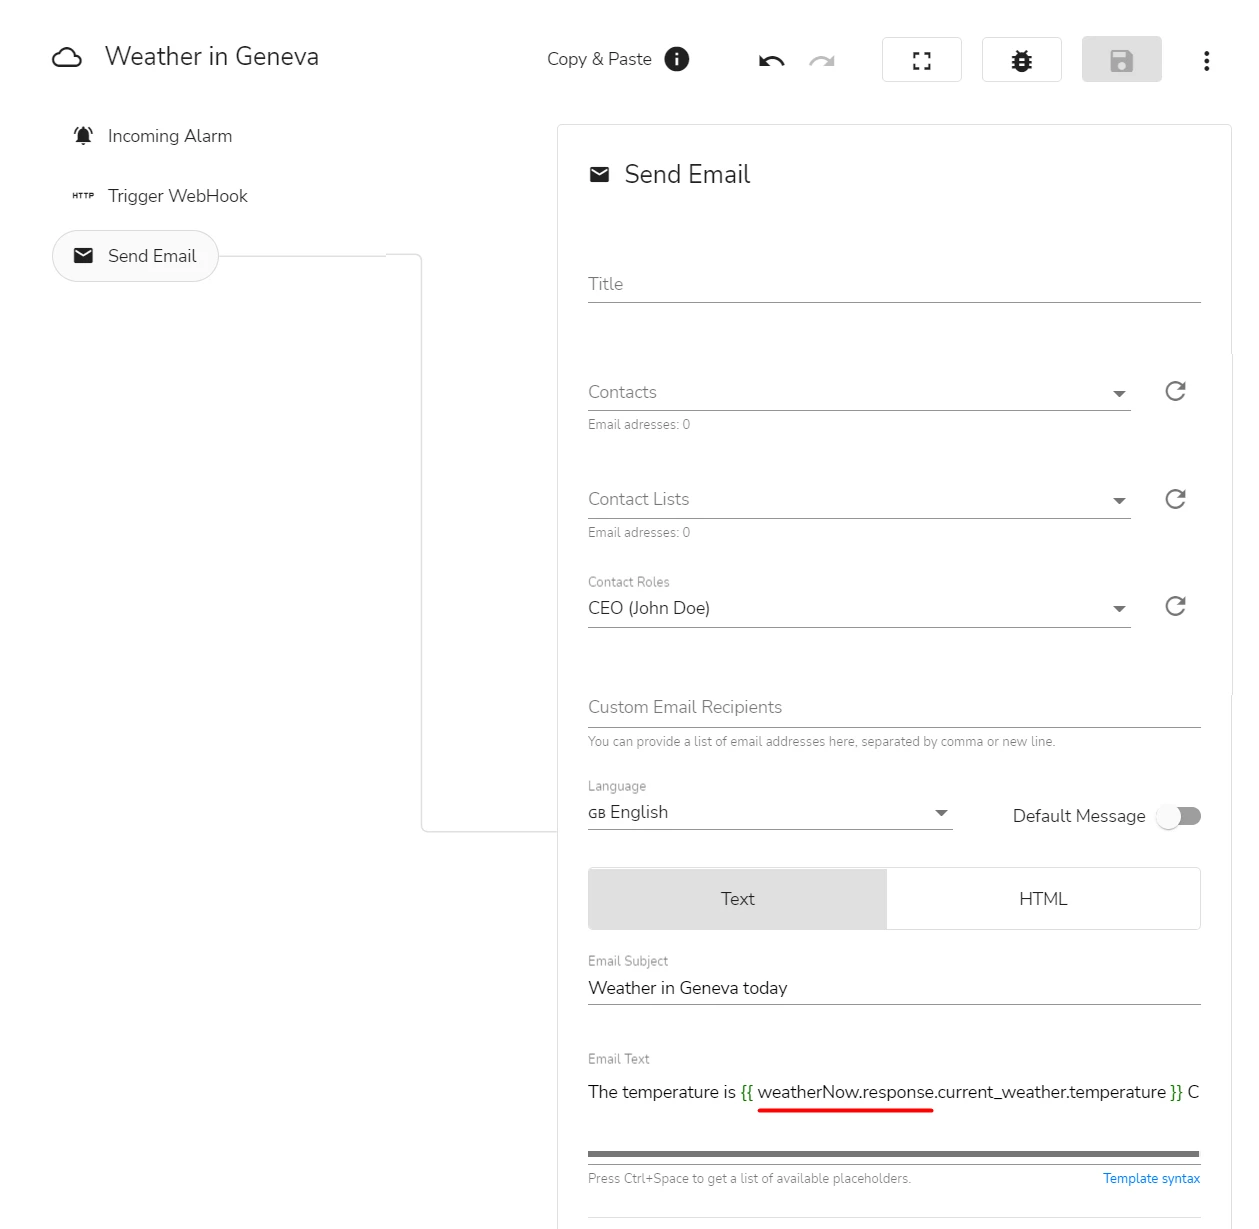
Another example of using step data is provided in the figure below:

In the example above:
- the underlined part of the expression is the workflow step reference – [step_parameter_name].[attribute] (with a customized step parameter name)
- the other part of the expression contains the parameters of the external system from which the step data were retrieved via the referenced Trigger WebHook step
The expression can generate the following email body text, for example:
The temperature is 29.4 C.
 Link is copied