Work with Workflow Settings
The settings of a workflow define the workflow operation parameters: the priority when alarms are assigned, the event logging options used, etc. Different types of workflows (Manual, Automated, Standard, Managed Workflows, etc.) have different scopes of settings available for them.
All workflow settings are configurable by users with Administrator and Manager permissions only.
Workflow settings are best configured when the Advances Settings mode is used for workflows (the default option). If Simple Settings mode is set, most of the settings are hidden. For details on switching the mode, see section Work with Workflow Settings > Toggle between Advanced Settings and Simple Settings Modes.
The Areas of the Workflow Editor where Settings are Located
The workflow settings can be accessed:
-
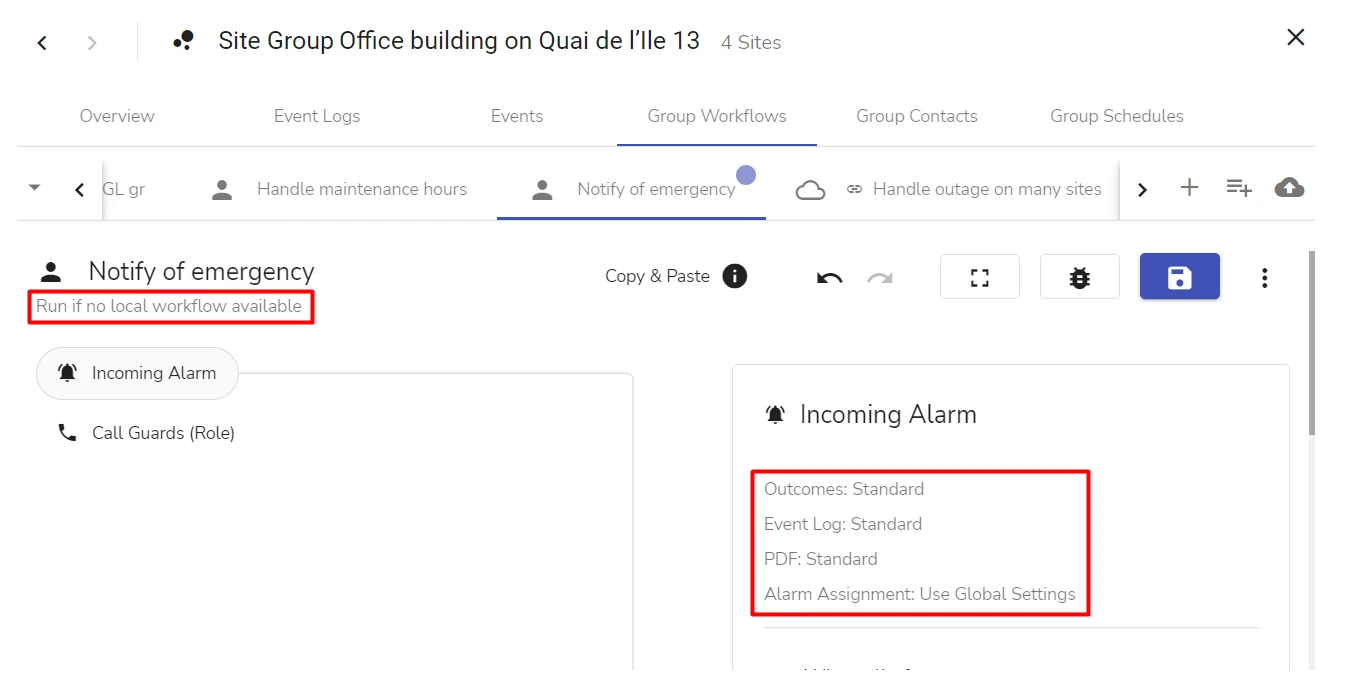
in the Incoming Alarm step – in the settings area of the right pane, above the incoming conditions
-
under the workflow name in the left pane
The example below shows the settings of a Manual Workflow created for a site group:
Global Operation Settings for Workflows
The settings described in this subsection are global settings which are configured from the workflow editor of a particular workflow.
After these settings are configured for one of the workflows (regardless of the workflow level), they are propagated to all workflows created under the Company account.
After these changes are applied, saving the workflow is not required.
Enable the Auto-Save Option
By default, the option is disabled.
To enable global auto-save:
-
Open any workflow in the editor
-
Click on the three dots icon at the top right
-
Select Enable Auto-Save
All workflows will now have the auto-save option enabled.
To disable auto-save, perform the same steps as described above and select Disable Auto-Save.
Toggle between Advanced Settings and Simple Settings Modes
By default, the Advanced Settings mode is set.
Switching to Simple Settings allows to hide most of the workflow settings.
Hiding settings might be useful, for example, to simplify the editor appearance or to prevent users with Operator permissions from viewing the settings.
To users with Operator permissions, evalink talos UI provides no indication about which Settings mode is currently on.
To set the Simple Settings mode for all workflows:
-
Open any workflow in the editor
-
Click on the three dots icon at the top right
-
Select Simple Settings
After the option is enabled, the following workflow settings are hidden from the workflow editor:
- PDF and Event Log (see section Event Log and PDF Settings)
- Alarm Assignment (see section Alarm Assignment)
All other settings remain visible.
The option is applied to all workflows and for all users working under the Company account.
To revert to using the Advanced Settings mode, repeat the procedure above and select Advanced Settings.
Event Log and PDF Settings
Event Log and PDF are event logging settings that are configurable for all types of workflows.
For details on these settings, see sections PDF Setting and Event Log Setting in Event Logging for Workflows > Event Logging Settings on the Workflow Level.
Settings Specific for Automated Workflows
For general information on Automated Workflows, see section Manual and Automated Workflows > Automated Workflows in Workflows Overview > Workflow Types.
The figure below shows the settings that are configurable for Automated Workflows in the settings area of the Incoming Alarm step:
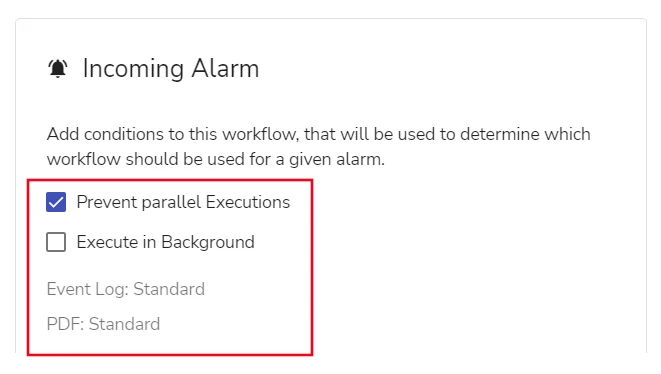
These settings are explained in subsections below.
Prevent Parallel Executions Checkbox
The option determines how evalink talos handles a new matching alarm that arrives while the current Automated Workflow is in progress. It is designed for handling cases when an alarm panel sends several alarms in a row instead of just one.
To have evalink talos create a new instance of the workflow for each new matching alarm, leave the checkbox unselected (the default option).
To have evalink talos assign all new matching alarms to the same workflow, select the checkbox (as on the figure above).
Execute in Background Checkbox
The option determines if the workflow is a Foreground or a Background Workflow (see section Manual and Automated Workflows > Automated Workflows Executed in Foreground and in Background in Workflows Overview > Workflow Types).
The key difference between the two is as follows:
- a Background Workflow is always executed when a matching alarm arrives
- a Foreground Workflow may not be executed if the alarm is consumed by a workflow with a higher priority
For details on workflow priority, see section Workflows Overview > Alarm Consuming Priority.
When the Execute in Background checkbox is checked, the workflow becomes a Background workflow.
Settings Specific for Manual Workflows
For general information on Manual Workflows, see section Manual and Automated Workflows > Manual Workflows in Workflows Overview > Workflow Types.
The figure below shows the settings that are configurable for Manual Workflows in the settings area of the Incoming Alarm step:
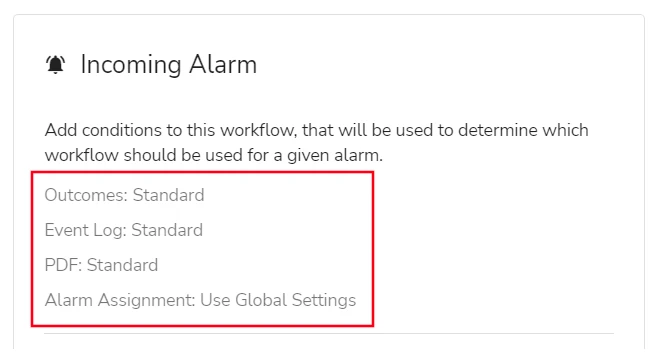
For information on the PDF and Event Log settings, see section Event Log and PDF Settings.
Other settings are explained in subsections below.
Manual Workflows created on the global and site group level also have the workflow priority setting that is located in the left pane of the editor, under the workflow name. The setting is described in section Override the Default Workflow Priority below.
Outcomes
The Outcomes setting defines which Workflow Outcome List is used for the workflow. For basic information on Workflow Outcome Lists, see section Event Logging for Workflows > Global Event Logging Settings > Workflow Outcome Lists.
For details on using a Workflow Outcome List in a workflow, see section Event Logging for Workflows > Event Logging Settings on the Workflow Level > The Workflow Outcome List to Be Applied.
Alarm Assignment
The setting defines the behavior for new alarms that arrive for the same site while the current Manual Workflow is in progress (is being worked on by the operator).
This behavior is defined by the global policy, see section Global Settings for Workflows > New Alarms Attaching for Manual Workflows. The setting described in this section allows to override the global policy on the workflow level.
The following options are available:
-
Use Global Settings (the default option) – use the global setting as is (don't override)
-
Assign All Alarms – attach all alarms arriving for the site to the current workflow
An analog of the global option Group Alarms of the same Site on the site level.
-
Assign Alarms by Conditions – attach only alarms that satisfy the incoming conditions of the workflow
An analog of the global option Group Alarms by Conditions on the site level.
-
Don't Assign Alarms – don't attach any alarms to the workflow while it is in progress
An analog of the global option Don't group Alarms on the site level.
The option currently set is displayed in the settings area of the Incoming Alarm step, see the figure above. Administrator or Manager can change this option for the workflow.
To set new alarm assignment policy on the workflow level:
-
Open the workflow in the editor
-
Click on Alarm Assignment setting and select the desired option from the list
- Click Save

Settings Specific for Global and Site Group Workflows
For general information on site group and global workflows, see section Workflow Overview > Workflow Types > Site, Site Group, and Global Workflows.
Override the Default Workflow Priority
The setting described in this section is only relevant to:
- Standard Workflows (see section Standard, Managed Workflows, and Workflow Templates > Standard Workflows in Workflows Overview > Workflow Types)
- Manual Workflows (see section Manual and Automated Workflows in Workflows Overview > Workflow Types)
- global and site group workflows (see section Site, Site Group, and Global Workflows in Workflows Overview > Workflow Types)
By default, if a site (local) workflow and a higher-level workflow (for example, a site group or a global workflow) have the same incoming conditions, the site workflow always takes precedence and consumes the matching alarm. For information on the workflow priorities, see section Workflows Overview > Alarm Consuming Priority.
For workflows created on the site group or global level, Administrator or Manager can override the default priority in the workflow settings, see the figure below:
To set higher priority for a higher-level workflow:
-
Open the workflow in the editor
-
In the left pane of the editor, under the name of the workflow, click on the Run if no local workflow available option (the default option value)
-
From the list that expands, select Run instead of local workflow
To change the priority back to the default one, click on the option and select Run if no local workflow available.
If several higher-level workflows with the Run instead of local workflow option compete for an alarm, the alarm is consumed by the lowest-level workflow in the list. For example, if both a global and a site group workflow have Run instead of local workflow option set, the alarm is consumed by the site group workflow.
Settings Specific for Managed Workflows
For general information on Managed Workflows, see section Standard, Managed Workflows, and Workflow Templates > Managed Workflows in Workflows Overview > Workflow Types.
Open a Managed Workflow on Its Original Workflows Page
This section describes how to open a linked Managed Workflow in its original editor.
From the page of a Managed Workflow you can, for example, view the full list of sites on which the Managed Workflow can operate.
For details, see section Link or Unlink a Managed Workflow to / from Sites.
To proceed to the original page of a Managed Workflow:
-
On the Workflows page of a site, open a Managed Workflow that is linked to the site
-
Click on the bubble with the workflow name (see the figure below)

The Managed Workflow is opened in the editor on the Workflows page where it was created.
Link or Unlink a Managed Workflow to / from Sites
This operation can be performed from the editor of a Managed Workflow on its original Workflows page.
To link or unlink a Managed Workflow to / from one or several sites:
-
Open the Managed Workflow in the editor on its original Workflows page (see section Open a Managed Workflow on Its Original Workflows Page)
-
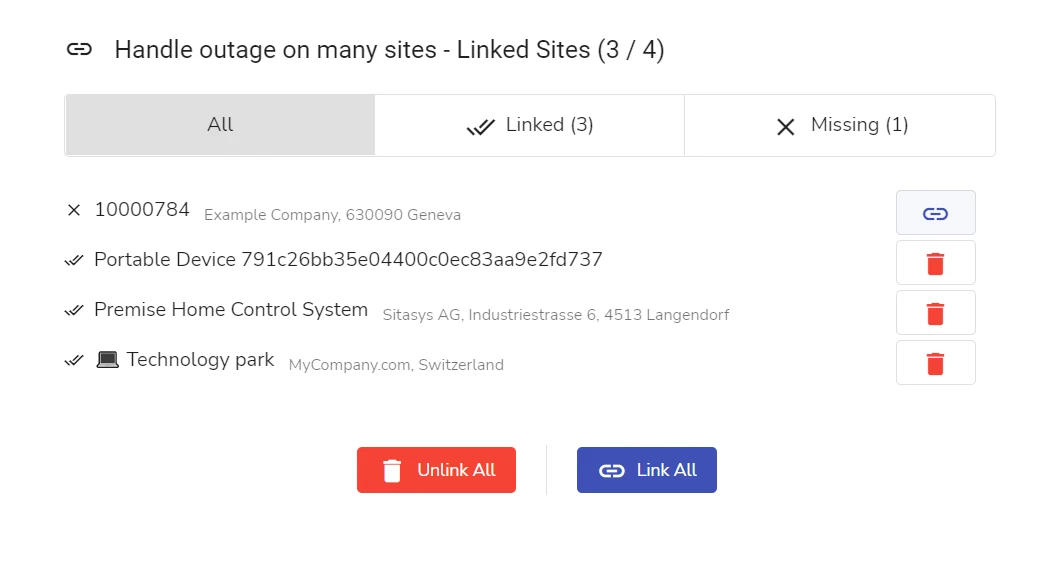
In the left pane of the editor, click on the Linked to N sites link under the workflow name
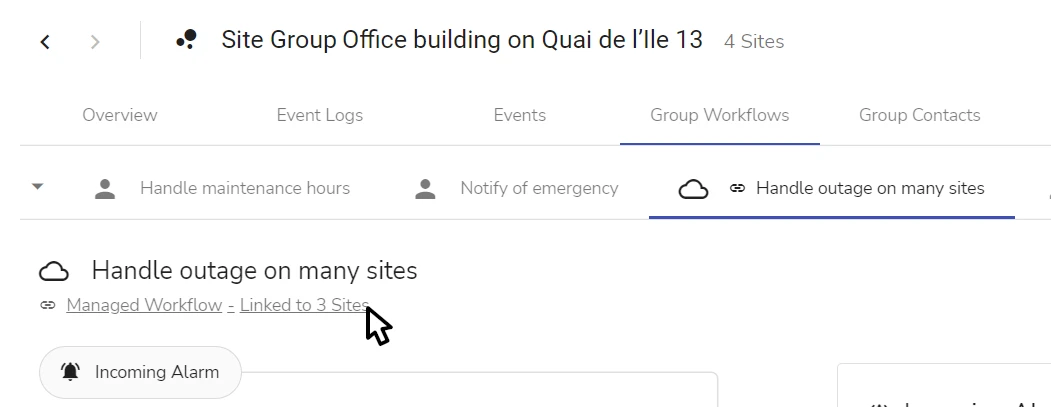
In the dialog that opens:
-
the Linked tab shows the sites to which the workflow is linked
-
the Missing tab shows the sites to which it is not linked
-
the All tab shows the full list of sites that can link the workflow
For example, for a Managed Workflow created on the site group level, the list on the All tab includes all sites that belong to the site group.
- Select the sites that you wish to link the workflow to by clicking on the corresponding buttons.
You can link or unlink sites one by one using the / buttons or use the Link All and Unlink All buttons.
- Click outside the dialog to exit it
The settings applied in the dialog are saved automatically.
A Managed Workflow can also be linked to an individual site from the Workflows page of the site, see section Work with Workflows > Add a Workflow > Start Creating a Workflow for details.
 Link is copied