Advanced Topics
Manage Status Roles
A Status Role is a status placeholder that is used in workflows for referencing a certain status of a particular site. For details, see section Advanced Features in evalink talos > Use of Roles.
For an example of how a Status Role can be used, see section Advanced Features in evalink talos > Use of Roles > Status Roles Specifics.
A Status Role is created on a global level, and is then assigned to a particular site status on the site level.
A Status Role typically represents a particular type of a status, for example, Arm/Disarm Status, Cooling Status, etc. You may assign a Status Role to one site status only.
Create a Status Role
The creation of Status Role is shown on the figure below:
To create a Status Role:
-
Go to Company > Settings > Statuses. On the Statuses page, click Add Role
-
Specify the name and states for the role
Name is a mandatory field, at least one state must be specified.
infoThe site statuses that the Status Role will be assigned to must have the same set of states, state names are case sensitive.
-
Click Submit.
Assign a Status Role to a Site Status
Each Status Role can be assigned only to one status on each particular site.
However, one site status can have several Status Roles assigned.
For information on how to view the Status Roles already assigned to a status, see section Statuses Overview > Site Statuses Subpage.
To assign a Status Role to a site status:
-
Go to the site Statuses subpage as described in section Statuses Overview > Site Statuses Subpage.
-
Click the Edit button in the corresponding status record
The status editor opens.
-
In the top-right corner of the editor, select the desired Status Roles in the list as shown on the figure below
Status Roles already used on the current site are not available for selection.

-
Click Submit at the bottom of the dialog to save the status
In some cases a Status Role can be assigned automatically to a status. For details, see section Advanced Features in evalink talos > Use of Roles > Status Role Name.
Edit a Status Role
Once a Status Role is created, you can edit only the role name. If you wish to change the states configured for a Status Role, you can only delete the current role and create a new one.
To edit a Status Role name:
-
Click on the Edit button opposite to the role in the list
-
Edit the name
-
Click Submit
The Status Role name is updated in the records of all site statuses to which the Status Role was assigned.
Delete a Status Role
To delete a Status Role:
-
Click Delete opposite to the role in the list
-
In the confirmation dialog that opens, enter the confirmation code and click Confirm Delete
To be able to delete a Status Role, first unassign all site statuses from it.
Configure a Workflow that Checks or Sets a Status
It is possible to check or set the status automatically in a workflow using the Automated Decisions > Check Status and Automated Actions > Set Status steps.
To set up a workflow that checks or sets a status:
-
Create a workflow as described in Workflow Reference > Operations with a Workflow
a. Create a workflow – see section Add a Workflow > Start Creating a Workflow in Workflow Reference > Operations with a Workflow
b. Set incoming conditions for the workflow – see section Workflow Incoming Conditions and Workflow Comment > Set Incoming Conditions for a Workflow
-
Add and configure the corresponding step:
For general information on how to add a step, see section Work with Workflow Steps > Add a Step.
The setup of particular steps is described in Workflow Reference > Workflow Step Reference > Automated Steps
-
Automated Decisions > Check Status – in section Automated Decisions > Check Status
-
Automated Actions > Set Status – in section Automated Actions > Set Status
-
Test Status Operation
Sometimes it is necessary to test status operation when the transmitter is not connected. To do so, use one of the instructions below.
Test State Activation Alarms Arrival
Prerequisite: a State Activation alarm was set for a status, see section Operations with a Status > Create an Alarm on State Activation.
To test if a state change triggers the State Activation alarm:
-
On the site Statuses subpage of a site, go to the record of the concerned status
-
Manually set the state that should trigger the alarm (see the figure below):
a. Click on the state icon near the status
b. Select the state from the drop-down
c. Click Submit
-
Wait for the alarm to arrive
If a delay was set in the state settings (see section Create a Status > Create a Custom Status > Configure a State for a Status > Create an Alarm on State Activation), the alarm will arrive after the specified time period.
Note that some alarm codes may be included in the list of ignored alarms, preventing the alarms from being displayed on the Alarms page. For details, see the note in section Create a Status > Create a Custom Status > Configure a State for a Status > Create an Alarm on State Activation.
Test if Alarm Is Triggered by a Status Rule
Prerequisite: at least one alarm was created for a Status Rule: an Active violation alarm, a Passive violation alarm, or a Restore alarm (see section Statuses Overview > Status Usage > Status Rules).
To test if the corresponding alarm is triggered by a Status Rule:
-
Change the state of the status and the state of the monitored schedule in such a way that this triggers an Active violation alarm, a Passive violation alarm, or a Restore alarm set for the Status Rule
For details on these types of alarms, see section Statuses Overview > Status Usage > Status Rules.
The status state can be changed manually as described in section Advanced Topics > Test State Activation Alarms Arrival.
To edit a schedule, follow the instructions in section Manage Schedules > Edit a Schedule.
-
Wait for the expected type of alarm to arrive
If necessary, repeat the procedure to check all types of alarms configured for the Status Rule. Having completed the tests, restore the settings of the concerned schedule.
If a schedule is adjusted in a way that triggers an Active violation alarm, the Status Rule state on the site Statuses subpage changes to Violated, see section Work with Status Rules > View Status Rules and Their State for details.
Set a Site Status to Listen to Alarms from a Particular Transmitter
When several transmitters are connected to one site, you can configure a site status to react upon the alarms received from a certain transmitter only.
To do that, you need to create a separate instance of a status for each transmitter and set it up to listen to a specific alarm source via an alarm expression.
Before you begin, make sure that:
-
all the necessary integrations are configured on the Company level
-
all the necessary transmitters are connected to the site
To set a site status to listen to a particular transmitter of a particular type:
-
On the Overview > Statuses subpage of a site, сreate the appropriate site status separate status instance for each transmitter
For example, you can create a separate instance of a Connection status for each connected alarm transmitter.
For details on how to create a status, see section Operations with a Status > Create a Status.
-
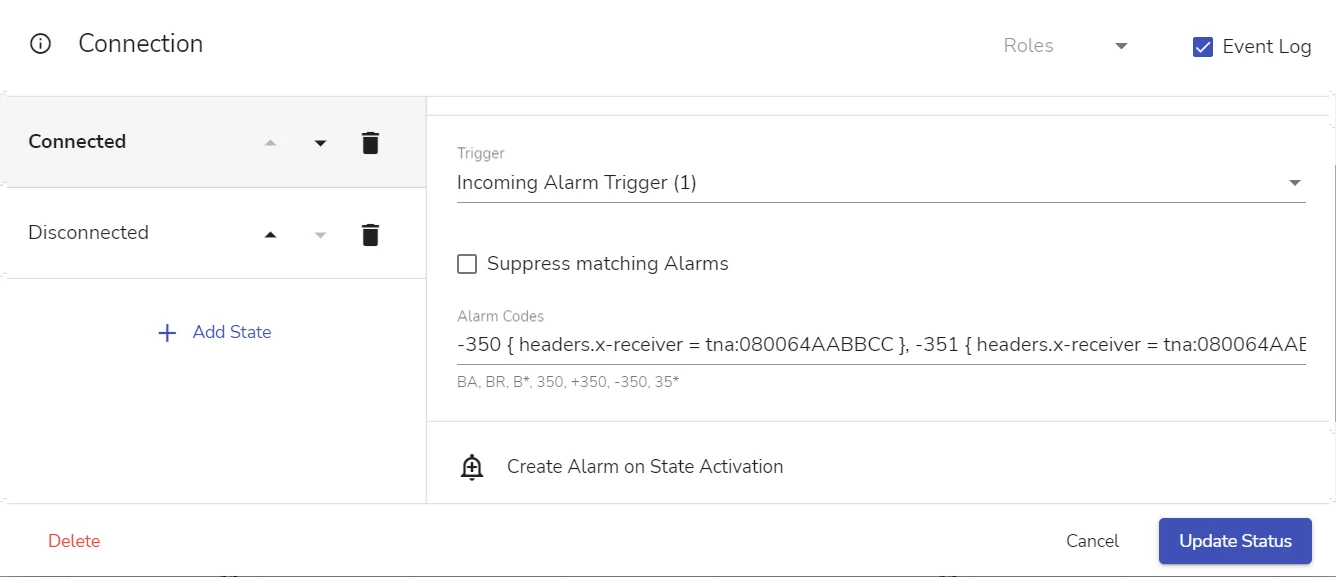
In the settings of each status instance, configure status states as follows:
a. Set the Trigger field value to Incoming Alarm Trigger (1)
b. For each state of the status, in the Alarm Codes field, instead of the alarm codes, specify alarm expressions in one of these formats:
-
to filter alarms from transmitters of different types –
[alarm code]{headers.x-source=[receiver_type]} -
to filter alarms from different transmitters of the same type –
[alarm code]{headers.x-receiver=[receiver_type]:[unique_property]}
In the expressions above,
[receiver_type]is the transmitter type that is supported by evalink talos – the value examples are tna, vds, dc09, flexc, galaxy, etc.For details on alarm expression parameters, see section Advanced Features in evalink talos > Alarm Expression Syntax > headers Sub-Parameters. The section also provides details on the
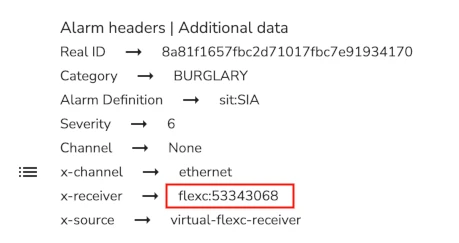
[unique_property]format for TNA transmitters.tipTo find out the
[receiver_type]:[property]pair, trigger an alarm on the concerned transmitter and view the value of the x-receiver property in the details of the alarm (see the figure below):
You can specify several alarm expressions separated by a comma (see the figure below):

-
-
Click Update Status to save the changes
To configure several instances of a status (for example, several Arm Statuses) to listen to different alarm sources, repeat the procedure for each instance of the concerned status.
For Arm Statuses created on the basis of Arm Status (Partitions) template, the transmitter to listen to can be specified in the dedicated Virtual Device field in the status settings. For details, see section Operations with a Status > Edit Or Delete A Partition / Global Arm Status.
 Link is copied