Virtual SIA DC09 Receiver Ajax Panel Setup
In this section, the term panel indicates a connected 3d-party panel of any model, if not stated otherwise.
The term a receiver instance indicates a single Virtual SIA DC09 Receiver with a unique account assigned by evalink talos and optionally an encryption key.
Configuration Overview for Virtual SIA DC09 Receiver with Ajax Hub
One of the key usecases for evalink talos Virtual SIA DC09 Receiver is connection with Ajax panels through Ajax Hub. The Ajax Hub acts as the central control unit of the security system for all connected devices, such as motion sensors, door / window sensors, fire alarms, and MotionCam / PIRCAM.
Ajax devices for residential and commercial use connect to Ajax Hub. Ajax uses its proprietary Jeweller protocol for encrypted two-way wireless communication with devices.
Ajax Hub uses SIA DC09 protocol over IP with AES-128 encryption, among others, to connect to central monitoring stations and alarm processing centers such as evalink talos.
The Ajax Hub supports multiple channels to send alarms and notifications to evalink talos:
- Ethernet (primary)
- Cellular networks (e.g., GSM 2G/3G/4G) as a backup
- Wi-Fi (depending on the model)
When you configure Ajax Hub to connect to evalink talos, you can:
- Receive pictures directly from Ajax Motion Cam on evalink talos
- Arm and Disarm your Ajax Hub on evelink talos
Pre-requisites for Setting Up Virtual SIA DC09 Receiver with Ajax
Before you configure Virtual SIA DC09 Receiver to connect with Ajax, you need to set up the Ajax configuration.
For details on how to configure Ajax Hub hardware and software, see Ajax documentation. Make sure you have completed the following steps:
- Connect your Ajax Hub to power and Internet and add a SIM card
- Download and install AjaxPRO application
- Create and configure Ajax Hub account
Your Ajax Hub account needs to be regular. Ajax Hub Pro accounts may not work correctly.
- Register your Ajax Hub
- Extablish Ethernet, Cellular and Monitoring Station
Now you can use the Ajax Hub credentials that you obtain during the setup process to configure Virtual SIA DC09 Receiver on evalink talos side.
Configure Virtual SIA DC09 Receiver for Ajax Hub
For details on how to configure Ajax Hub credentials on the global level, see section Enable Virtual SIA DC09 Receiver Globally.
The procedure below generally follows a regular configuration of a Virtual SIA DC09 Receiver for a site: Configure Virtual SIA DC09 Receiver for a Site with specifics added for Ajax Hub connection:
-
Go to Sites > [site] > Receivers > tab
-
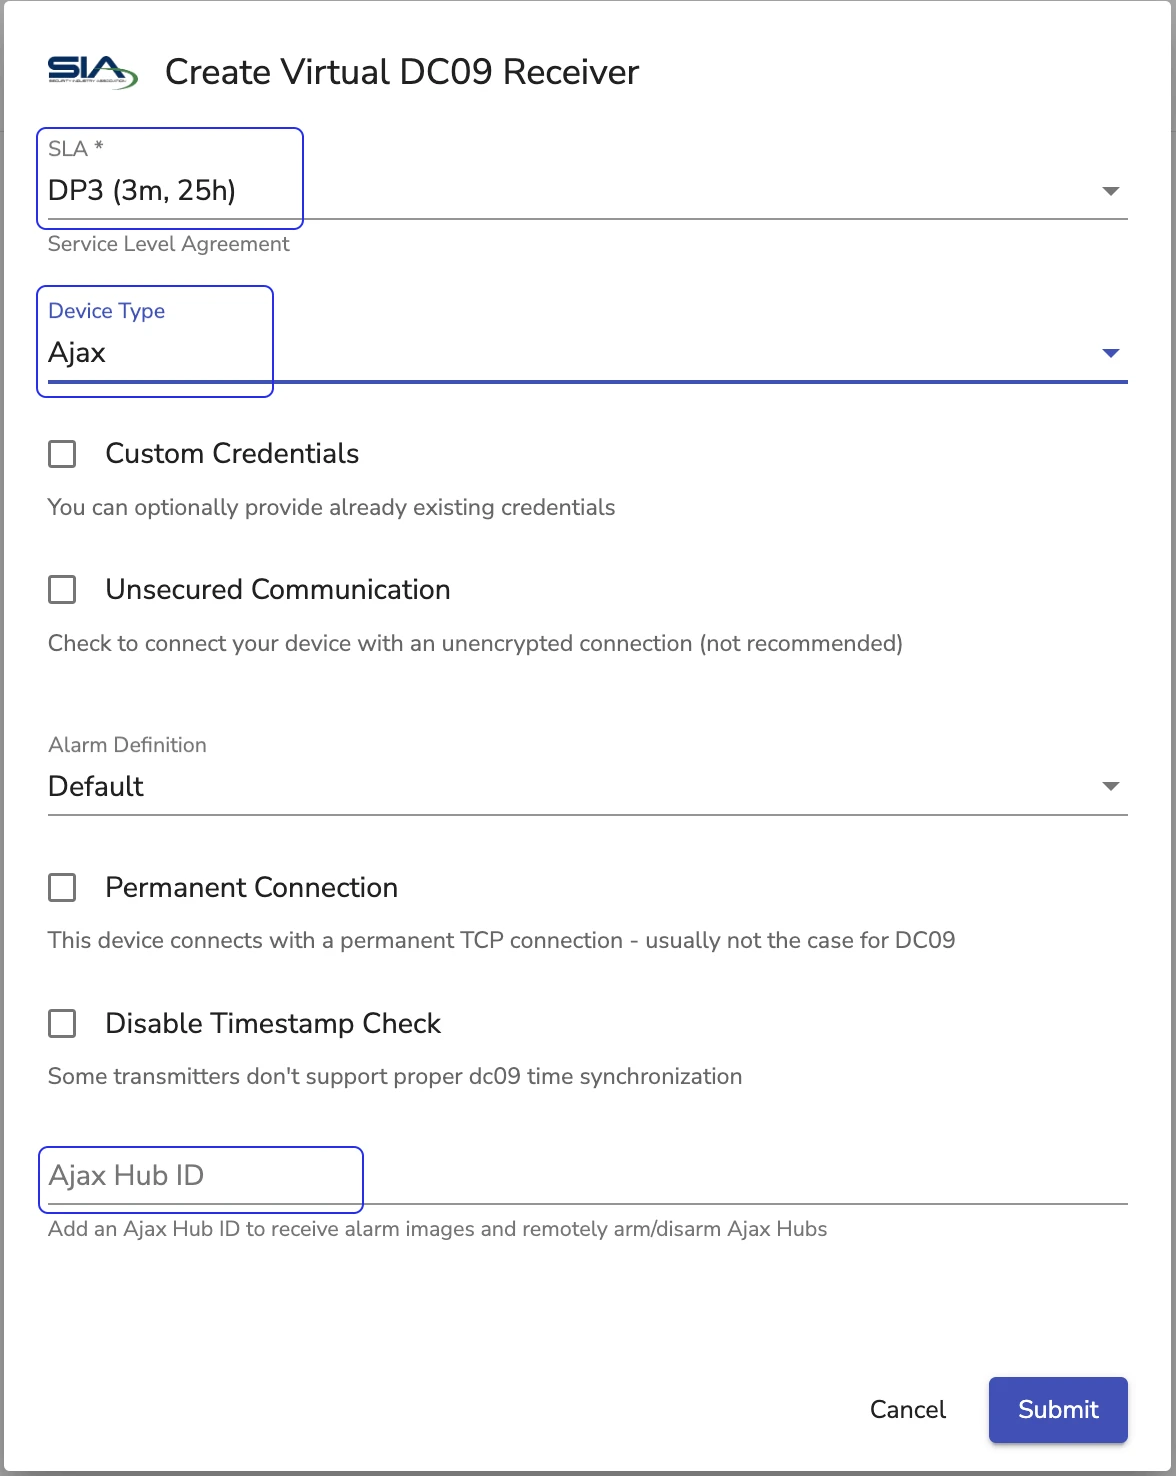
On the Receivers tab, click on the Add a Virtual Receiver button and select Virtual SIA DC09 Receiver from the list
Virtual SIA DC09 Receiver configuration dialog opens.

-
In the Device Type field, select Ajax
-
In the Ajax Hub ID field, enter your Ajax Hub ID
infoYou can get your Ajax Hub ID from your AjaxPRO application and copy it to clipboard. You use the same Ajax Hub ID in the global setting.
-
Click Sumbit
At first configuration, evalink talos displays the following error message: Cannot get information about this hub…

This is expected, as evalink talos gets information about the Hub only when you configure the new user with evalink talos credentials on the Ajax Hub side.
Add evalink talos as a Monitoring Station in Ajax Hub
To complete the connection configuration between your Ajax Hub and evalink talos Virtual SIA DC09 Receiver, you need to authorize evalink talos as a monitoring station on the Ajax Hub side.
-
Disarm your Ajax Hub
-
In your AjaxPRO application, navigate to Settings > Monitoring Station
-
Enter the following information from evalink talos Virtual SIA DC09 Receiver instance to your Monitoring Station settings in the AjaxPRO:
- In the Object Number field, enter your Virtual SIA DC09 Receiver instance account number
- In the Primary IP Address field, enter your Virtual SIA DC09 Receiver instance Public IP1
- In the Secondary IP Address field, enter your Virtual SIA DC09 Receiver instance Public IP2
- In the Port field for each IP address, enter the respective port number from the receiver instance
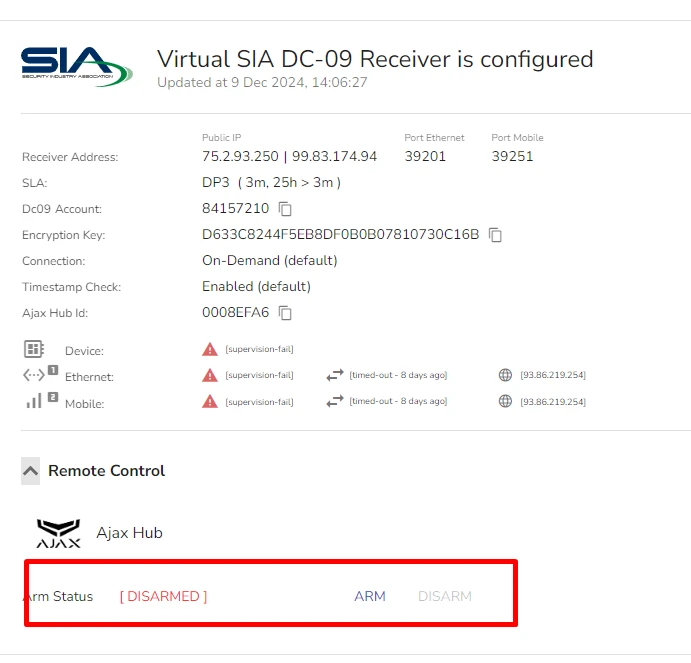
- Copy the encryption key generated when your Virtual SIA DC09 Receiver instance is created and enter it in the Encryption Key field on AjaxPRO
-
Configure other AjaxPRO Monitoring Station settings as desired
-
Click Save
As a result, your connection status on evalink talos should change to Connected.
Add an evalink talos User to AjaxPRO
To fully complete the configuration of Virtual SIA DC09 Receiver with evalink talos, a Company Admin needs to add Ajax Hub credentials for SIA DC09 Receiver on the Global Level.
You can obrain these credentials once you have connected your Ajax Hub with at least one instance of Virtual SIA DC09 Receiver for a site in your tennant by adding a user on AjaxPRO side.
Once a Company Admin adds Ajax Hub credentials in global configuration, it doesn't limit the Virtual SIA DC09 Receiver to working with Ajax setup only.
Make sure the user you're adding to AjaxPRO for evalink talos configuration is a new user and not an existing one.
-
In your AjaxPRO application, navigate to Settings > User
-
Click Send Invites and enter a user email address that you haven't yet used for Ajax
-
Have the user create a user profile on AjaxPRO with a password
Now, a company admin can use the same user email and password to populate the Ajax Credentials fields in the global configuration.
To add the Ajax credentials to your global configuration, you need to edit the Virtual SIA DC09 Receiver integration globally.
For details, see section Edit or Disable Virtual SIA DC09 Receiver Globally.
Arming and Disarming Ajax Hub from evalink talos
You can use Remote Control functionality to arm and disarm your Ajax Hub from evalink talos.
To arm or disarm a connected Ajax Hub:
-
Go to Sites > [site] > Receivers > tab
-
Find the record of the Virtual SIA DC09 Receiver instance which connects to the Ajax Hub you need to disarm
-
Click on the Remote Control button
The remote control options become visible.

-
Click Arm or Disarm depending on the status you need to set for the Ajax Hub.
Configuration of Motion Events for Ajax Cloud
If you are using DC09 video alarm verification and Ajax Cloud, it is recommended to use the following configuration in order to avoid receiving multiple Burglary Alarm events after an original alarm.
- In the global Virtual SIA DC09 configuration, check the Enable Ajax Cloud Zone Mapping checkbox
When you enable this setting, evalink talos maps the alarm as a MOTION event during video verification. The zone in this case is the same as
Ajax panel reports it.
When you disable this setting, evalink talos uses the BA alarm with the default Zone=700 value for all similar events.
- In the Ajax Cloud settings, in the Send Image settings, select All images in a single message option
In a situation when a false alarm is detected, system is disarmed and an operator confirms that everything is in order, there may be a delay which causes visual verification signals arrive after the restore signal.
If visual verification images are multiple, by default Ajax device sends a separate event code for each generated video alarm verification image. This setting allows to avoid it.
 Link is copied