Virtual SIA DC09 Receiver Site Setup
In this section, the term panel indicates a connected 3d-party panel of any model, if not stated otherwise.
The term a receiver instance indicates a single Virtual SIA DC09 Receiver with a unique account assigned by evalink talos and optionally an encryption key.
Configure Virtual SIA DC09 Receiver for a Site
You can configure one or several instances of Virtual SIA DC09 Receiver for any site within your company.
When an instance of Virtual SIA DC09 Receiver is configured, you can receive alarms and technical messages from connected panels or third-party receivers over SIA protocol. In case of Ajax panels, you can also send certain Remote Control messages to the panels.
Each receiver instance is connected to its corresponding panel and is configured separately.
To configure Virtual SIA DC09 Receiver for a site:
-
Go to Sites > [site] > Receivers > tab
-
On the Receivers tab, click on the Add a Virtual Receiver button and select Virtual SIA DC09 Receiver from the list
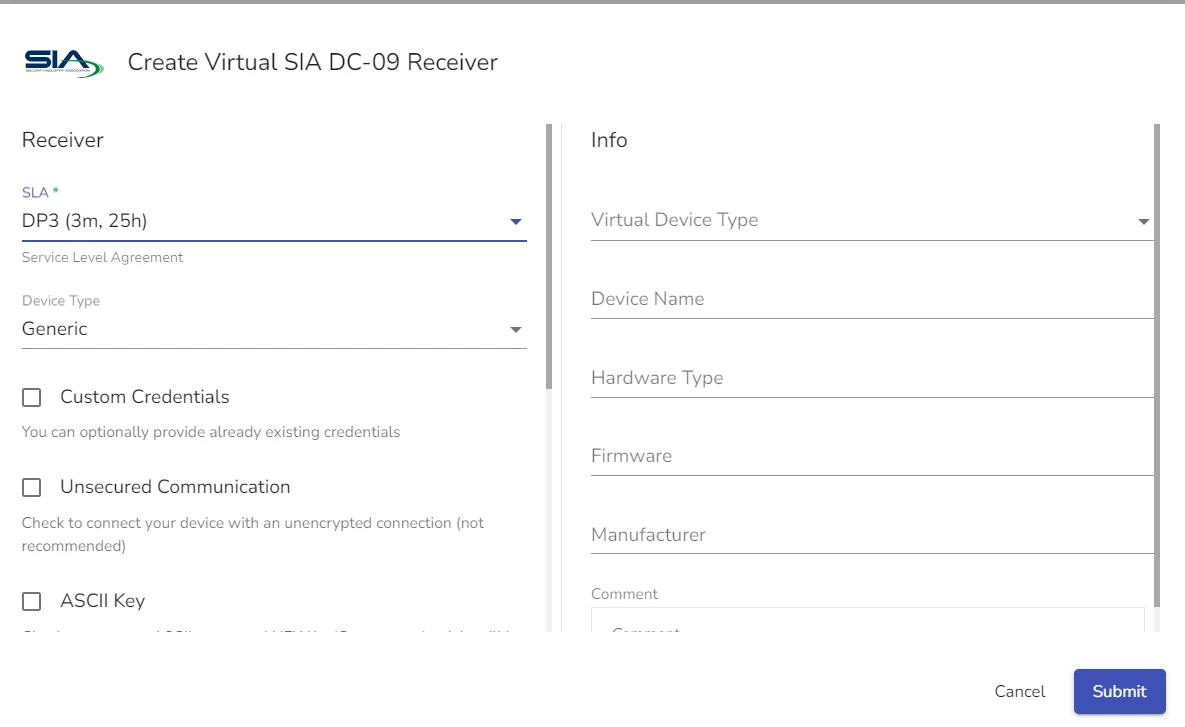
Virtual SIA DC09 Receiver configuration dialog opens.

-
Select the SLA (Service Level Agreement) option to be used
SLA DP3 (3m, 25h) is selected by default. For details on setting up SLA options for a Virtual Receiver, see section Direct Connection Monitoring > Set SLA for a Virtual Receiver
-
Select one of the following device types:
- Generic - to connect third-party receiver or panel that support over SIA protocol.
- Ajax - to connect an Ajax panel. This option is only active if a Company Admin has configured Ajax credentials globally.
- Resideo ProSeries - to connect to all-in-one Resideo Proseries panels, such as PROA7 or PROA7PLUS.
-
(Optional) Check the Custom Credentials box to add custom Account and Encryption Key
If you don't use this option, evalink talos creates these values by default.
-
(Optional) Check Unsecured Communication checkbox if you want to use unencrypted connection.
infoIt is best practices not to use unencrypted connection. Only check this box if your connection or panel specifically requires it.
-
(Optional) Check the ASCII Key checkbox to generate a HEX key.
This option is mutually exclusive with the Custom Credentials option. You can use only either one of them.
-
(Optional) In the Alarm Definition field, select the Alarm Definition you want to use for this receiver instance
-
Specify connection options
infoFor details, see section Specify Connection Options for Virtual SIA DC09 Receiver below.
-
Add Device Information to the Virtual DC09 Receiver instance
For details on how to add Device Information to a virtual receiver instance, see section Add Device Information to a Virtual Receiver Record.
- Click Submit
Specify Connection Options for Virtual SIA DC09 Receiver
Depending on your panel type, you can select several connection options for better compatibility and alarm message parsing. You can specify all of these options once you open the Virtual SIA DC09 Receiver creation / editing dialog.

To specify connection option:
-
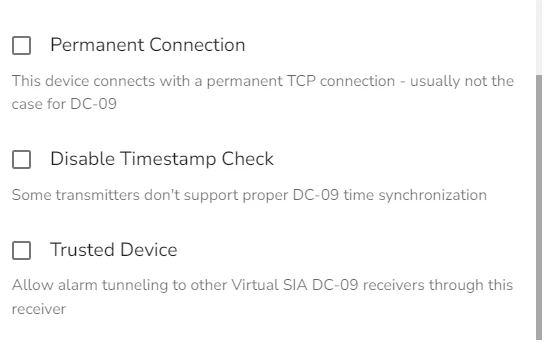
(Optional) Check the Permanent Connection checkbox
infoWhen checked, the external device establishes a permanent TCP connection to the evalink talos.
This means the communication channel between the panel and the receiver is always open, allowing real-time data transfer without reestablishing the connection for every event.
This is not typical for SIA DC09, as it primarily relies on event-driven connections where the panel / transmitter connects to the receiver only when an event (e.g. alarm, status update) needs to be transmitted.
This option can be required for older panels or panels that use proprietory versions of the SIA DC09 Protocol.
-
(Optional) Check the Disable Timestamp Check
infoWhen this checkbox is checked, the virtual receiver instance does not validate the timestamp in the event message against its own clock. This is useful when the transmitting panel/transmitter does not support proper SIA DC09 time synchronization.
Example of panels that need this option to work properly: Ademco Vista panels (Honeywell) without advanced communicator add-ons, DSC PowerSeries PC1616/1832/1864 (older firmware), as well as basic communicators such as Texecom Premier Elite with early-generation IP communicators, entry-level panels, such as Pyronix Enforcer without advanced IP modules or panels with GSM-only modules.
-
(Optional) Check the Trusted Device checkbox
infoWhen this option is checked, evalink talos is allowed to tunnel alarms to other virtual receivers through this one.
This option is useful If you have a multi-tiered monitoring setup and use connection hierarchy to forward alarms.
-
Click Sumbit
View the Connection Status of a Virtual SIA DC09 Receiver
You can view connection status for each Virtual SIA DC09 Receiver instance on your site. To access the receiver page, go to Sites > [site] > Receivers > Virtual SIA DC09 Receiver tab and select the receiver you want to view from the list. Each Virtual SIA DC09 Receiver instance displays the following data:
- Key parameters, such as public IP addresses and ports
- SIA DC09 Account ID
- Connection Status parameters
The figure below shows record data for an instance of a Virtual SIA DC09 Receiver:

For details about connection status indicators, see section View Connection Status Indicators on the Virtual Receiver Page.
Edit Virtual SIA DC09 Receiver on a Site Level
To edit an instance of Virtual SIA DC09 Receiver on a site level:
-
Go to Sites > [site] > Receivers > tab
-
Click the icon next the record of the receiver instance you want to edit and select Edit
-
In the dialog that opens, edit the receiver settings
-
Click Submit
You can view logs and version history for each virtual receiver instance, and also restore the virtual receiver to a selected version. For details, see section Work with Virtual Receiver Logs and Version History.
Disable Virtual SIA DC09 Receiver on a Site Level
Use this option if you do not want to use a Virtual SIA DC09 Receiver instance, but want to keep its credentials and configuration.
To disable an instance of Virtual SIA DC09 Receiver, set the corresponding Enable / Disable toggle for a Virtual SIA DC09 Receiver instance to Off.
Delete Virtual SIA DC09 Receiver on a Site Level
Use this option if you want to completely delete an instance of Virtual SIA DC09 Receiver from a site together with its credentials and configuration.
To delete an instance of Virtual SIA DC09 Receiver:
-
Go to Sites > [site] > Receivers > tab
-
Click the corresponding icon next the record of the receiver instance you want to delete and select Delete Receiver
-
In the confirmation dialog that opens, type the confirmation message and click Confirm Delete
 Link is copied