Virtual Vanderbilt SPC Receiver Site Configuration
In this section, the term panel indicates a connected 3d-party panel of any model, if not stated otherwise.
The term a receiver instance indicates a single Virtual Vanderbilt SPC Receiver with a unique account assigned by evalink talos.
Configure Virtual Vanderbilt SPC Receiver for a Site
You can only configure one instance of Vanderbilt SPC Virtual Receiver for each evalink talos site.
When an instance of Virtual Vanderbilt SPC Receiver is configured, you can receive alarms and technical messages from connected panels and also send certain Remote Control messages to the panels.
Each receiver instance is connected to its corresponding panel and is configured separately.
To configure Virtual Vanderbilt SPC Receiver for a site:
-
Go to Sites > [site] > Receivers > tab
-
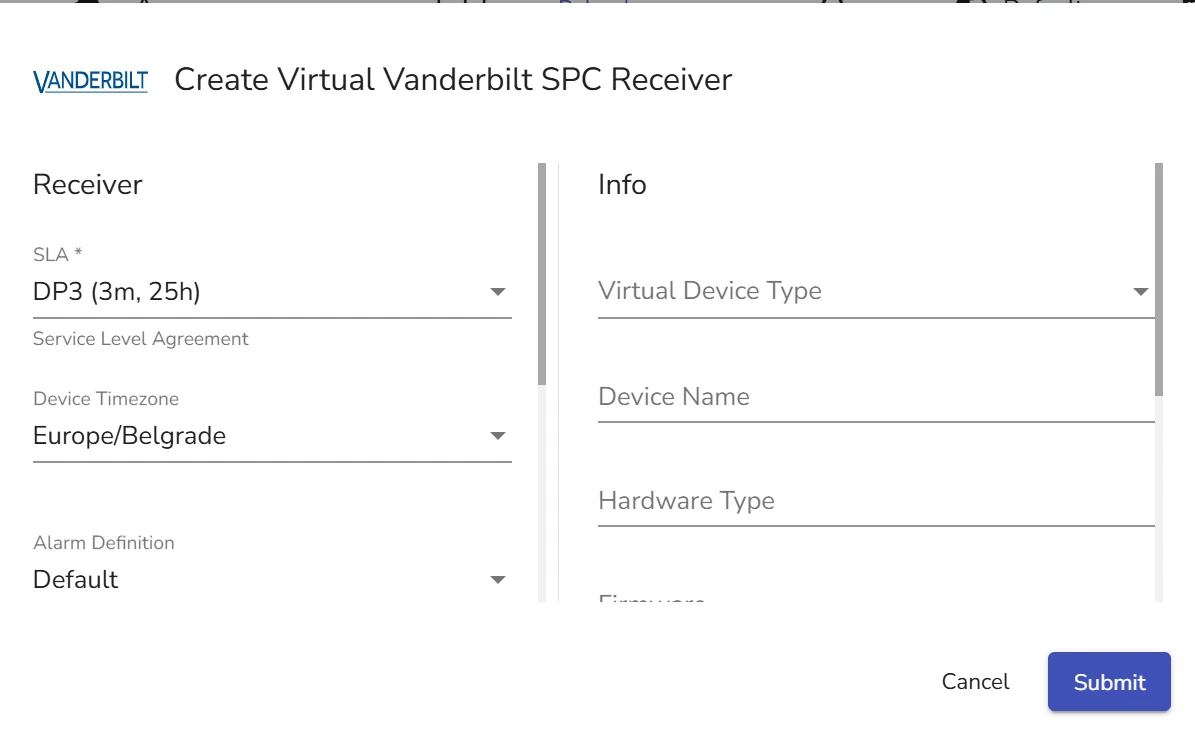
On the Receivers tab, click on the Add a Virtual Receiver button and select Virtual Vanderbilt SPC Receiver from the list
Virtual Vanderbilt SPC Receiver configuration dialog opens.

-
Select the SLA (Service Level Agreement) option to be used
SLA DP3 (3m, 25h) is selected by default. For details on setting up SLA options for a Virtual Receiver, see section Direct Connection Monitoring > Set SLA for a Virtual Receiver
-
In the Device Time Zone field, select the time zone where your Vanderbilt SPC Panel is located
infoevalink talos automatically selects a time zone which is set on the device from which you are using evalink talos. If your panel is located in another time zone, it is recommended to select this particular time zone.
-
(Optional) In the Alarm Definition field, select the Alarm Definition you want to use for this receiver instance
-
In the Username, enter a user name your Vanderbilt SPC panel provides for connection with third-party SPCs.
-
In the Password, enter a password your Vanderbilt SPC panel provides for connection with third-party SPCs.
-
(Optional) Enable Audio / Video Verification enabled option.
infoWhen this option is enabled, evalink talos can pull live video or audio feeds when an alarm is triggered to verify whether an event is truly an alarm situation.
-
(Optional) Check the Custom Credentials box to add custom Account and Key
If you don't use this option, evalink talos creates these values by default.
-
Add Device Information to the Receiver instance
For details on how to add Device Information to a virtual receiver instance, see section Add Device Information to a Virtual Receiver Record.
- Click Submit
Configure Vanderbilt SPC Receiver connection on the Panel Side
Establishing a connection between an instance of evalink talos Virtual Vanderbilt SPC Receiver and a Vanderbilt SPC panel requires a specific ATP configuration on the panel side. You can add this configuration using SPC Connect PRO Desktop application which comes with your panel.
-
When adding a new ATS to the system, select Add Dual Path ATS
-
In the SPC Account Code field, use the Vanderbilt SPC Account value from the evalink talos Virtual Vanderbilt SPC Receiver instance you want to connect to
-
In the RCD Identification and Backup RCD Identification use the data from Public IP and Port fields from the evalink talos Virtual Vanderbilt SPC Receiver instance you want to connect to
-
Change the order of the newly created ATPs so that Ethernet ATPs haver priority over Mobile Data ATPs
-
Open the primary ethernet ATP for editing, open Advanced Settings and do the following:
- Set Encryption Key Mode to Fixed Encryption
- Copy the encryption key from your Virtual Vanderbilt SPC Receiver instance and paste it into the Encryption Key field of your panel configuration app
-
Repeat step 5 for all ATPs
View the Connection Status of a Virtual Vanderbilt SPC Receiver
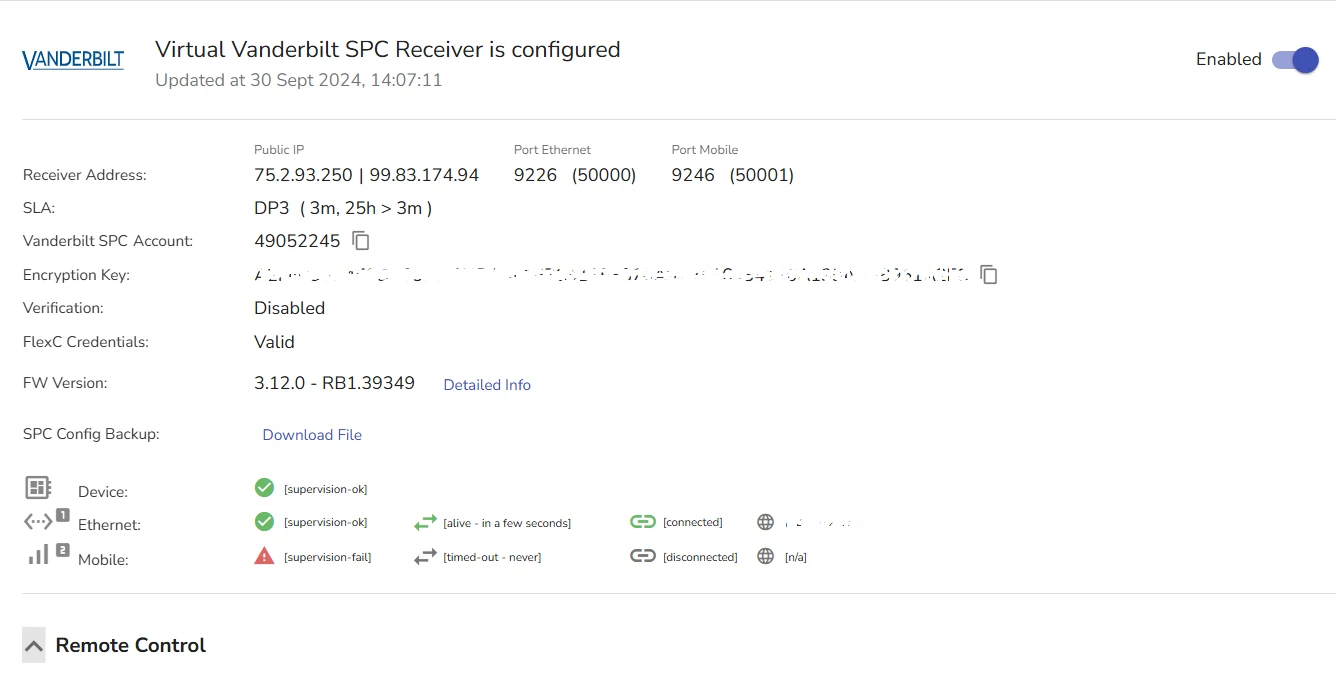
You can view connection status for Virtual Vanderbilt SPC Receiver instance on your site. To access the receiver page, go to Sites > [site] > Receivers > Virtual Vanderbilt SPC Receiver tab.
Each Virtual Vanderbilt SPC Receiver instance displays the following data:
- Key parameters, such as public IP addresses and ports
- Vanderbilt SPC Account and Encryption key that you need to enter on the panel side
- Verification status (enabled or disabled)
- FlexC credentials validity status
- Connection Status parameters
- Remote Control details
The figure below shows record data for an instance of a Virtual Vanderbilt SPC Receiver:

For details about connection status indicators, see section View Connection Status Indicators on the Virtual Receiver Page.
Virtual Vanderbilt SPC Receiver Remote Control Options
The FlexC protocol which Virtual Vanderbilt SPC Receiver uses to connect with Vanderbilt SPC panels, supports two-way connection and Remote Control.
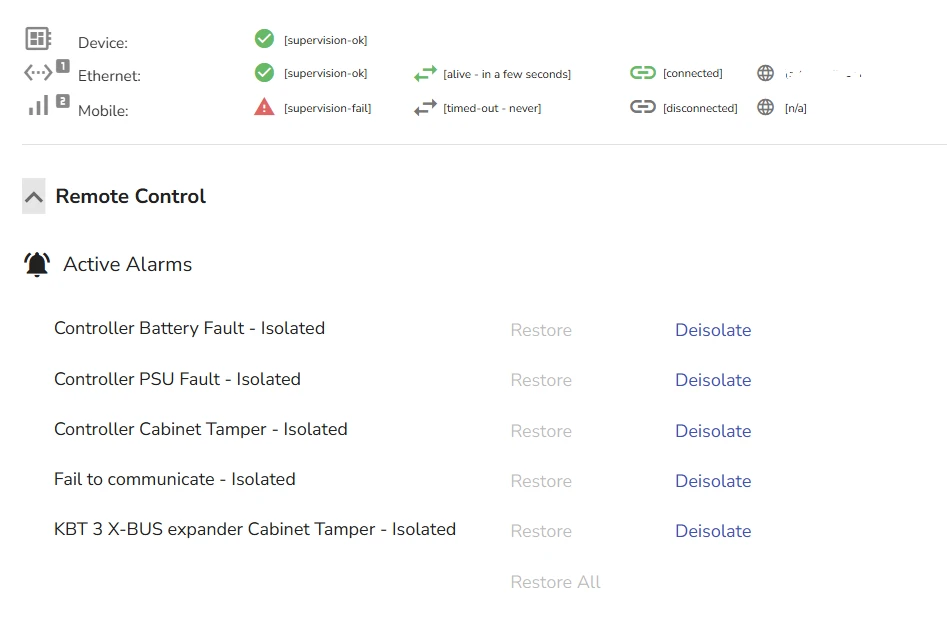
The Remote Control settings open if you click on the Remote Control dropdown in the receiver instance record.

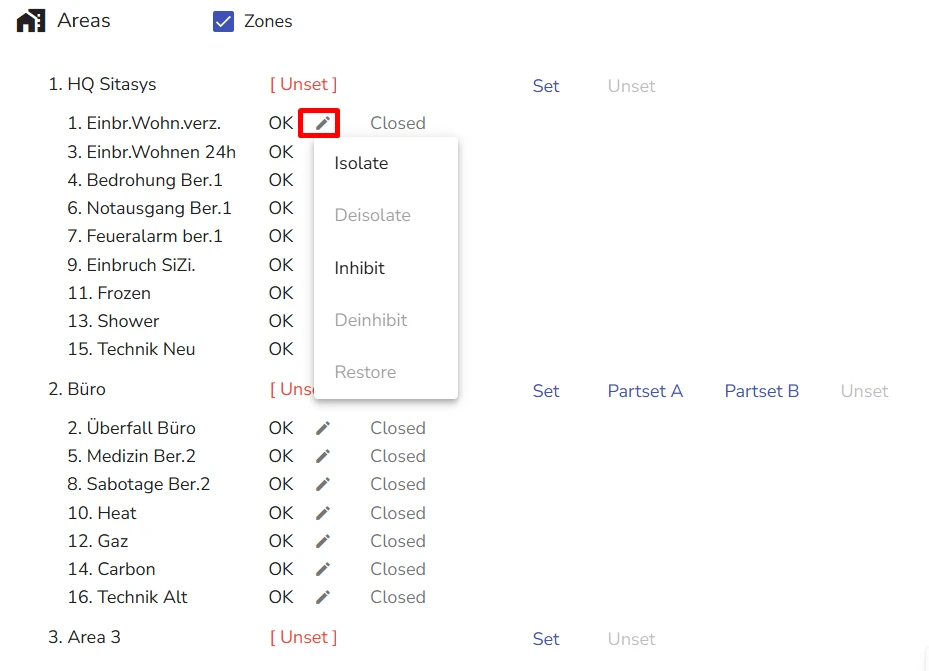
The Remote Control settings area features a list of active alarms with their zone status (see figure above) and a list of areas and zones within them which you can configure from evalink talos.

The following Area actions are available:
-
Set - The area is fully armed, all security zones that are not inhibited or isolated,are active and will trigger alarms.
-
Partset - The area is partially armed, only a subset of zones, is active while others remain unarmed. There can be different Partset levels (e.g., Partset A and Partset B), allowing for flexible configurations.
-
Unset - The system is disarmed, no zones will trigger alarms.
The following Zone actions are available:
-
Isolate - Manually exclude the zone from monitoring until explicitly reactivated (persists across disarm/arm cycles).
-
Deisolate - Undo isolate.
-
Inhibit - Temporary exclude a zone from monitoring for one arming period (resets upon disarm).
-
Deinhibit - Undo inhibit.
-
Restore
When zone set / unset options appear disabled, it means that you have to deisolate and restore pending alarms for these zones to continue normal operation.
Edit Virtual Vanderbilt SPC Receiver on a Site Level
To edit an instance of Virtual Vanderbilt SPC Receiver on a site level:
-
Go to Sites > [site] > Receivers > tab
-
Click the icon next to the record of the receiver instance you want to edit and select Edit
-
In the dialog that opens, edit the receiver settings
-
Click Submit
You can view logs and version history for each virtual receiver instance, and also restore the virtual receiver to a selected version. For details, see section Work with Virtual Receiver Logs and Version History.
Disable Virtual Vanderbilt SPC Receiver on a Site Level
Use this option if you do not want to use a Virtual Vanderbilt SPC Receiver instance, but want to keep its credentials and configuration.
To disable an instance of Virtual Vanderbilt SPC Receiver, set the corresponding Enable / Disable toggle for a Virtual Vanderbilt SPC Receiver instance to Off.
Delete Virtual Vanderbilt SPC Receiver on a Site Level
Use this option if you want to completely delete an instance of Virtual Vanderbilt SPC Receiver from a site together with its credentials and configuration.
To delete an instance of Virtual Vanderbilt SPC Receiver:
-
Go to Sites > [site] > Receivers > tab
-
Click the corresponding icon next the record of the receiver instance you want to delete and select Delete Receiver
-
In the confirmation dialog that opens, type the confirmation message and click Confirm Delete
 Link is copied