Virtual Galaxy Receiver Setup for a Site
In this section, the term panel indicates a Honeywell Galaxy Series panel of any model, if not stated otherwise.
The term receiver instance indicates a single Virtual Galaxy Receiver with a unique Galaxy account assigned by evalink talos.
Configure Virtual Galaxy Receiver for a Site
You can configure one or several instances of Virtual Galaxy Receiver for any site within your company. When a Virtual Galaxy Receiver is configured for a site, evalink talos can receive alarms from a Honeywell Galaxy Series panel connected to it and / or send Remote Control commands to the panel.
Each receiver instance is connected to its corresponding panel and is configured separately.
To configure a Virtual Galaxy Receiver for a site:
-
Go to Sites > [site] > Receivers > tab
-
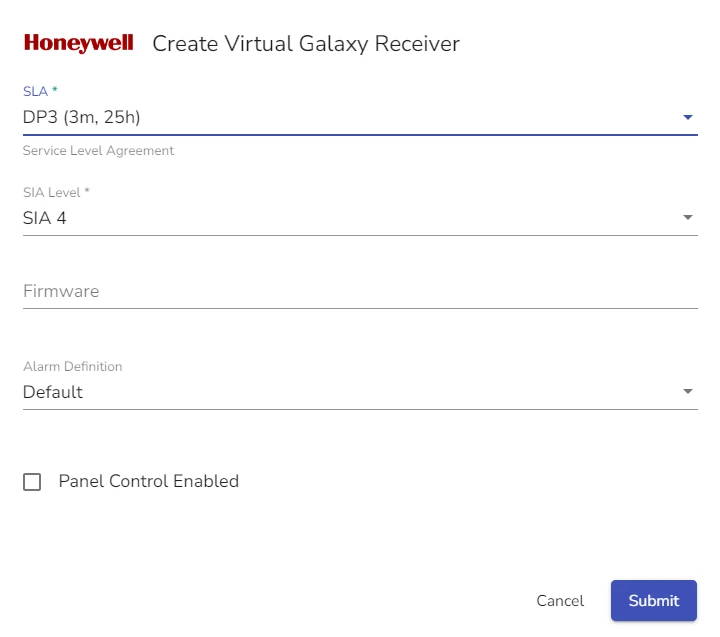
On the Receivers tab, click on the Add a Virtual Receiver button and select Virtual Galaxy Receiver from the list
Virtual Galaxy Receiver configuration dialog opens.

-
Select the SLA (Service Level Agreement) option to be used
SLA DP3 (3m, 25h) is selected by default. For details on setting up SLA options for a Virtual Receiver, see section Direct Connection Monitoring > Set SLA for a Virtual Receiver
-
Select SIA protocol level
infoSIA protocol level defines the level of details in alarms transmitted from the connected panel and whether Remote Control is available or not.
For Galaxy Virtual Receiver, Remote Control options are available at SIA level 4.
For details about the SIA protocol, see section SIA Protocol Specifics for Virtual Galaxy Receiver
-
(Optional) If you have selected SIA Level 4 on the step above, check the Panel Control Enabled checkbox to enable Remote Control
coming soonInformation about working with Remote Control will be added in future documentation releases.
-
(Optional) In the dialog that opens, enter panel details
For Details on panel details, see section Specify Honewell Galaxy Series Panel Details for Remote Control below.
-
(Optional) In the Firmware field, enter the firmware version
infoThis step is relevant if your panel doesn't retrieve firmware information automatically.
-
Select the Alarm Definition profile from the dropdown menu
You can find detailed lists of all available Alarm Definition sets on the Company > Settings > Alarms page.
-
Click Submit
You can create more instances of Virtual Galaxy Receiver by clicking the Add Receiver button.
Virtual Galaxy Receiver Details in Panel Configuration
In order to properly connect your Honeywell Galaxy Series panel to an instance of Virtual Galaxy Receiver that you have created for a site in evalink talos, you need to specify Virtual Galaxy Receiver details.
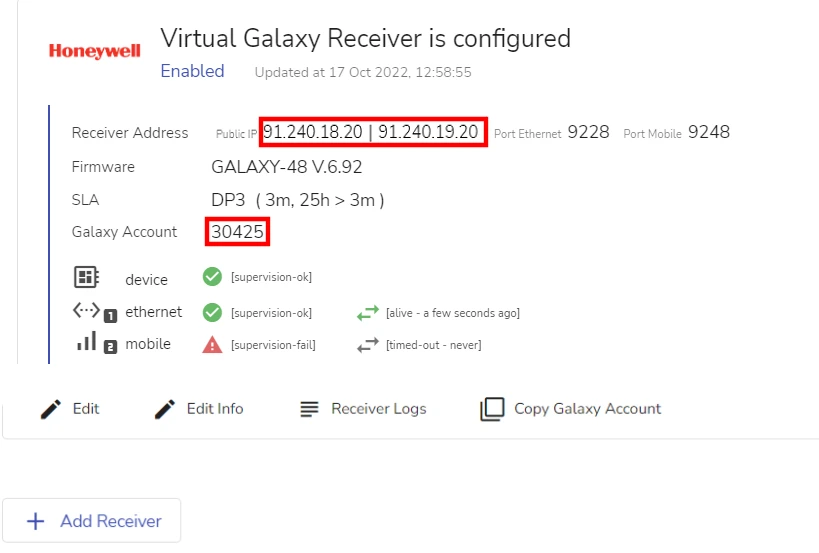
When an instance of Virtual Galaxy Receiver is created, the following details are assigned to it:
- Receiver Address: includes public IPs (primary and secondary), Port Ethernet and Port Mobile
- Galaxy account: a unique numeric ID generated by evalink talos when a Virtual Galaxy Receiver is created
The figure below shows a connected Virtual Galaxy Receiver with receiver details:

To connect your Honeywell Galaxy Series panel to an instance of Virtual Galaxy Receiver, you need to specify the following details of the receiver instance in your panel's application:
- Galaxy account
- Primary and secondary IP addresses (for DP connections, Primary only for SP connections)
- Port number (depending on the type of connection you use)
- Required SIA protocol level (specify level 4 if you intend to use Remote Control options)
You can copy your Galaxy ID to clipboard by clicking the Copy Galaxy Account button.
For details on how to configure the settings on the panel, refer to the panel user documentation.
If you want to connect a panel previously connected to Virtual Galaxy Receiver, to a new receiver instance, you can do so. You will need to enter new receiver instance details in your panel's control application. But in this case, the previous instance of the Virtual Galaxy Receiver will stop working.
Specify Honeywell Galaxy Series Panel Details for Remote Control
If you select SIA level 4 as your level of SIA protocol when configuring an instance of Virtual Galaxy Receiver for a site, you can use it for Remote Control options. In this case, to establish the two-way connection between the panel and the receiver instance, you need to specify panel details in the Virtual Galaxy Receiver instance configuration.
To specify Honeywell Galaxy Series panel details for Remote Control, do the following:
-
Go to Sites > [site] > Integrations > Galaxy Receiver tab or Sites > [site] > Receivers > tab
-
Create a new instance of Virtual Galaxy Receiver or open an existing one for editing
For details on how to create a Virtual Galaxy Receiver instance, see section Configure Virtual Galaxy Receiver for a Site above.
For details on how to edit a Virtual Galaxy Receiver instance, see section Edit Virtual Galaxy Receiver on a Site Level below.
-
From the SIA level dropdown, select SIA level 4
-
Check the Panel Control Enabled checkbox, a Remote Control Configuration dialog becomes available.
The figure below shows a Virtual Galaxy Receiver configuration dialog with fields for Remote Control panel details:
-
Enter the following data from your panel configuration application:
- Panel hostname:
nat-ip.tech.sitasys - Panel PIN: a PIN number that authorizes third-party applications to connect and exchange data with your panel.
- Port number: 10005
infoPort 10005 is selected by evalink talos by default and is used by the Virtual Galaxy Receiver to transmit SIA protocol commands to the panel. It is recommended not to change this setting.
- Panel hostname:
-
Click Submit
If you have entered correct details, Remote Control block becomes available for this particular instance of the Virtual Galaxy Receiver.
View the Connection Status of a Virtual Galaxy Receiver
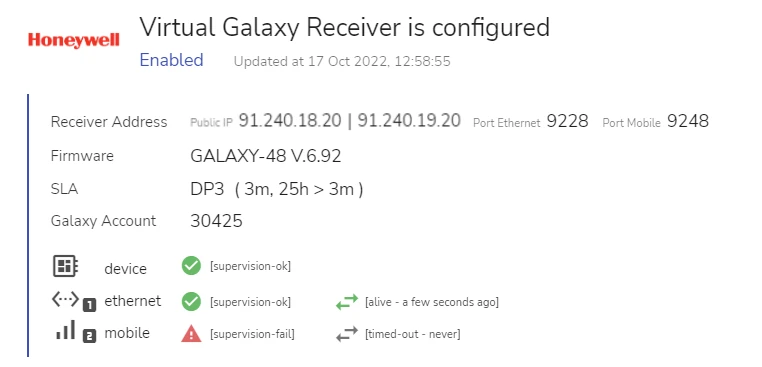
You can view connection status for each Virtual Galaxy Receiver instance on your site. To access the receiver page, go to Sites > [site] > Receivers > Galaxy Receiver tab and select the receiver you want to view from the list.
Each Virtual Galaxy Receiver instance displays the following data:
- Key parameters, such as public IP addresses and ports
- Galaxy Account ID
- Connection Status parameters
The figure below shows record data for an instance of a Virtual Galaxy Receiver:

For details about connection status indicators, see section View Connection Status Indicators on the Virtual Receiver Page.
For Honeywell Galaxy Dimension Series panels, which do not support mobile connection, only ethernet connection status indicators will be shown in the receiver instance details.
Edit Virtual Galaxy Receiver on a Site Level
To edit an instance of Virtual Galaxy Receiver on a site level:
-
Go to Sites > [site] > Receivers > tab
-
Click the icon below the record of the receiver instance you want to edit
-
In the dialog that opens, edit the receiver settings
infoIf you want to change the SIA protocol level from 0 to 1, 2, 3 or 4 or vice versa, evalink talos will assign a different Galaxy Account number to the receiver instance.
SIA level 0 supports account numbers up to 4 characters, while SIA level 1, 2, 3 and 4 support account numbers up to 6 characters.
-
Click Submit
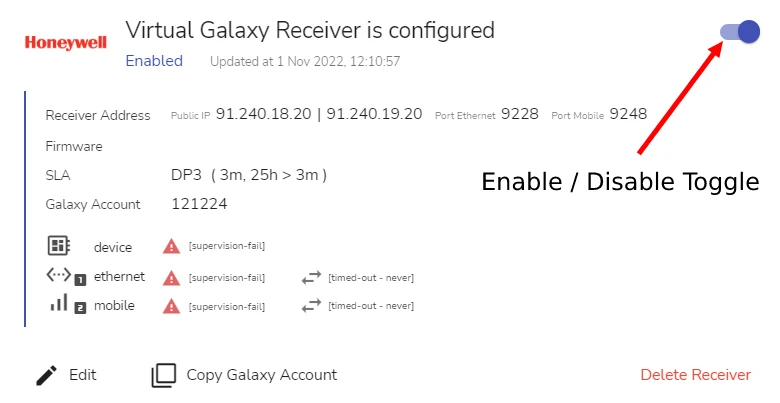
Disable Virtual Galaxy Receiver on a Site Level
Use this option if you do not want to use a Virtual Galaxy Receiver instance, but want to keep its credentials and configuration.
To disable an instance of Virtual Galaxy Receiver, set the corresponding Enable / Disable toggle for a Virtual Galaxy Receiver instance to Off.

Delete Virtual Galaxy Receiver on a Site Level
Use this option if you want to completely delete an instance of Virtual Galaxy Receiver from a site together with its credentials and configuration.
To delete an instance of Virtual Galaxy Receiver:
-
Go to Sites > [site] > Integrations > Galaxy Receiver tab or Sites > [site] > Receivers > tab
-
Click the corresponding Delete Receiver button below the record of the receiver instance you want to delete
-
In the confirmation dialog that opens, type the confirmation message and click Confirm Delete
 Link is copied