TNA Integration Setup for a Site
In this section, the term panel indicates a TNA Series panel of any model, if not stated otherwise.
The term receiver instance indicates a single Virtual TNA Receiver with a unique MAC-address connected to evalink talos.
Configure Virtual TNA Receiver for a Site
You can configure one or several TNA Virtual Receiver instances for any site within your company. When an instance of a TNA Virtual Receiver is properly configured for a site and a panel is connected to it, evalink talos can receive and process alarms coming to the TNA Virtual Receiver and send administration commands to the panel.
To configure a Virtual TNA Receiver instance for a site:
-
Go to Sites > [site] > Receivers > tab
-
On the Receivers tab, click on the Add a Virtual Receiver button and select Virtual TNA Receiver from the list
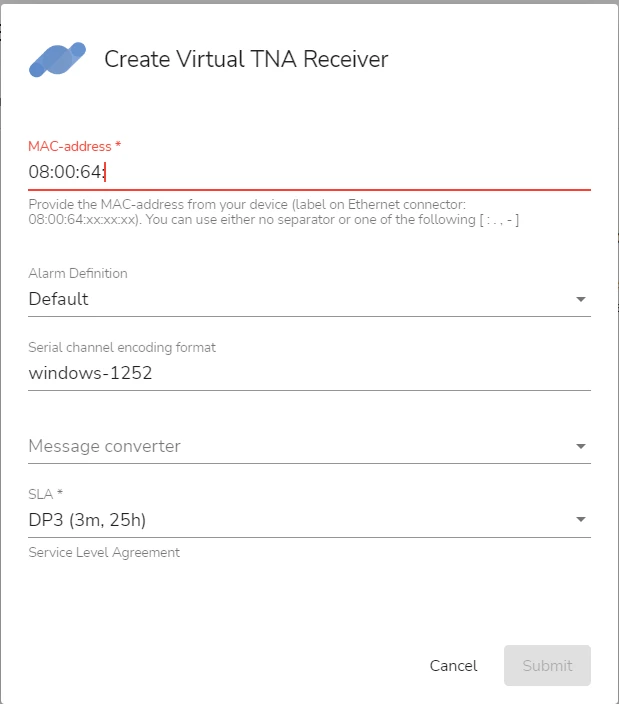
A Virtual TNA Receiver configuration dialog opens:

-
Enter the MAC-address of your TNA panel
infoYou can find the MAC-address on your TNA device and its packaging. The first six digits are the same for all devices, so they are already pre-entered in the evalink talos configuration. You need to type the remaining digits, copying them from your TNA device.
-
Select the Alarm Definition profile from the dropdown menu
You can find detailed lists of all available Alarm Definition sets on the Company > Settings > Alarms page.
-
Select a serial channel encoding format
By default, evalink talos uses Windows-1252 format.
-
Select a message converter
infoMessage converters are pre-configured per company by evalink talos team and depend on particular customer requirements.
-
Select the SLA (Service Level Agreement) option to be used
SLA DP3 (3m, 25h) is selected by default. For details on setting up SLA options for a Virtual Receiver, see section Direct Connection Monitoring > Set SLA for a Virtual Receiver.
-
Click Submit
You can create more instances of Virtual TNA Receiver by clicking the Add Receiver button.
You don't need to enter any evalink talos credentials on the panel side. Once the panel is on and active, and connected to either Ethernet or mobile Internet, it goes live immediately after you configure an instance of a Virtual TNA Receiver using its MAC-address.
Configure APN Settings for Virtual TNA Receiver
If you are using mobile connection for your TNA panel, usually evalink talos automatically picks up APN settings from the SIM card you use. If it doesn't happen, you may need to additionally configure APN settings.
To access and configure APN settings:
-
Go to Sites > [site] > Integrations > TNA Receiver tab or Sites > [site] > Receivers > tab
-
For a particular Virtual TNA Receiver instance, click on the three dots menu button next to its record
-
From the dropdown list, select Advanced Settings
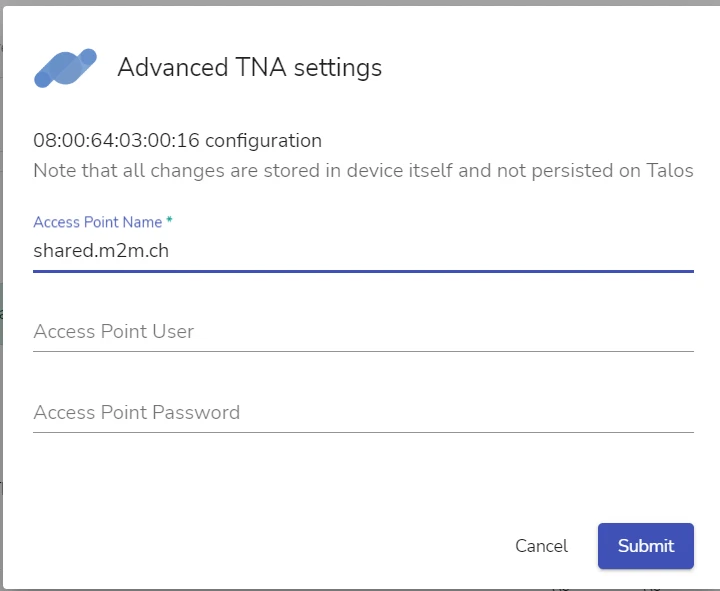
APN editing dialog opens:
 info
infoIf a SIM card is not connecting to your TNA panel or APN settings aren't recognized by evalink talos, default settings will be displayed, as in the figure above.
-
Enter the desired APN credentials
infoYou can obtain the APN credentials from the mobile operator which has issued your SIM card.
-
Click Submit
Handling Several Virtual TNA Receiver Instances for One Site
It is possible to connect several TNA panels and have several active TNA Receiver Instances for a single site. In this case, each TNA panel must have its own receiver instance. You can't connect the same TNA panel to several receivers because a unique usage of the panel's MAC-address is required.
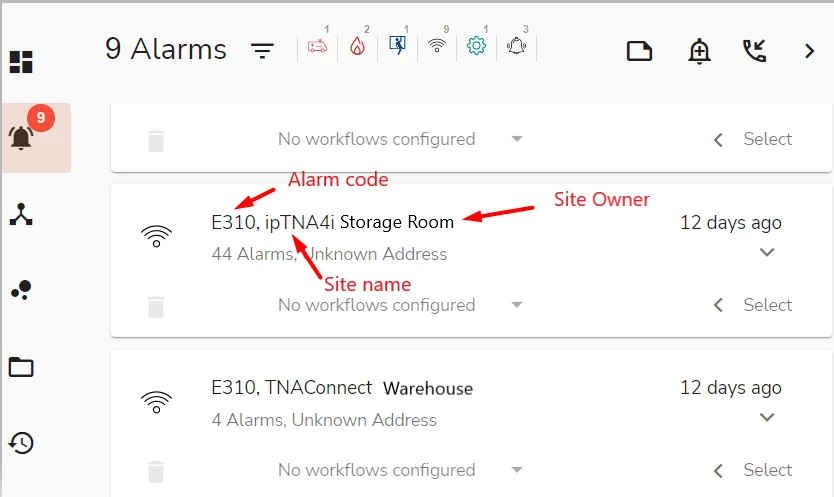
It is best practices to have a dedicated evalink talos site for each TNA panel with just one Virtual TNA Receiver. This way, it is more convenient to process alarms coming from several panels. On the dashboard and the Alarms page, evalink talos shows the alarm code, site name and site owner.

To differentiate between several Virtual TNA Receivers and their respective connected panels, an operator needs to check the x-receiver header of the incoming alarms when there are several TNA Virtual Receivers on a single site.
If you connect each of your TNA panels to a dedicated site, it is possible to differentiate between alarms coming from various TNA panels from evalink talos dashboard or Alarms page without opening alarm details.
Edit a Virtual TNA Receiver for a Site
To edit an instance of Virtual TNA Receiver:
-
Go to the Sites > [site] > Integrations > TNA Receiver tab or Sites > [site] > Receivers tab
-
Click the Edit button below the corresponding Virtual TNA Receiver record
The Virtual TNA Receiver Configuration dialog opens.
-
Edit the fields as desired
infoYou can't change the MAC-address field for the TNA panel after you have entered it during initial configuration.
To connect another TNA panel instead of an existing one, use the Replace Device option. For details about this option, see section Replace Device below.
-
Click Submit
Replace Device
Once you have connected a TNA panel to an instance of a Virtual TNA Receiver, you can't change the MAC-address you have entered. Thus, you can't change the device with the help of Edit Integration option. Instead, you can use the device replacement procedure.
To replace a TNA panel in an existing instance of the Virtual TNA Receiver:
-
Disable the instance of Virtual TNA Receiver
For details on how to disable a Virtual TNA Receiver for a site, see section Enabling or Disabling Virtual TNA Receiver for a Site below.
-
Click the Replace Device button for the receiver instance
-
In the dialog that opens, type the MAC-address of the new TNA panel you want to use
warningIf your previous TNA panel is connected and you haven't disabled the Virtual TNA Receiver, you will receive an error message when trying to use the Replace Device option.
-
Click Submit
Enabling or Disabling Virtual TNA Receiver for a Site
Use the disable option if you don't want to use a particular Virtual TNA Receiver instance, but want to keep its configuration, data, and credentials.
To enable or disable an instance of Virtual TNA Receiver, set the corresponding Enable / Disable toggle for a Virtual TNA Receiver instance to Off or On.

Delete TNA Virtual Receiver for a Site
Use this option if you want to completely delete an instance of Virtual TNA Receiver from a site together with its credentials, data, and configuration.
To delete an instance of Virtual TNA Receiver:
-
Go to the Sites > [site] > Integrations > TNA Receiver tab or Sites > [site] > Receivers tab
-
Click the corresponding Delete Receiver button below the record of the receiver instance you want to delete
-
In the confirmation dialog that opens, type the confirmation message and click Confirm Delete
 Link is copied